Deploy applications directly from GitHub, GitLab, and Bitbucket repositories with minimal setup!
How It Works
The Akash Console now supports a powerful feature that allows users to deploy applications directly from GitHub, GitLab, and Bitbucket repositories, enabling rapid deployment of modern web apps and static sites with minimal setup.
This feature eliminates the need for manual Docker image building and pushing, making it easier than ever to deploy your applications to the Akash Network.
Key Benefits
- One-click deployment: Connect your repository and deploy instantly
- Automatic builds: No need to manually build and push Docker images
- Framework detection: Automatically detects and configures popular frameworks
- Environment variables: Easy configuration of app settings
- Cost-effective: Deploy for a fraction of traditional cloud costs
Supported Repository Providers
The GitHub Deploy Feature supports the following repository providers:
- GitHub - Full integration with GitHub repositories
- GitLab - Connect your GitLab projects
- Bitbucket - Deploy from Bitbucket repositories
Supported Frameworks
The feature automatically detects and configures the following frameworks:
JavaScript Frameworks
- React - Single-page applications built with React
- Vue.js - Progressive JavaScript framework
- Next.js - React framework for production
- Angular - Platform for building mobile and desktop web applications
- Ember.js - Framework for ambitious web developers
Static Site Generators
- Gatsby.js - React-based static site generator
- Nuxt.js - Vue.js framework for universal applications
- Astro - Modern static site builder
- VitePress - Static site generator for technical documentation
- 11ty.js - Simpler static site generator
Full-stack Frameworks
- Remix - Full stack web framework
- Vite - Next generation frontend tooling
- Express.js - Fast, unopinionated web framework for Node.js
Step-by-Step Guide
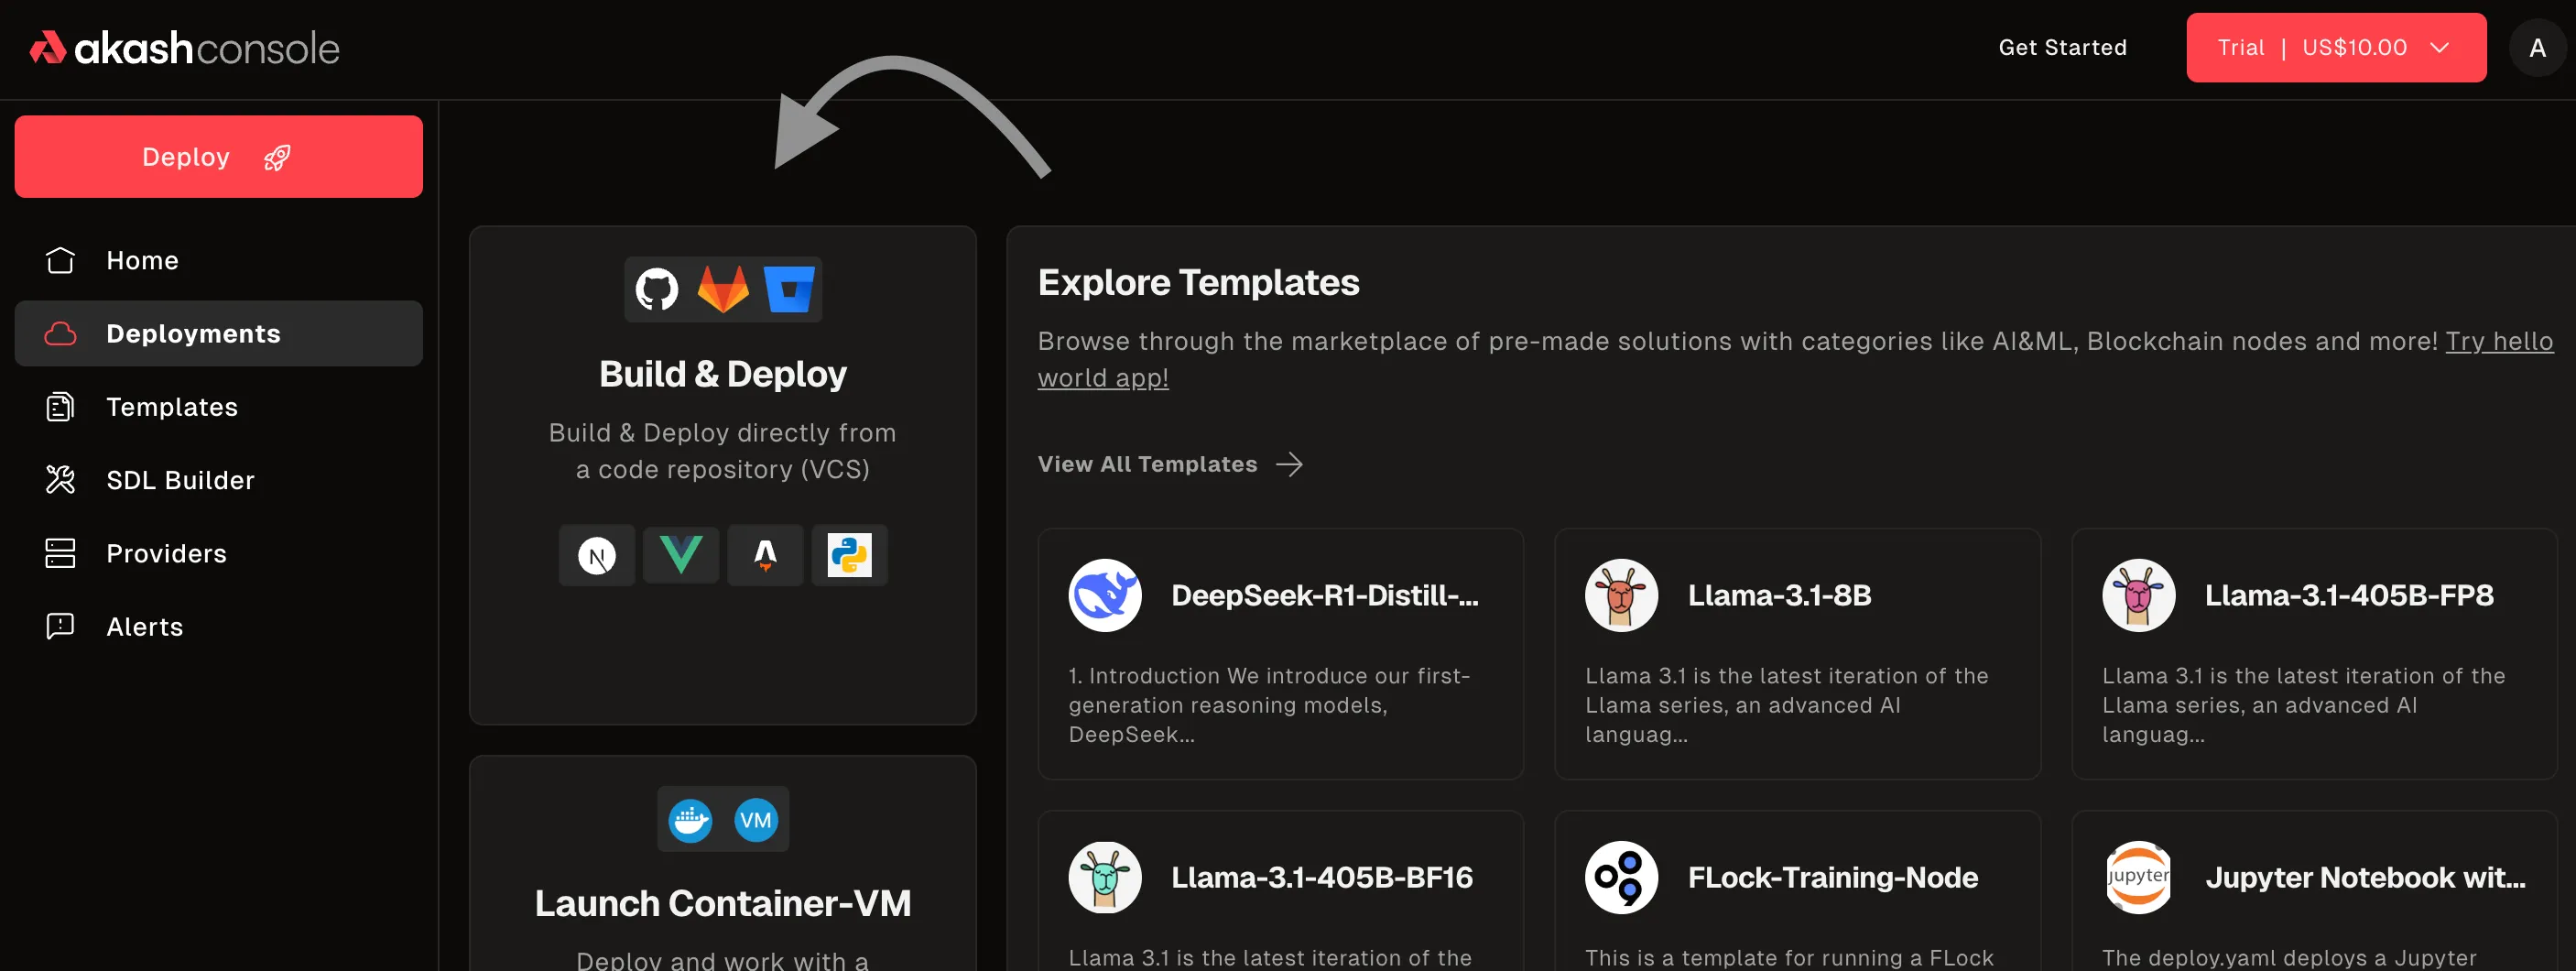
Step 1: Access the GitHub Deploy Feature
- Navigate to the Akash Console
- Connect your wallet (Keplr or Leap)
- Click on the “Deploy” button in the main navigation
- Look for the “Build & Deploy” card
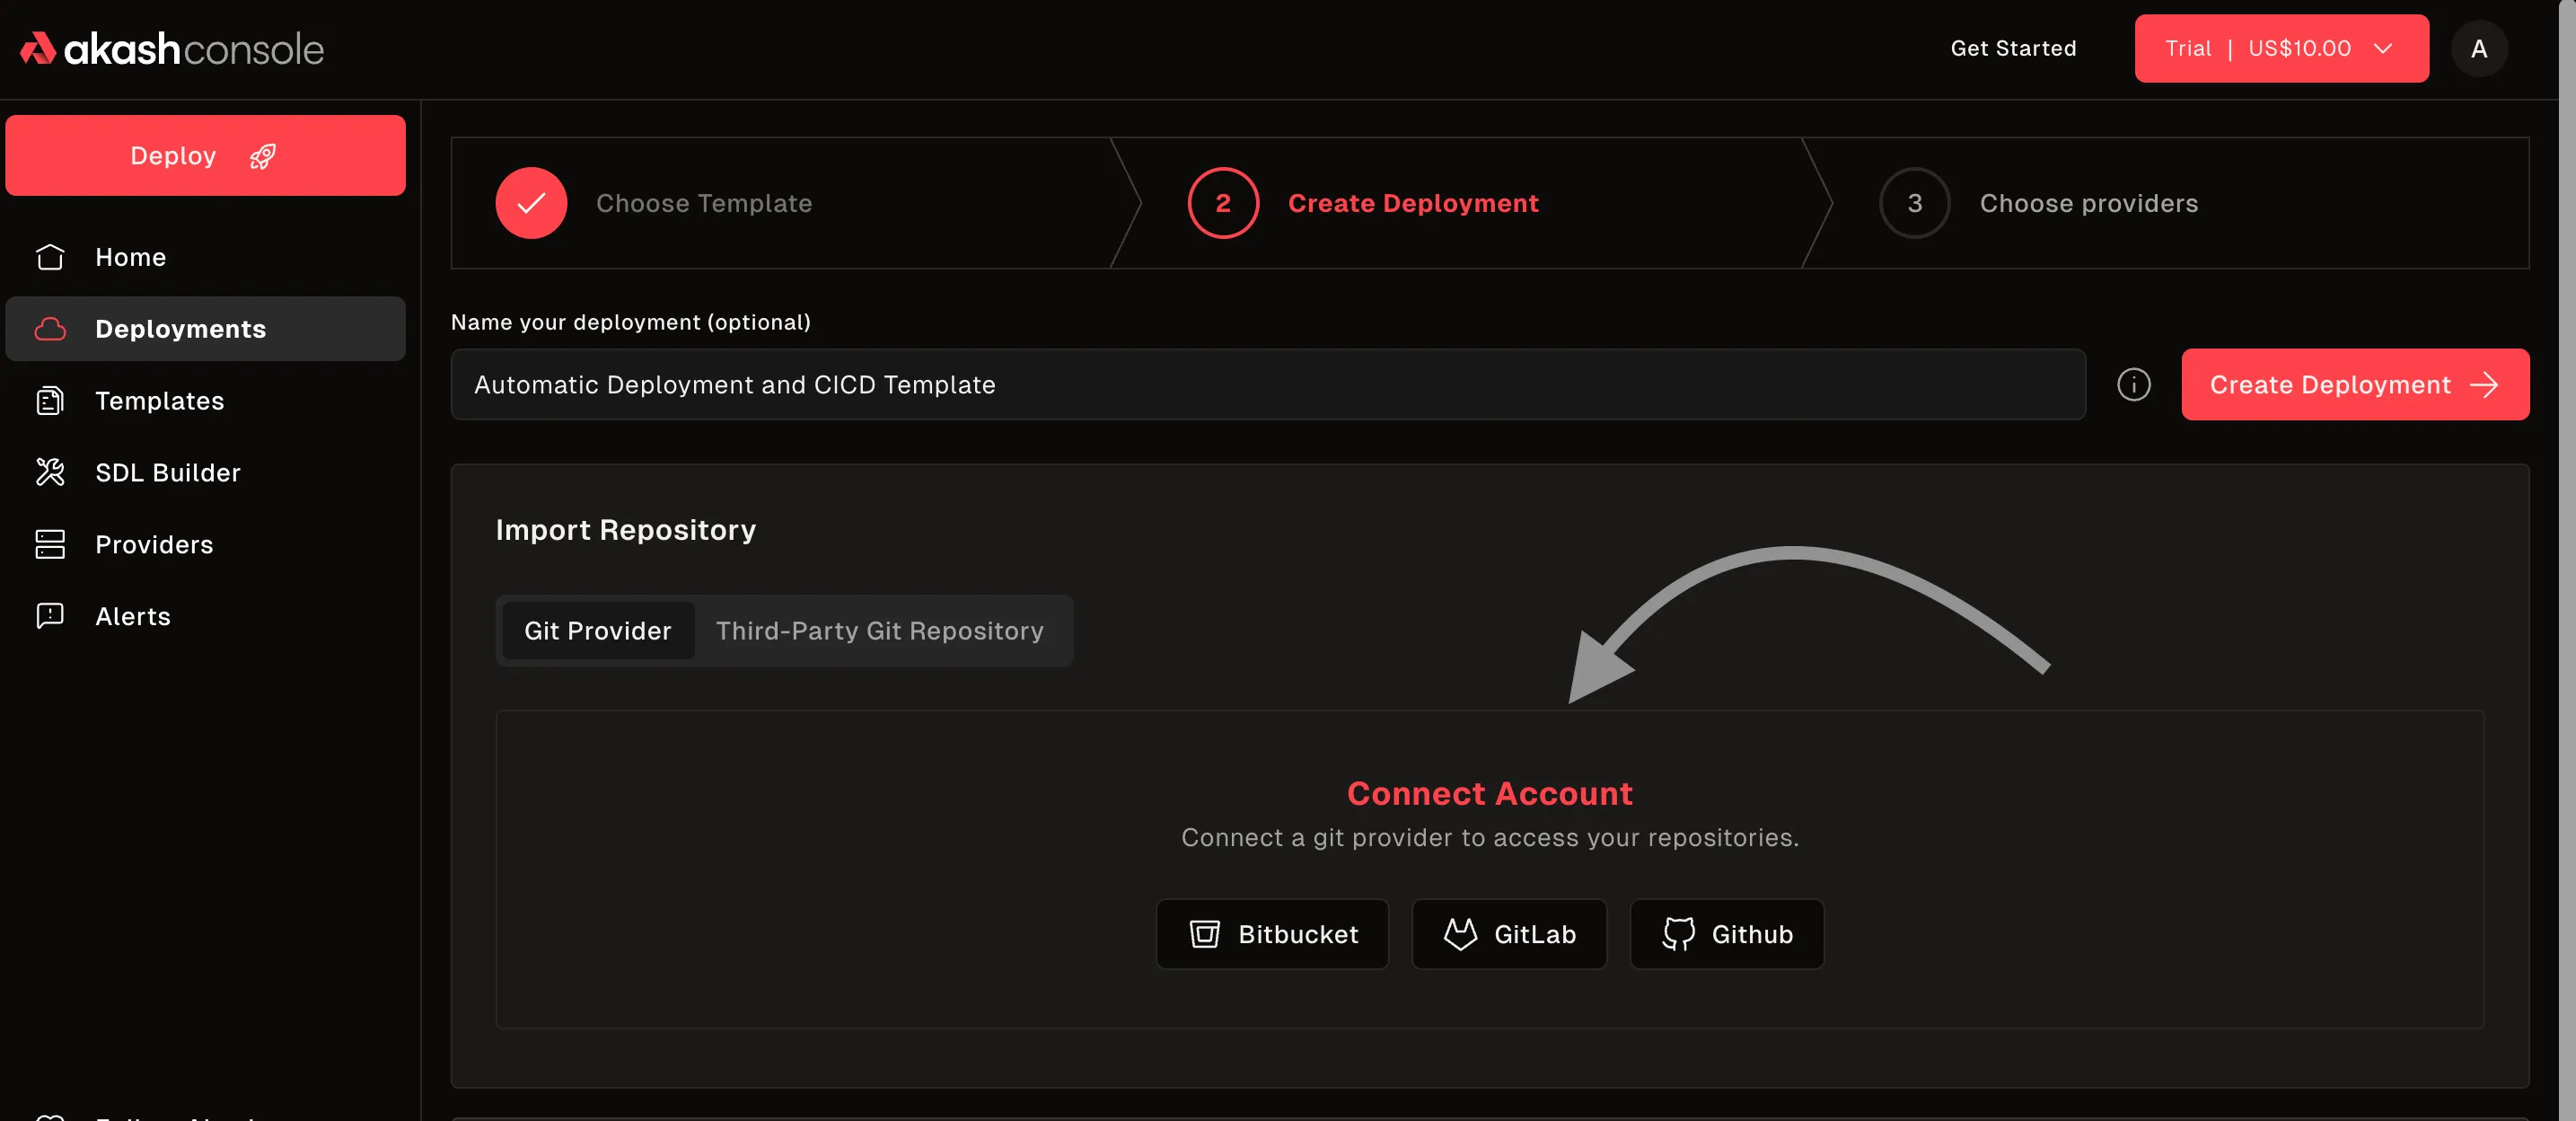
Step 2: Connect Your Repository
You have two options to connect your repository:
Option 1: Connect a Provider (Recommended)
- Click “Build & Deploy” or similar option
- Choose your repository provider:
- GitHub: Authenticate with your GitHub account and authorize Akash Console. Select your repository (public or private).
- GitLab: Authenticate with your GitLab account and authorize Akash Console. Select your repository (public or private).
- Bitbucket: Authenticate with your Bitbucket account and authorize Akash Console. Select your repository (public or private).
- Proceed with configuration and deployment as described in the next steps.
Note: The Akash Console supports deploying from private repositories on GitHub, GitLab, and Bitbucket. When connecting your account, you may be prompted to grant access to private repositories. Ensure you select the correct repository visibility during the selection step. All build and deployment steps are performed securely in the Akash Console.
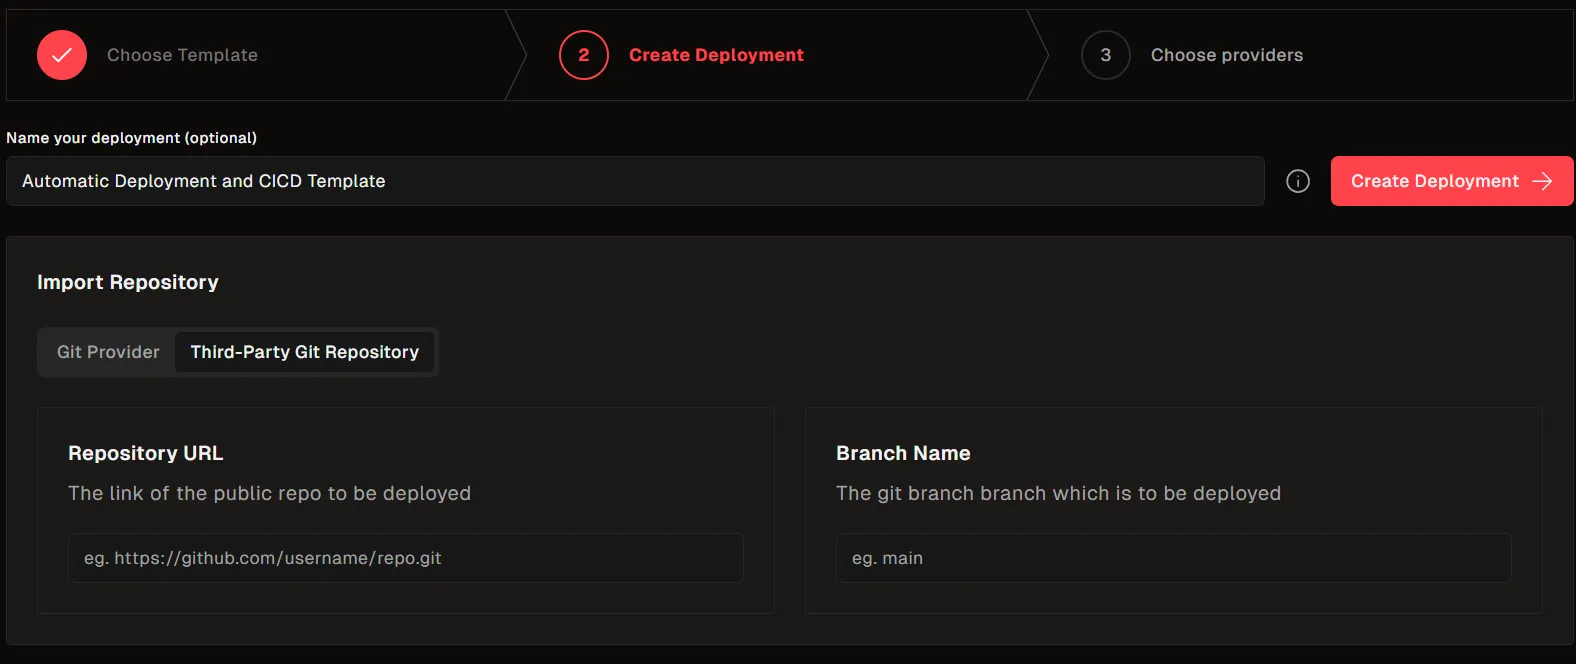
Option 2: Paste Public Repo Link & Branch (No Provider Connection)
- On the deployment screen, look for the option to deploy via repo URL.
- Paste the full public repository link (e.g.,
https://github.com/username/repo). - Enter the branch name you wish to deploy (e.g.,
main). - Proceed with configuration and deployment as usual.
Note: This method only works for public repositories. Private repositories require provider authentication.
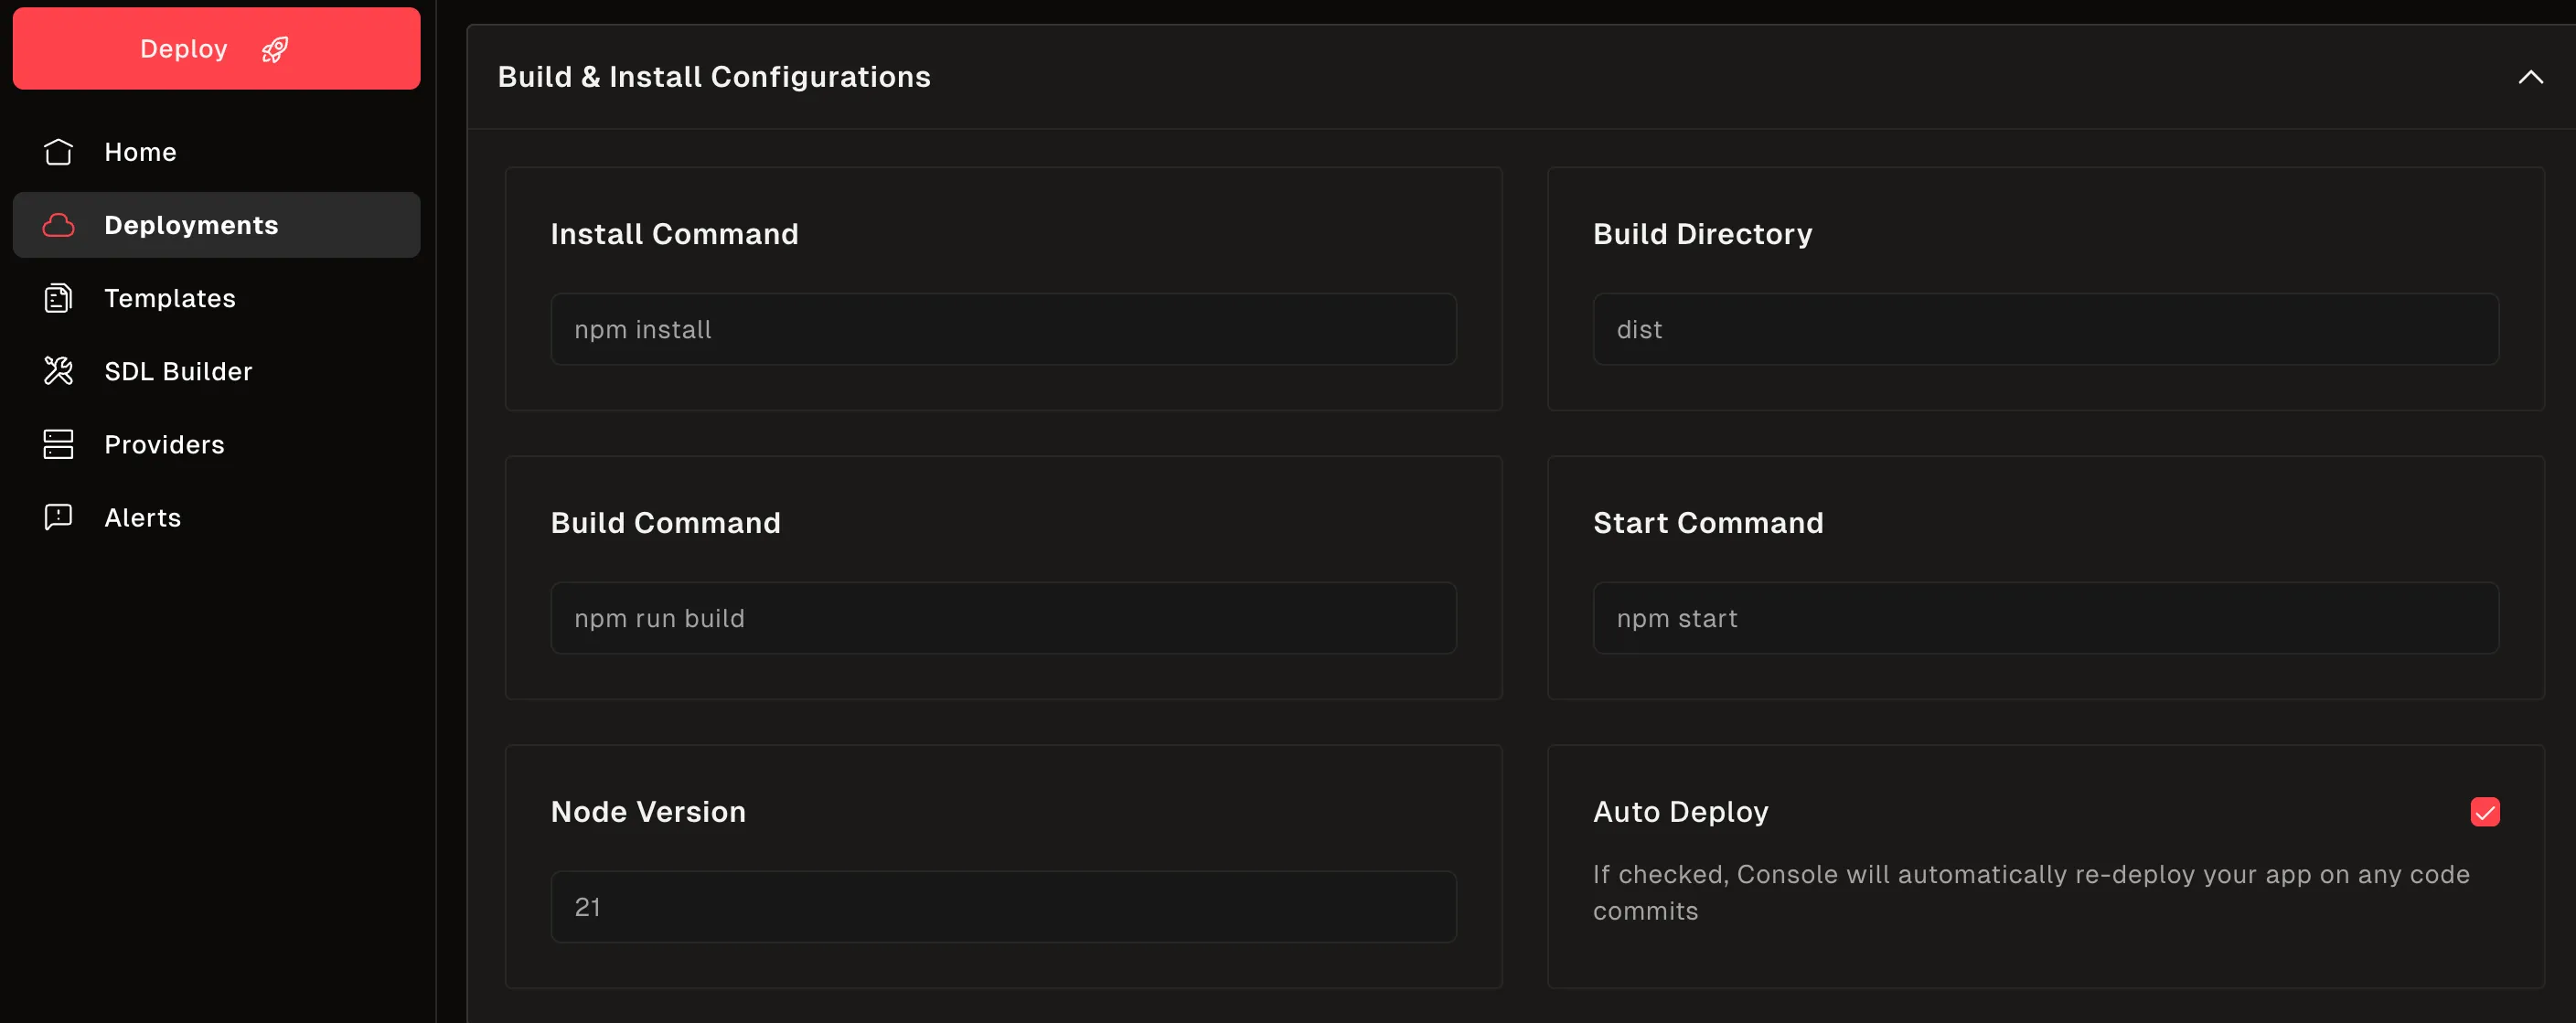
Step 3: Configure Your Deployment
- Framework Detection: The console will automatically detect your project’s framework
- Build Settings: Configure build commands if needed
- Environment Variables: Add any required environment variables
- Domain Settings: Configure custom domains (optional)
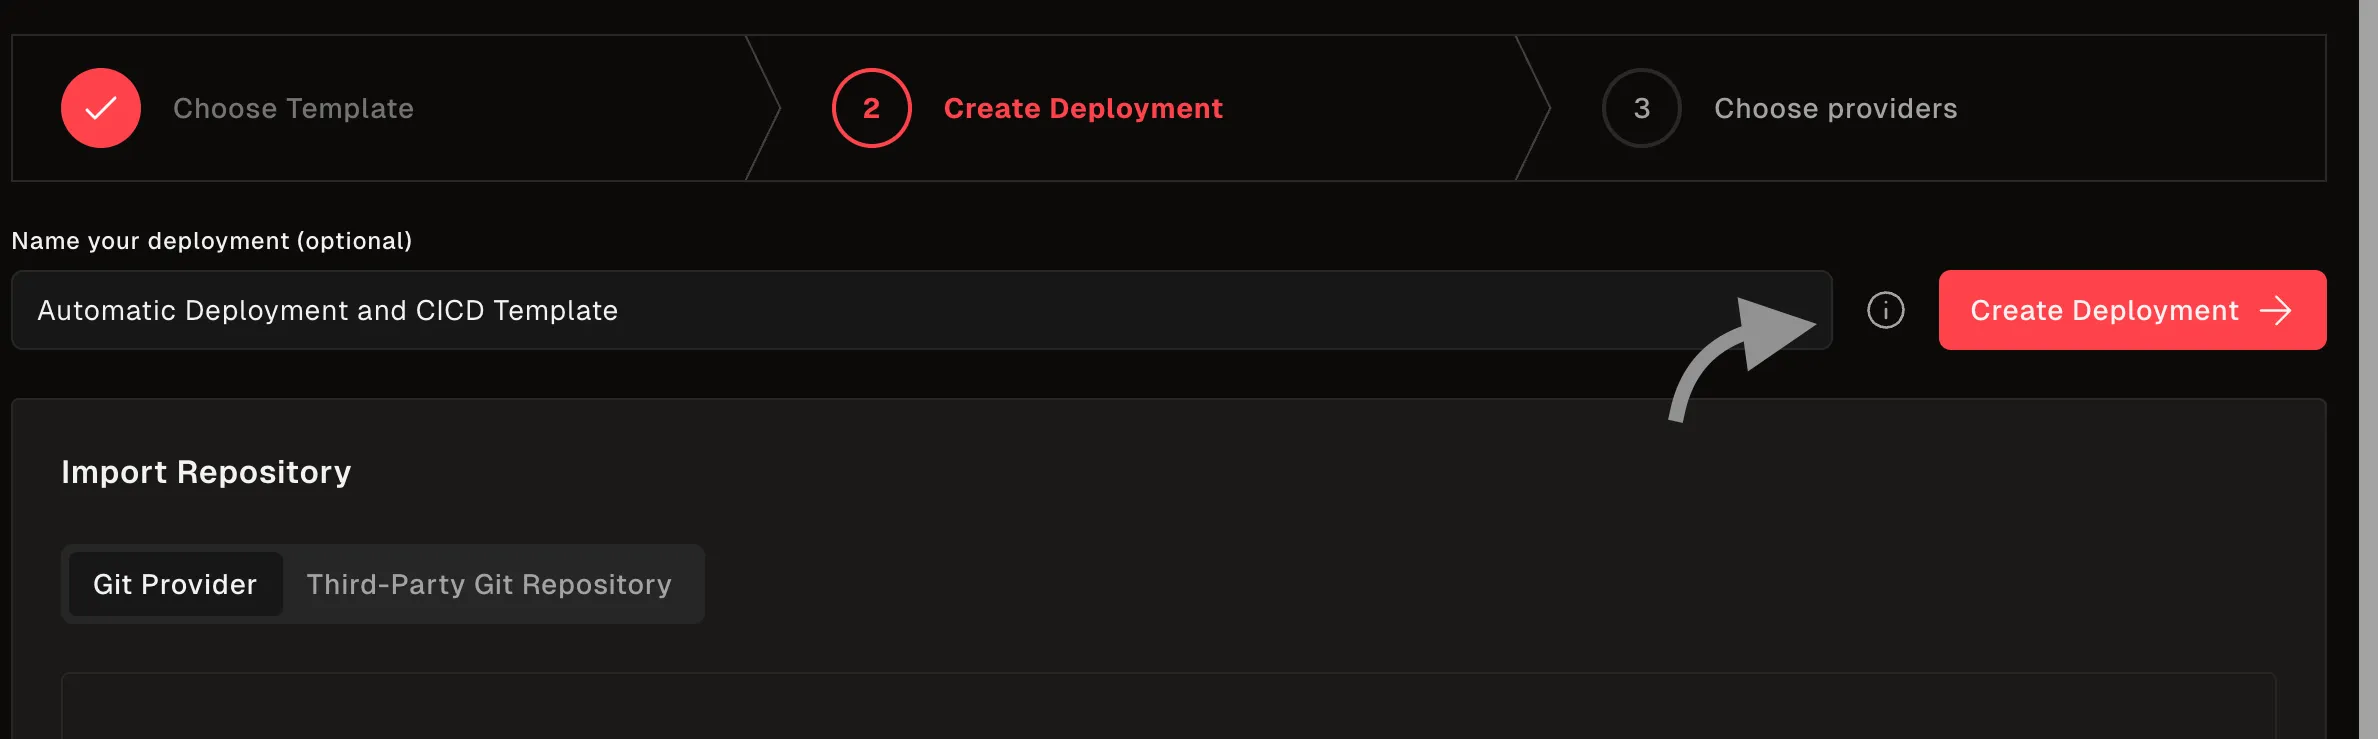
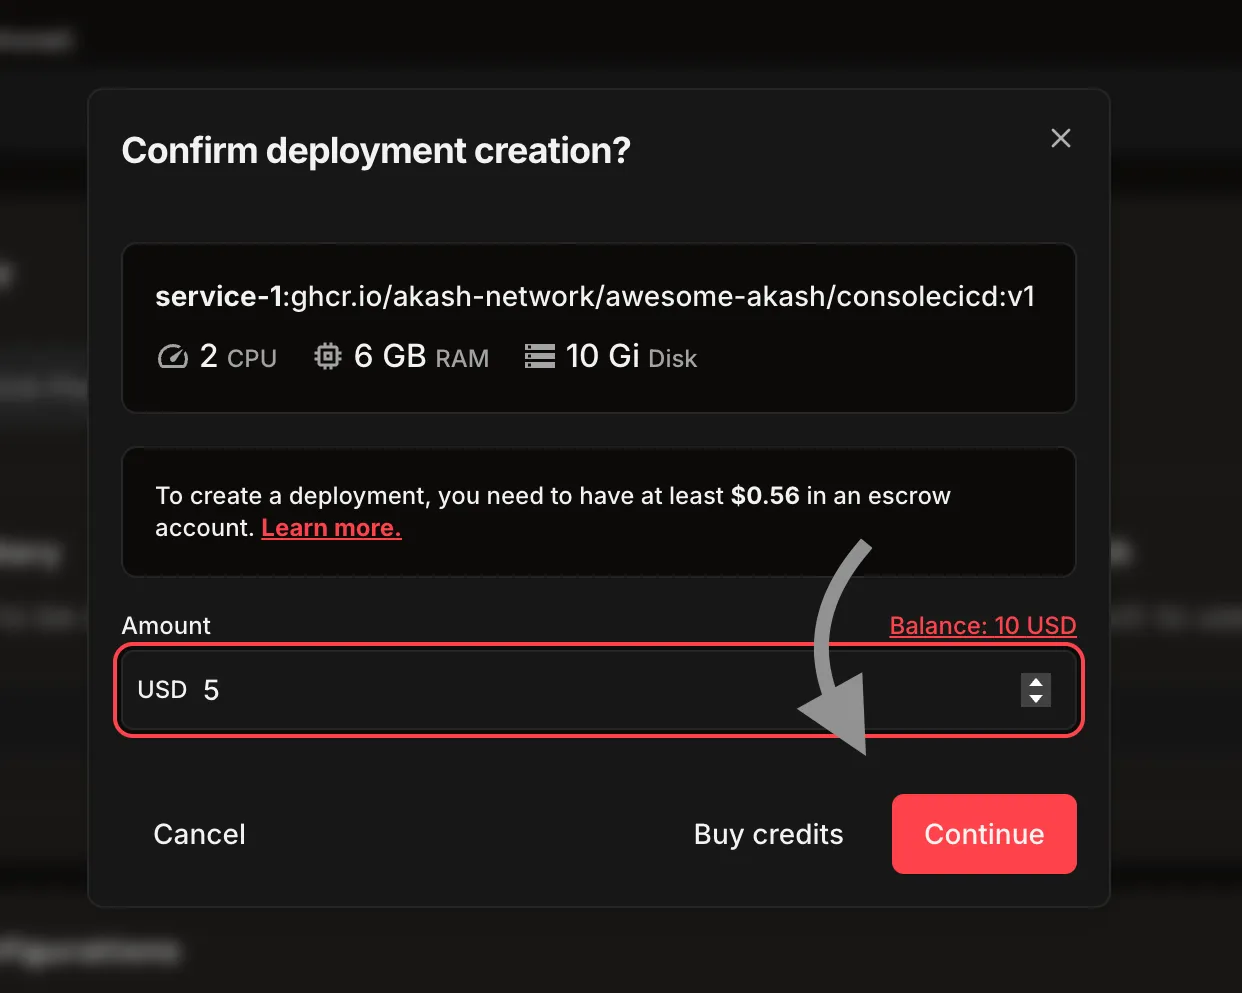
Step 4: Deploy Your Application
-
Review your deployment settings.
-
Click the Create Deployment button to proceed.
-
Confirm deployment creation and set the amount if prompted.
-
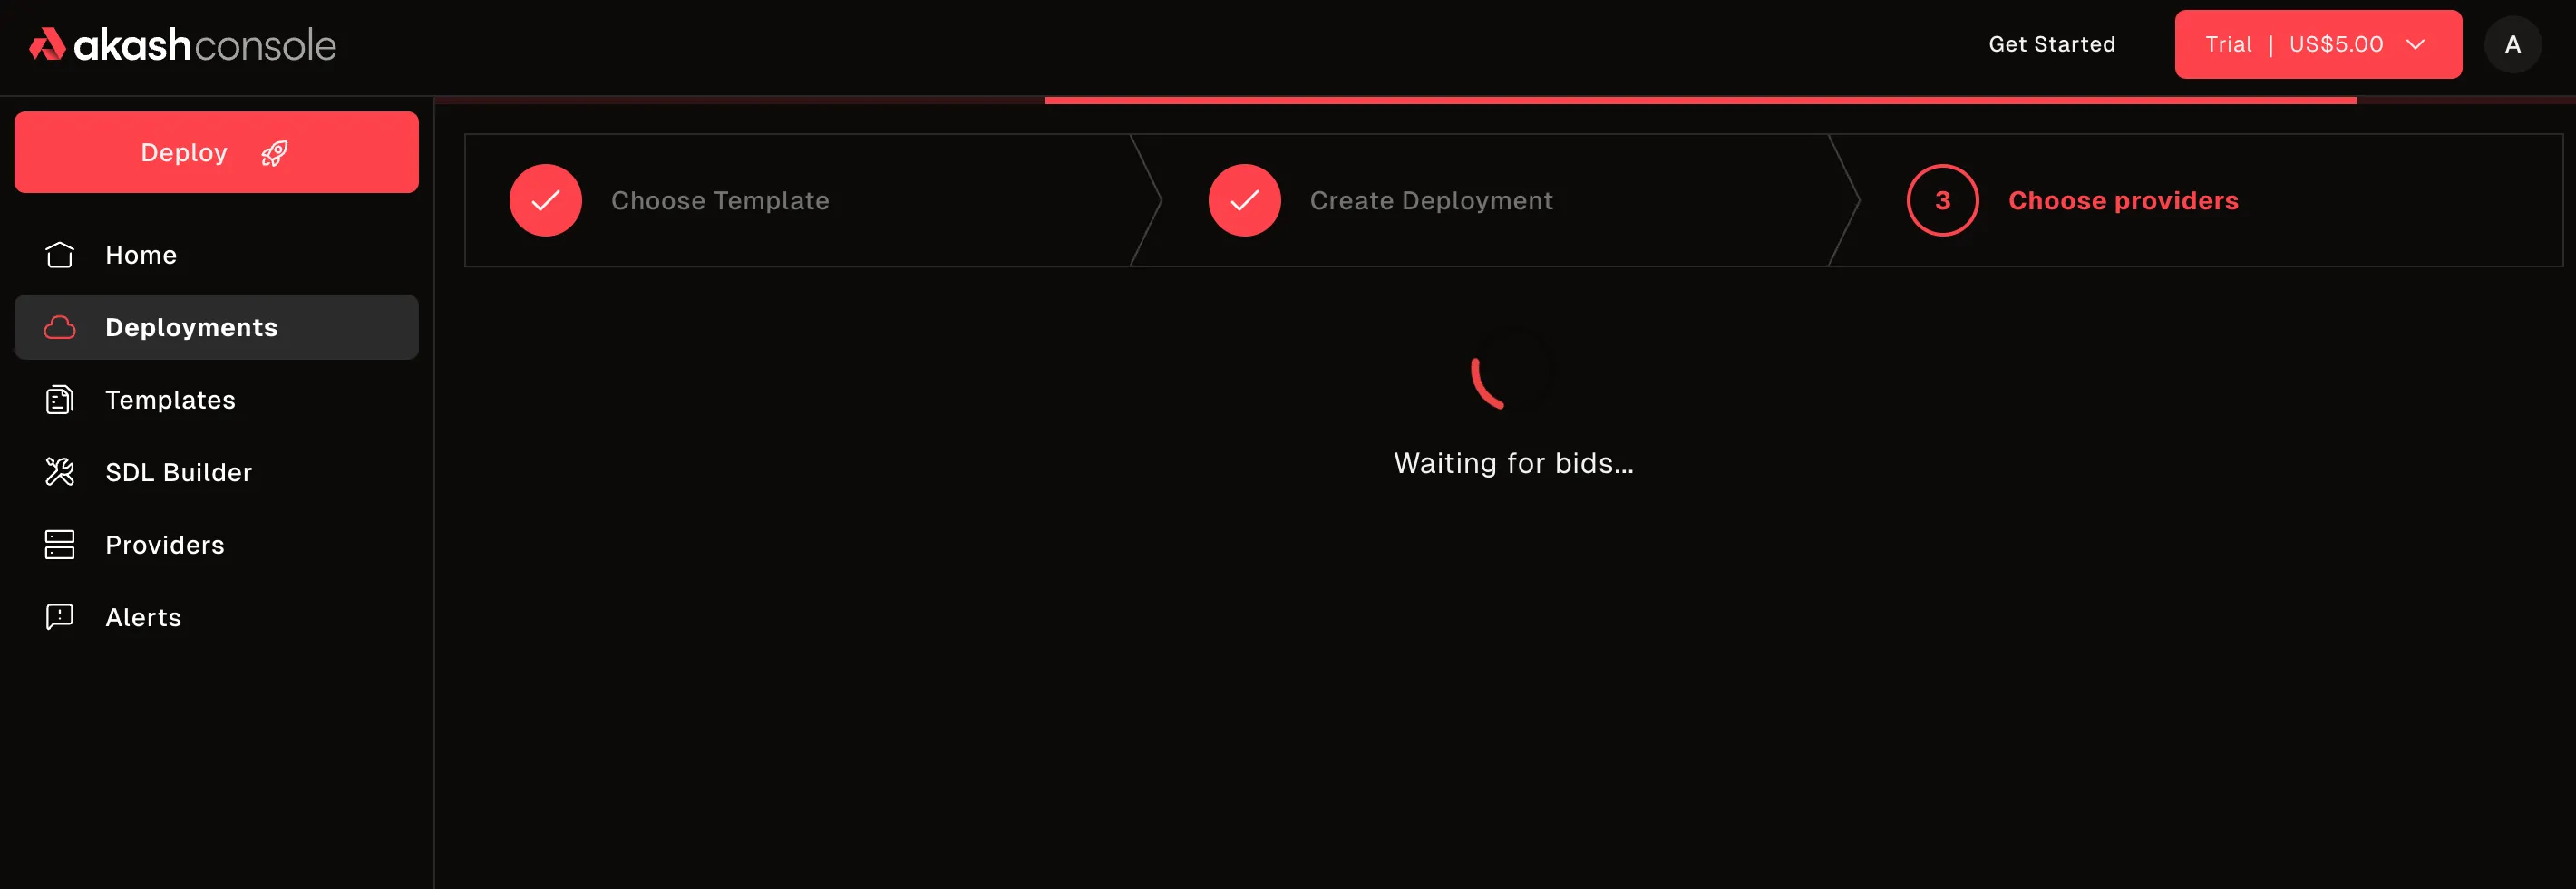
Monitor the build and deployment progress.
Step 5: Access Your Application
- Once deployment is complete, go to the Deployments page
- Copy the provided deployment URL or check the status
- Your application is now live on the Akash Network!
Repository Requirements
Supported Repository Structure
Your repository should follow one of these structures:
For Static Sites (React, Vue, etc.)
your-project/├── package.json├── src/├── public/└── README.mdFor Next.js Applications
your-project/├── package.json├── pages/├── components/└── next.config.jsFor Express.js Applications
your-project/├── package.json├── server.js├── routes/└── README.mdRequired Files
- package.json - Must be present for Node.js applications
- README.md - Recommended for project documentation
- Framework-specific files - Such as
next.config.jsfor Next.js
Environment Variables
Setting Environment Variables
- In the deployment configuration, navigate to the “Environment Variables” section
- Add your environment variables in the format:
KEY=value
- Common environment variables include:
NODE_ENV=productionDATABASE_URL=your_database_urlAPI_KEY=your_api_key
Secure Environment Variables
- Never commit sensitive environment variables to your repository
- Use the console’s environment variable feature for sensitive data
- Consider using Akash’s secret management for production deployments
Troubleshooting
Common Issues and Solutions
Build Failures
Issue: Deployment fails during build process
Solutions:
- Check that your
package.jsonhas the correct build scripts - Ensure all dependencies are properly listed in
package.json - Verify that your repository is public or properly connected
Framework Not Detected
Issue: Console doesn’t recognize your framework
Solutions:
- Ensure your project follows the standard structure for your framework
- Check that framework-specific files are present (e.g.,
next.config.jsfor Next.js) - Try manually selecting your framework in the configuration
Deployment Timeout
Issue: Deployment takes too long or times out
Solutions:
- Check your build process for any hanging processes
- Ensure your application starts properly
- Verify that your application listens on the correct port
Environment Variables Not Working
Issue: Environment variables not being applied
Solutions:
- Check the format of your environment variables (KEY=value)
- Ensure your application is reading environment variables correctly
- Restart the deployment after adding environment variables
Getting Help
If you encounter issues not covered here:
- Check the logs: Use the console’s log viewer to debug issues
- Community support: Join the Akash Discord for help
- Documentation: Refer to the Akash documentation for more details
Best Practices
Repository Setup
- Keep repositories public for easier deployment
- Use semantic versioning for your releases
- Include proper documentation in your README
- Test locally before deploying
Deployment Configuration
- Start with minimal configuration and add complexity as needed
- Use environment variables for configuration
- Monitor your deployments regularly
- Set up proper logging for debugging
Cost Optimization
- Choose appropriate resource allocation for your application
- Monitor usage to avoid unexpected costs
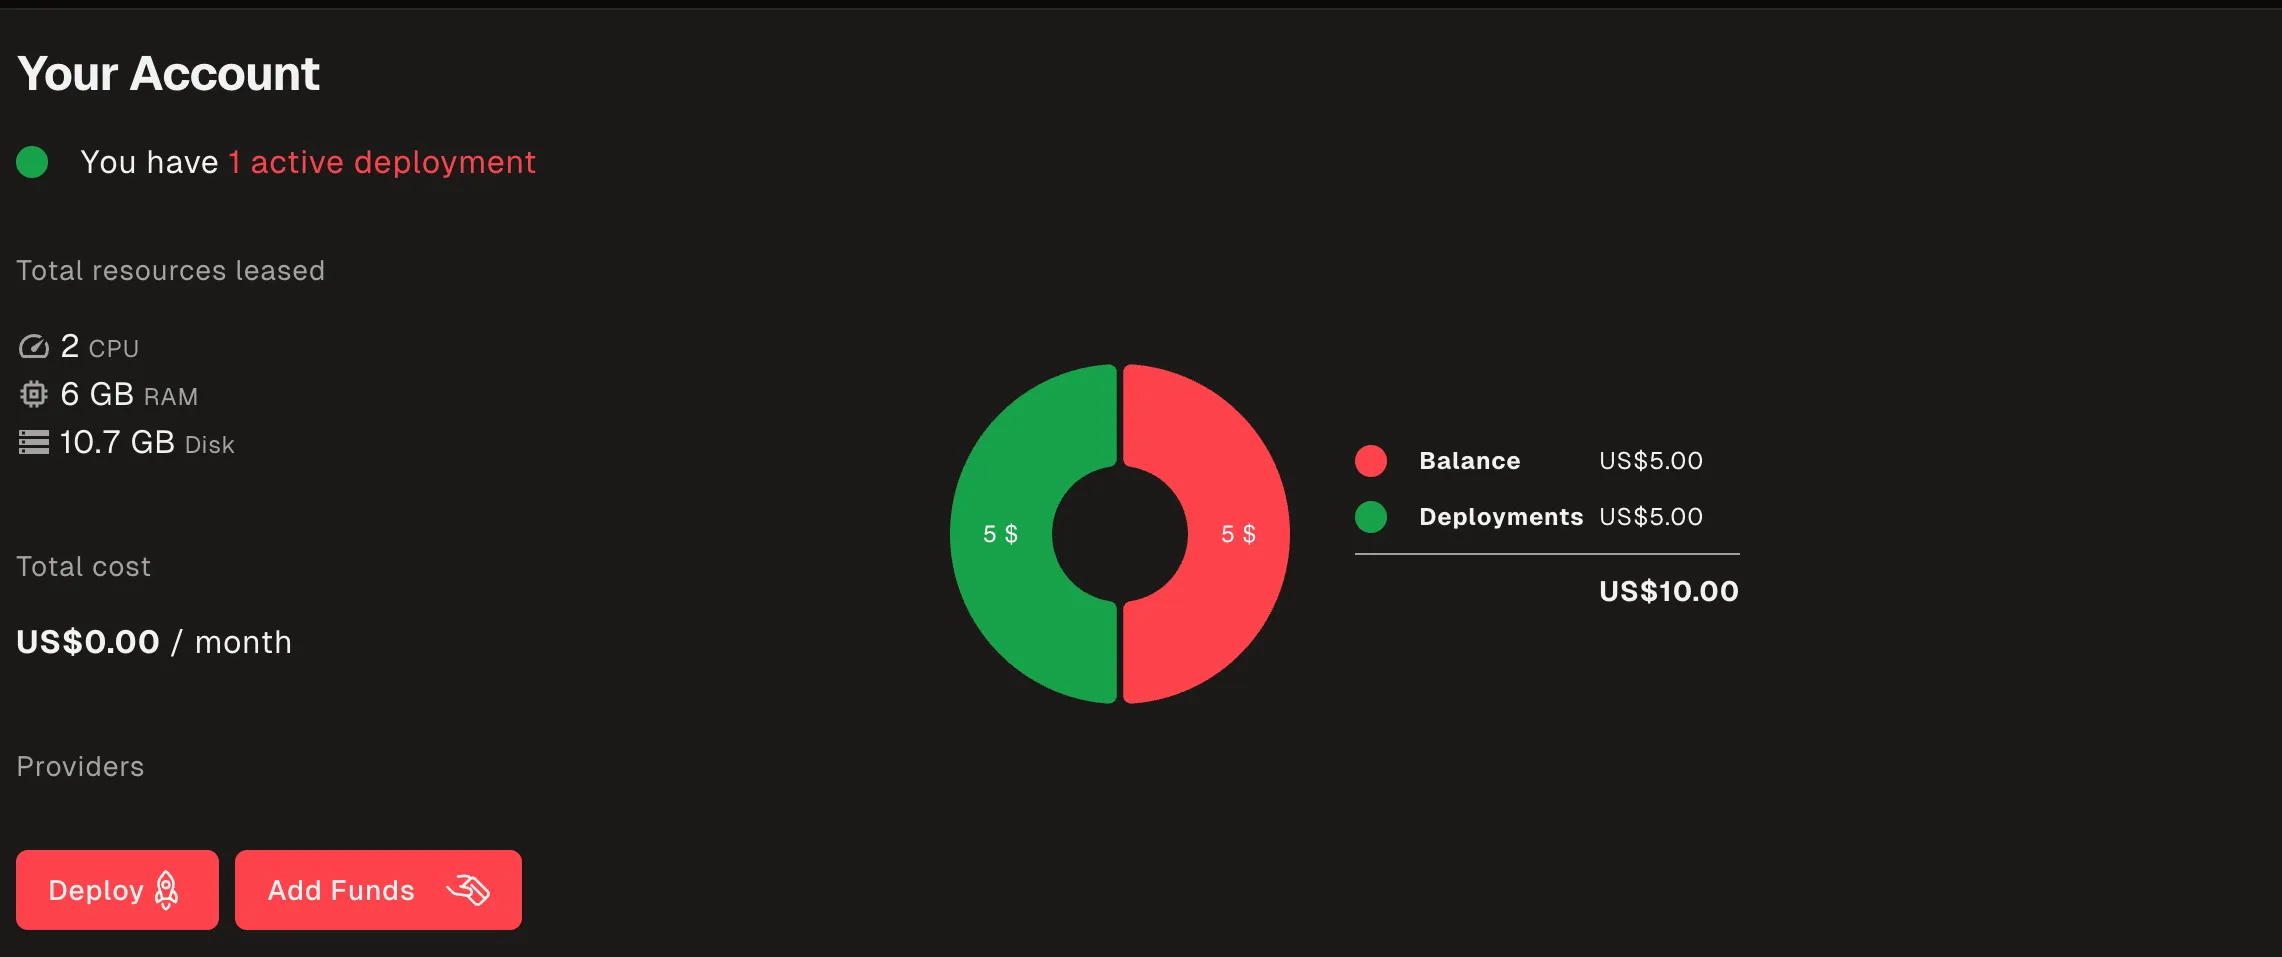
- Use the trial deployment to test before committing funds
- Consider using the $10 trial for initial testing
Advanced Configuration
Custom Build Commands
If your project requires custom build steps:
-
Add a
buildscript to yourpackage.json:{"scripts": {"build": "your-custom-build-command"}} -
The console will automatically use your custom build command
Custom Domains
To use a custom domain:
- Configure your domain’s DNS to point to your Akash deployment
- Add the domain in the deployment configuration
- The console will handle SSL certificate generation
Persistent Storage
For applications requiring persistent storage:
- Configure persistent storage in your deployment settings
- Ensure your application is designed to work with the provided storage paths
- Consider data backup strategies for important data
Examples
React Application
Repository: https://github.com/your-username/react-app
Structure:
react-app/├── package.json├── src/│ ├── App.js│ └── index.js├── public/└── README.mdDeployment: Automatic detection and deployment of React application
Next.js Application
Repository: https://github.com/your-username/nextjs-app
Structure:
nextjs-app/├── package.json├── pages/│ ├── index.js│ └── _app.js├── components/├── next.config.js└── README.mdDeployment: Automatic Next.js detection with SSR support
Express.js API
Repository: https://github.com/your-username/express-api
Structure:
express-api/├── package.json├── server.js├── routes/└── README.mdDeployment: Automatic Express.js detection with API endpoint exposure
Conclusion
The GitHub Deploy Feature makes it incredibly easy to deploy your applications to the Akash Network. With support for popular frameworks and repository providers, you can go from code to deployment in minutes.
Next Steps
- Try the feature with a simple repository
- Explore advanced configurations for production deployments
- Join the community to share your experiences
- Contribute to the Akash ecosystem
For more information about Akash deployments, see the Deployment Overview and Akash Console documentation.