In this guide we will create an Akash Validator as a deployment on the Akash network. The Tendermint Key Management System (TMKMS) will be used so that we do not store the validator’s private key on the validator server itself.
An implementation of Stunnel is included to provide secure peer to peer communication between the Akash validator and the TMKMS server.
The Validator deployment will take advantage of statesync for rapid blockchain synchronization.
Sections in this guide:
- STEP 1 - Validator Topology
- STEP 2 - Obtain Private Key
- STEP 3 - Akash Validator Deployment
- STEP 4 - TMKMS Setup
- STEP 5 - Start and Verify the TMKMS Service
- STEP 6 - Stunnel Client
- STEP 7 - Verify Validator Status
- Additional Resources
Additional Resources
Creation of an Akash Validator with TMKMS and Stunnel via streamlined steps is the focus of this guide. For further information and details, reference the following GitHub repository maintained by the creators of the Omnibus project.
Validator Topology
In this guide we create a Validator within an Akash Deployment.
The topology of the environment will be as follows:
- Akash Validator as a deployment and as created in the Akash Validator Deployment section of this guide
- Tendermint Key Management System (TMKMS) used for storage of the Validators private key on a secured server. The TMKMS instance - configured in the TMKMS Setup section of this guide - may be created on any secure server of your choosing. The TMKMS server must have connectivity to the Akash Validator.
- Stunnel provides a secure communication path between the validator and the TMKMS node. A Stunnel server will be co-located with the Validator. A Stunnel client will be co-located with the TMKMS server.
Obtain Private Key
In the TMKMS Setup section of this guide we will import your Validators private key.
If you have a pre-existing Akash Validator the private key from this instance may be used.
If this is a new Akash Validator - create an Akash validator instance for the purpose of private key generation, capture the private key, and then shut down the validator. Use the instructions in Akash Node Deployment Via Omnibus to easily build an Akash Node for this purpose and to obtain the validator private key as detailed below. It is NOT necessary to complete the additional steps to turn the Node into a Validator. Completing only the Node build will allow the capture of the needed Validator private key.
Example Validator Private Key Retrieval
- Display contents of key file on the validator
cat ~/.akash/config/priv_validator_key.json- Example Output
{ "address": "134FCAC9<redacted>", "pub_key": { "type": "tendermint/PubKeyEd25519", "value": "BrL0wA8DWiVvm<redacted>" }, "priv_key": { "type": "tendermint/PrivKeyEd25519", "value": "3RphlkX7PucBKSdhFKviFV5TI<redacted>" }}Akash Validator Deployment
Akash Console
- Within this guide we will use the Akash Console application to create the Akash Validator
- Please review our Akash Console docs for instructions on how to install and configure the application if this is your first time using it.
Create the Akash Validator Deployment
- Use the steps that follow - within Akash Console - to create your Akash Validator deployment
- The Akash SDL used additionally spins up a Stunnel server to facilitate secure communication with the TMKMS server created in later steps
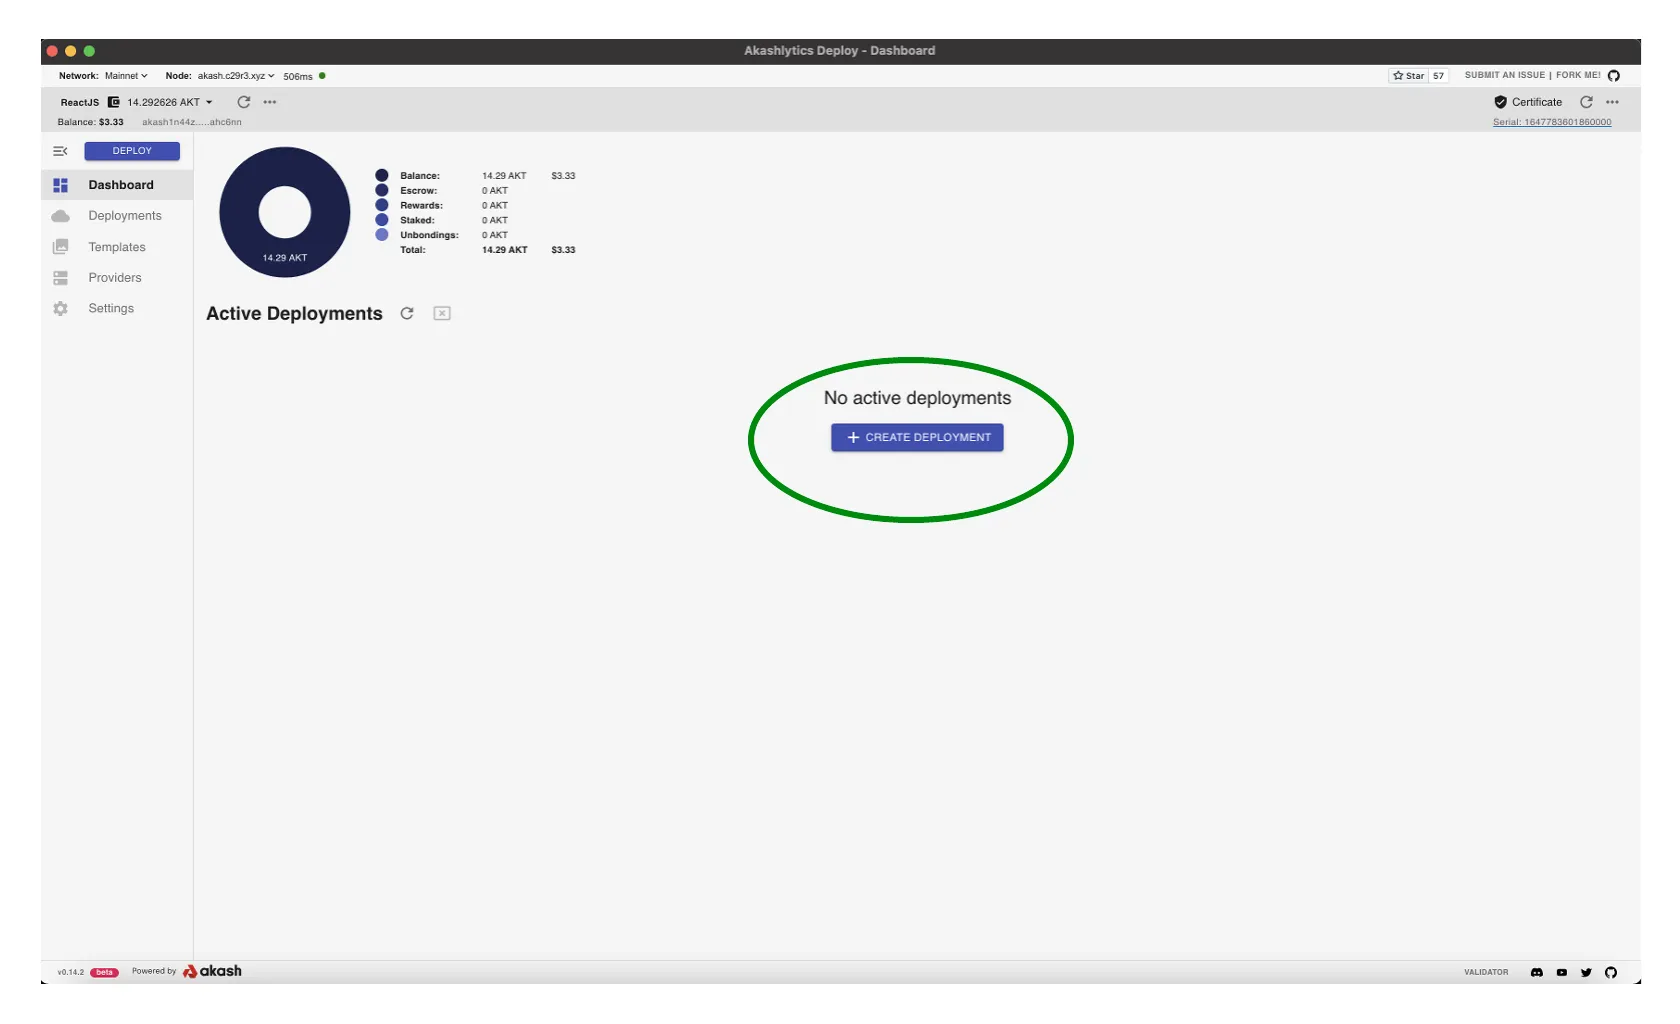
Create New Deployment
- Use the
CREATE DEPLOYMENTbutton to launch a new deployment
Empty Template Option
- Select the
Emptyoption as we will be copying a pre-constructed Akash SDL for the deployment
![]()
Copy SDL into Editor
- Copy the following Akash SDL into the Editor pane
- Reference the Populated Editor section of this guide for further clarity
- Note that the SDL is using persistent storage to allow data residency should your deployment restart. Data will only persist through the life of the associated Akash lease.
To ensure the updated SDL is utilized, view the latest version here.
SDL Edits
- Consider updating the Pre-Shared Key (PSK) value in the
proxyservice >envstanza to your own unique value. The pre-shared key must match that which is defined in the upcoming Stunnel Client configuration. - Update the MONIKER in the
nodeservice >envstanza to your own name/organization name. - No additional edits of this SDL are necessary for Akash Validator creation.
---version: "2.0"
services: node: image: ghcr.io/akash-network/cosmos-omnibus:v0.3.42-akash-v0.22.7 env: - MONIKER=my-moniker-1 - CHAIN_JSON=https://raw.githubusercontent.com/akash-network/net/main/mainnet/meta.json - MINIMUM_GAS_PRICES=0.0025uakt - P2P_POLKACHU=1 - STATESYNC_POLKACHU=1 - AKASH_PRIV_VALIDATOR_LADDR=tcp://0.0.0.0:26658 # requires remote signer expose: - port: 26657 to: - service: proxy # only exposed to proxy, not globally - port: 26658 to: - service: proxy # only exposed to proxy, not globally params: storage: data: mount: /root/.akash proxy: image: ghcr.io/ovrclk/stunnel-proxy:v0.0.1 env: - PSK=DmtaC6N3HOWFkJZpNZs2dkabFT5yQONw # must match PSK in Stunnel client - STUNNEL_SVC_RPC_ACCEPT=36657 # accept 36657 - STUNNEL_SVC_RPC_CONNECT=node:26657 # proxy 36657 to node:26657 - STUNNEL_SVC_SIGNER_ACCEPT=36658 # accept 36658 - STUNNEL_SVC_SIGNER_CONNECT=node:26658 # proxy 36658 to node:26658 expose: - port: 36657 # expose TLS encrypted 36657 globally through a random port to: - global: true - port: 36658 # expose TLS encrypted 36658 globally through a random port to: - global: true
profiles: compute: node: resources: cpu: units: 4 memory: size: 8Gi storage: - size: 512Mi - name: data size: 120Gi attributes: persistent: true class: beta2 proxy: resources: cpu: units: 1 memory: size: 512Mi storage: size: 512Mi placement: dcloud: attributes: host: akash signedBy: anyOf: - akash1365yvmc4s7awdyj3n2sav7xfx76adc6dnmlx63 pricing: node: denom: uakt amount: 10000 proxy: denom: uakt amount: 10000
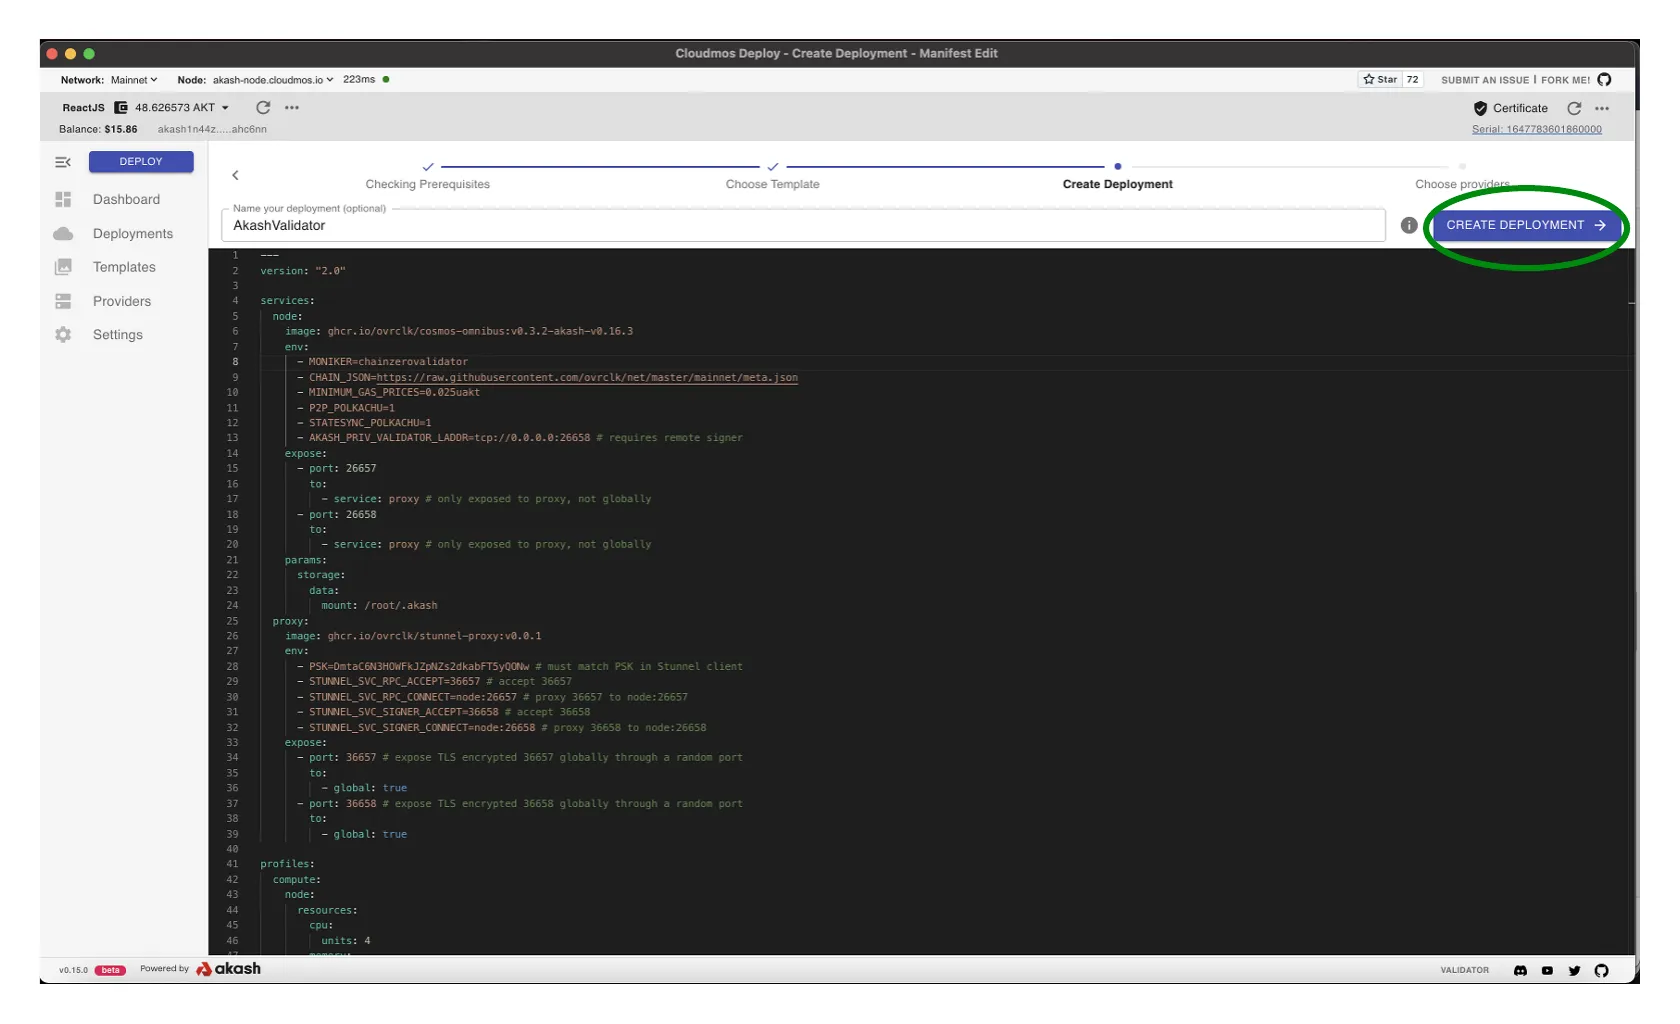
deployment: node: dcloud: profile: node count: 1 proxy: dcloud: profile: proxy count: 1Populated Editor
NOTE- SDL spans past the view in this panel and bottom portion is not displayed
- Select the
CREATE DEPLOYMENTbutton to proceed
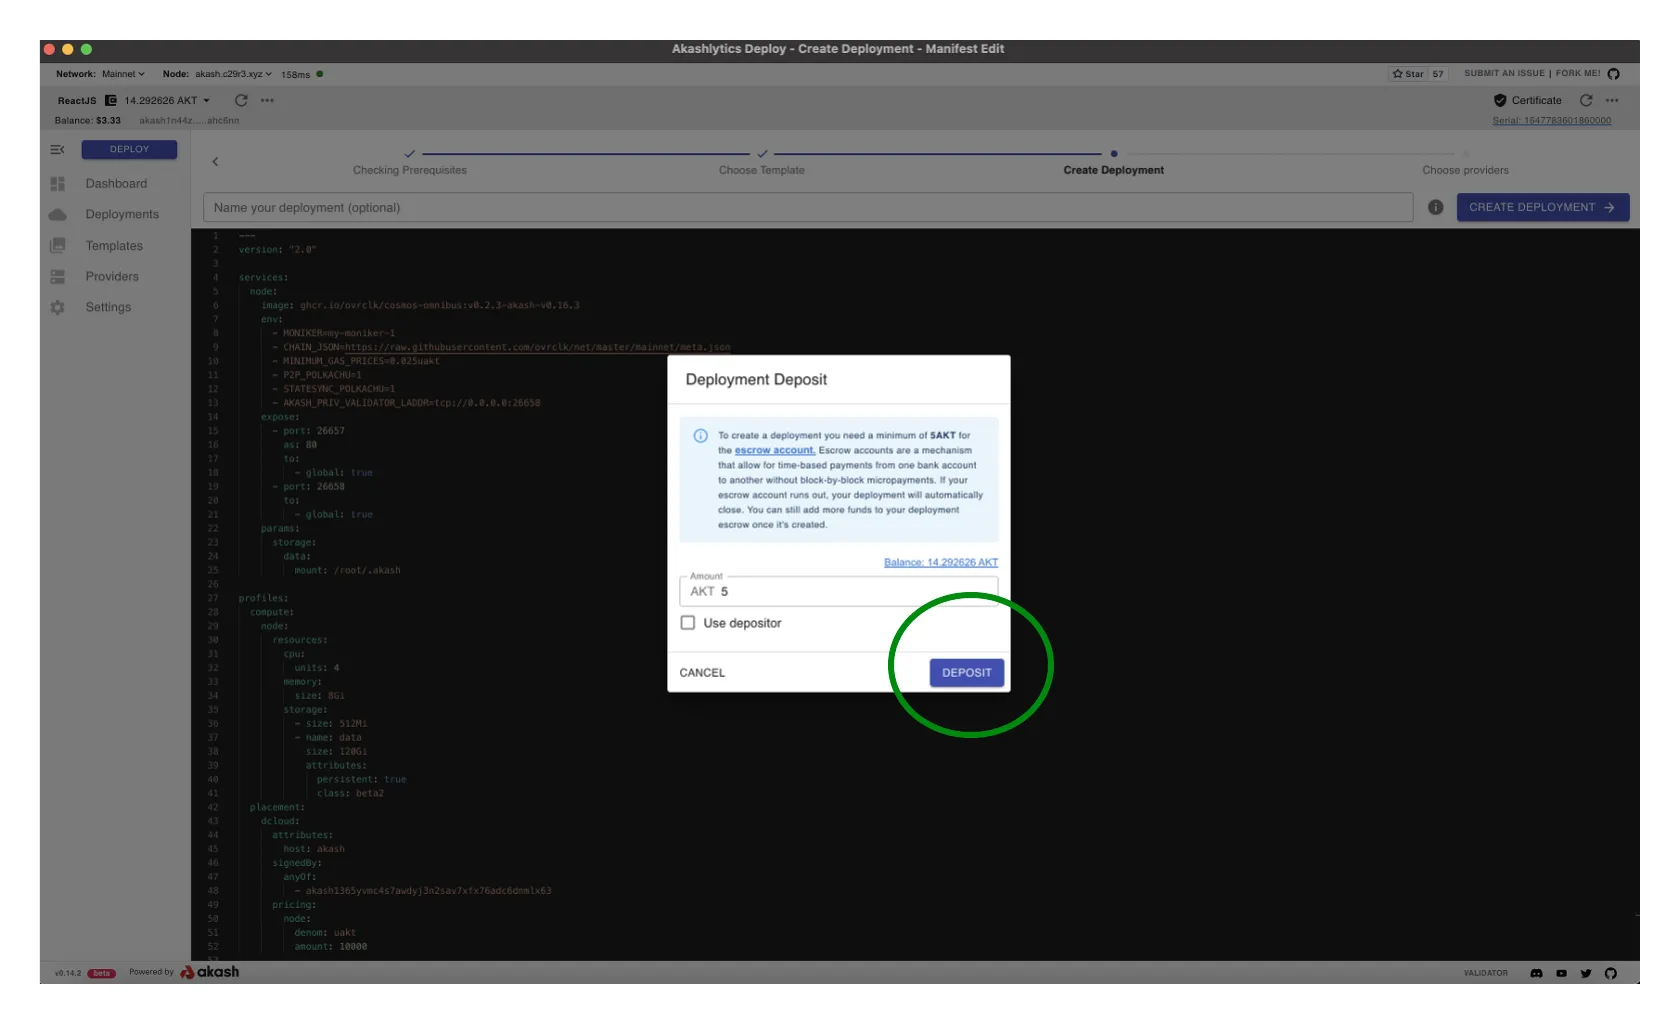
Deployment Deposit
- An escrow account is created for the deployment that is deducted from by the provider for the cost of the workload over time
- By default 0.5 AKT is specified as the initial escrow deposit
- If a deployment’s escrow runs out of funds (0 AKT), the lease will be closed by the provider. Consider increasing the initial deposit to an amount that will be enough to fund the deployment for some time. And/or consider a strategy to ensure the escrow is re-funded on a periodic basis to ensure no disruption to your validator.
- When ready select
DEPOSITto proceed andAPPROVEany Transaction/gas fee prompts that follow
Select Akash Provider
- A list of Akash Providers that have bid on your deployment is displayed
- Choose the desired Provider from the list and then select
ACCEPT BIDto proceed

Deployment Logs
- The
LOGS > EVENTSpane for the new Deployment will display - NOTE - after a period of time the logs will display a
Back-off restarting failed containermessage. This is expected as the container will not start until it has established a connection with the TMKMS server in subsequent steps. - Select the
LEASEStab to proceed into the next step

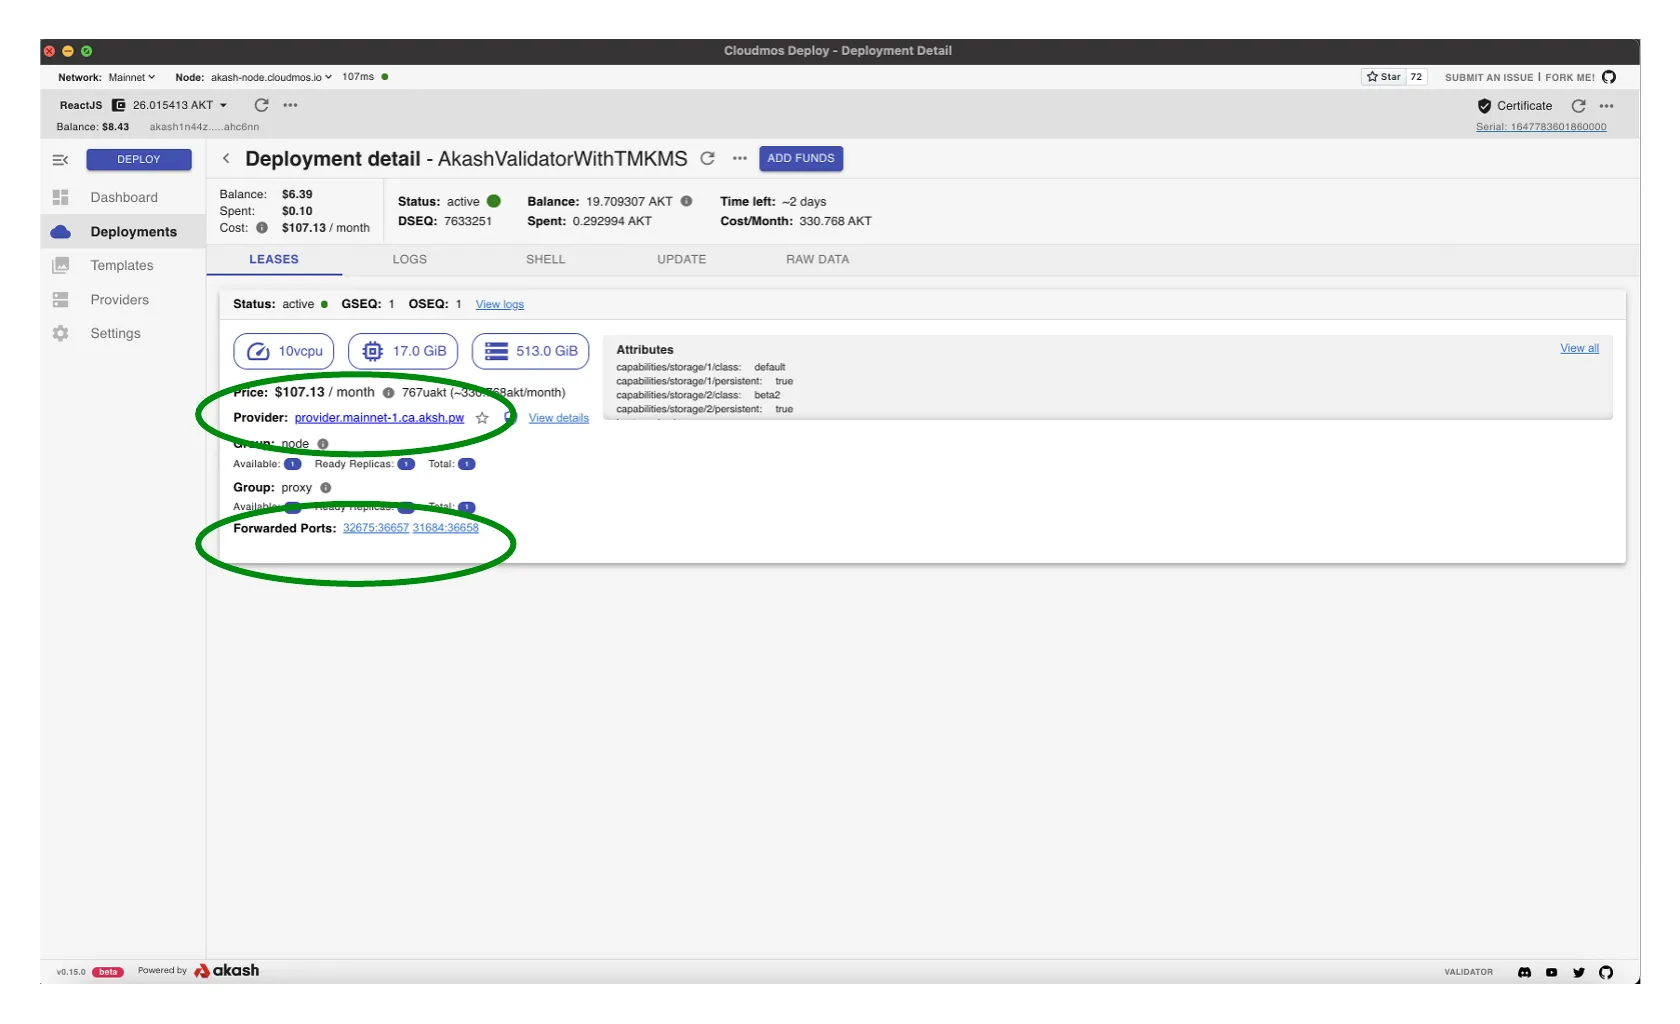
Capture Deployment URI and Port
- In upcoming TMKMS configuration sections we will need to specify our Akash Validator deployment’s URI and port
- Capture this info from the
LEASEStab for later use and specifically in the Stunnel Client section - In the example the following values would be captured (these values will be different for your deployment):
- URI - using the Provider field -
provider.mainnet-1.ca.aksh.pw- Signer Port - using the Forwarded Port field and capturing the port forward to
36658which in this example is31684- Proxy/RPC Port -using the Forwarded Port field and capturing the port forward to
36657which in this example is32675
TMKMS Setup
Considerations
- In a future step in this guide we deploy a Stunnel client which must co-exist on the same machine as the TMKMS server
- For simplicity we use Docker Compose to build the Stunnel client
- We do not offer a TMKMS image based on security concerns in using a third party TMKMS image. However you may want to consider using the Linux instructions below for TMKMS server build and create a container image yourself so that both the TKMKS server and the Stunnel client may both be deployed as containers on the single host.
Prepare TMKMS Dependencies (Ubuntu Instructions)
- All steps in this section should be performed on the TMKMS server unless otherwise noted
Rust Install
curl --proto '=https' --tlsv1.2 -sSf https://sh.rustup.rs | sh
source $HOME/.cargo/env
GCC
sudo apt update
sudo apt install git build-essential ufw curl jq snapd --yes
Libusb
apt install libusb-1.0-0-dev
export RUSTFLAGS=-Ctarget-feature=+aes,+ssse3
Setup TMKMS
- All steps in this section should be performed on the TMKMS server unless otherwise noted
Compiling TMKMS from Source Code
cd ~git clone https://github.com/iqlusioninc/tmkms.gitcd ~/tmkmscargo install tmkms --features=softsignmkdir /etc/tmkmstmkms init /etc/tmkms/Copy Validator Private Key into TMKMS Config File
- Create the
priv_validator_key.jsonfile
vi /etc/tmkms/secrets/priv_validator_key.json- Copy/paste the validator private key into the
priv_validator_key.jsonfile
Example priv_validator_key.json file
{ "address": "3407CC1<REDACTED>243E2865", "pub_key": { "type": "tendermint/PubKeyEd25519", "value": "5uAJKqd<REDACTED>mr5LrY6wsRs=" }, "priv_key": { "type": "tendermint/PrivKeyEd25519", "value": "d1feQqRc<REDACTED>p1pDs6B6avkutjrCxGw==" }}Import the Private Validator Key into TMKMS
tmkms softsign import /etc/tmkms/secrets/priv_validator_key.json /etc/tmkms/secrets/priv_validator_key.softsignDelete Private Key File on the Validator
- Conduct this step on the Akash Validator machine
- Securely delete the priv_validator_key.json from your validator node and store it safely offline in case of an emergency. The
priv_validator_keywill be what TMKMS will use to sign for your validator. - Return to the TMKMS server after this step to complete subsequent steps in this section
shred -uvz ~/.akash/config/priv_validator_key.jsonModify tmkms.toml
- Begin by deleting the existing
tmkms.tomlfile and re-creating anew
rm /etc/tmkms/tmkms.toml
vi /etc/tmkms/tmkms.toml- Copy the following configuration into the new
tmkms.tomlfile - No edits to the file syntax below should be necessary
# Tendermint KMS configuration file
## Chain Configuration
### akashnet-2-dev Network
[[chain]]id = "akashnet-2-dev"key_format = { type = "bech32", account_key_prefix = "akashpub", consensus_key_prefix = "akashvalconspub" }state_file = "/etc/tmkms/state/akashnet-2-dev-consensus.json"
## Signing Provider Configuration
### Software-based Signer Configuration
[[providers.softsign]]chain_ids = ["akashnet-2-dev"]key_type = "consensus"path = "/etc/tmkms/secrets/priv_validator_key.softsign"
## Validator Configuration
[[validator]]chain_id = "akashnet-2-dev"addr = "tcp://127.0.0.1:36658"secret_key = "/etc/tmkms/secrets/kms-identity.key"protocol_version = "v0.34"reconnect = true
Start and Verify the TMKMS Service
All steps in this section should be performed on the TMKMS server unless otherwise noted
Start the TMKMS Service
tmkms start -c /etc/tmkms/tmkms.tomlInitial Log Messages
- The following connection error messages will initially display after the TMKMS service start
- Wait approximately 5-10 minutes for the connection to establish and at which time these error messages should cease
2022-03-08T23:42:37.926816Z INFO tmkms::commands::start: tmkms 0.11.0 starting up...2022-03-08T23:42:37.926968Z INFO tmkms::keyring: [keyring:softsign] added consensus Ed25519 key: osmovalconspub1zcjduepq2qfkp3ahrhaafzuqglme9mares0eluj58xr6cy7c37cdmzq0eecqk0yehr2022-03-08T23:42:37.927216Z INFO tmkms::connection::tcp: KMS node ID: 948f8fee83f7715f99b8b8a53d746ef00e7b0d9e2022-03-08T23:42:37.929454Z ERROR tmkms::client: [osmosis-1@tcp://123.456.32.123:26659] I/O error: Connection refused (os error 111)Log Messages Indicating Successful TMKMS Connection
- NOTE - these verifications and log entries will not be seen until after the Stunnel Client is created and configured
- Eventually the following TMKMS log messages should display indicating successful connection between the TMKMS server and the Akash validator
2022-09-15T00:08:10.604353Z INFO tmkms::connection::tcp: KMS node ID: 7a1f7c7f726d94787045cca9fee05c1ec67cd09a2022-09-15T00:08:10.899641Z INFO tmkms::session: [akashnet-2@tcp://127.0.0.1:36658] connected to validator successfully2022-09-15T00:08:10.899670Z WARN tmkms::session: [akashnet-2@tcp://127.0.0.1:36658]: unverified validator peer ID! (aa9cdfb9e1af2d8033168f562941a95c98545372)Stunnel Client
Overview
- The Stunnel client is used to connect to the Stunnel server which was co-located on the Akash Validator server in prior steps
- We will install the Stunnel client via Docker Compose
- The Stunnel client must co-exist on the same server as TMKMS which was built in the prior step
Stunnel Client Source Code
Stunnel Repository with Docker Files
- The Stunnel Dockerfile and Docker Compose files used in this section are located here for your review
Pull Down a Copy of the Stunnel Repo
- This step and all subsequent steps should be performed on the server TMKMS was installed on prior
mkdir ~/stunnelcd ~/stunnelgit clone https://github.com/akash-network/stunnel-proxyCustomize the Stunnel Client Docker Compose File
- Navigate into the
clientdirectory and make necessary updates to thedocker-compose.ymlfile as detailed below
cd ~/stunnel/stunnel-proxy/clientvi docker-compose.ymlNecessary Docker Compose File Updates
- Use the details captured in the Akash Validator Deployment section of the guide - within the
Capture Deployment URI and Portsubsection - for the Docker Compose file updates discussed below
STUNNEL_SVC_RPC_CONNECT
- Update the
STUNNEL_SVC_RPC_CONNECTfield - This field should use the exposed Proxy/RPC port captured during the Akash Validator deployment and within this step
- Template - update the provider and exposed port variables with your unique Akash deployment values
STUNNEL_SVC_RPC_CONNECT=<akash-provider-url>:<expose-proxy-port>- Example of the setting based on the example deployment in this guide
STUNNEL_SVC_RPC_CONNECT=provider.mainnet-1.ca.aksh.pw:32675STUNNEL_SVC_SIGNER_CONNECT
- Update the
STUNNEL_SVC_SIGNER_CONNECTfield - This field should use the exposed Signer port captured during the Akash Validator deployment and within this step
- Template - update the provider and exposed port variables with your unique Akash deployment values
STUNNEL_SVC_SIGNER_CONNECT=<akash-provider-url>:<signer-port>- Example of the setting based on the example deployment in this guide
STUNNEL_SVC_SIGNER_CONNECT=provider.mainnet-1.ca.aksh.pw:31684Network > Server_Default Setting
- Update the Network > Server_Default setting to external: false such as:
networks: server_default: external: falsePre-Shared Key (PSK)
- Ensure the PSK field matches the value defined earlier in the Akash Validator Deployment section
Example docker-compose.yaml File
version: "3.3"services: stunnel: build: ../ environment: - PSK=DmtaC6N3HOWFkJZpNZs2dkabFT5yQONw - STUNNEL_SVC_RPC_CLIENT=yes - STUNNEL_SVC_RPC_ACCEPT=0.0.0.0:36657 - STUNNEL_SVC_RPC_CONNECT=provider.mainnet-1.ca.aksh.pw:32323 - STUNNEL_SVC_SIGNER_CLIENT=yes - STUNNEL_SVC_SIGNER_ACCEPT=0.0.0.0:36658 - STUNNEL_SVC_SIGNER_CONNECT=provider.mainnet-1.ca.aksh.pw:32435 networks: - server_default ports: - '36657:36657' - '36658:36658'networks: server_default: external: falseDocker Compose Up
- Create the Stunnel Client Container
cd ~/stunnel/stunnel-proxy/clientdocker compose up -dStunnel Client Successful Connection Logs
Confirm Name of Container
docker container lsExample Output
CONTAINER ID IMAGE COMMAND CREATED STATUS PORTS NAMESa4bd1b21f551 client-stunnel "/usr/local/configur…" 44 minutes ago Up 44 minutes 0.0.0.0:36657-36658->36657-36658/tcp, :::36657-36658->36657-36658/tcp client-stunnel-1View Stunnel Client Container Logs
docker container logs <container-name-obtained-in-last-step>Example
docker container logs client-stunnel-1Example Logs Indicating Successful Connection
client-stunnel-1 | 2022.09.15 00:08:09 LOG6[0]: s_connect: connecting 216.202.234.124:30017client-stunnel-1 | 2022.09.15 00:08:09 LOG7[0]: s_connect: s_poll_wait 216.202.234.124:30017: waiting 10 secondsclient-stunnel-1 | 2022.09.15 00:08:09 LOG5[0]: s_connect: connected 216.202.234.124:30017client-stunnel-1 | 2022.09.15 00:08:09 LOG5[0]: Service [signer] connected remote server from 172.18.0.2:48336client-stunnel-1 | 2022.09.15 00:08:09 LOG7[0]: Setting remote socket options (FD=8)client-stunnel-1 | 2022.09.15 00:08:09 LOG7[0]: Option TCP_NODELAY set on remote socketclient-stunnel-1 | 2022.09.15 00:08:09 LOG7[0]: Remote descriptor (FD=8) initializedclient-stunnel-1 | 2022.09.15 00:08:09 LOG6[0]: SNI: sending servername: provider.mainnet-1.ca.aksh.pwclient-stunnel-1 | 2022.09.15 00:08:09 LOG6[0]: Peer certificate not requiredclient-stunnel-1 | 2022.09.15 00:08:09 LOG7[0]: TLS state (connect): before SSL initializationclient-stunnel-1 | 2022.09.15 00:08:09 LOG6[0]: PSK client configured for identity "node"client-stunnel-1 | 2022.09.15 00:08:09 LOG7[0]: TLS state (connect): SSLv3/TLS write client helloclient-stunnel-1 | 2022.09.15 00:08:09 LOG7[0]: TLS state (connect): SSLv3/TLS write client helloclient-stunnel-1 | 2022.09.15 00:08:09 LOG7[0]: TLS state (connect): SSLv3/TLS read server helloclient-stunnel-1 | 2022.09.15 00:08:09 LOG7[0]: TLS state (connect): SSLv3/TLS write change cipher specclient-stunnel-1 | 2022.09.15 00:08:09 LOG6[0]: PSK client configured for identity "node"client-stunnel-1 | 2022.09.15 00:08:09 LOG7[0]: Deallocating application specific data for session connect addressclient-stunnel-1 | 2022.09.15 00:08:09 LOG7[0]: TLS state (connect): SSLv3/TLS write client helloclient-stunnel-1 | 2022.09.15 00:08:09 LOG7[0]: TLS state (connect): SSLv3/TLS write client helloclient-stunnel-1 | 2022.09.15 00:08:09 LOG7[0]: Deallocating application specific data for session connect addressclient-stunnel-1 | 2022.09.15 00:08:09 LOG7[0]: TLS state (connect): SSLv3/TLS read server helloclient-stunnel-1 | 2022.09.15 00:08:09 LOG7[0]: TLS state (connect): TLSv1.3 read encrypted extensionsclient-stunnel-1 | 2022.09.15 00:08:09 LOG7[0]: TLS state (connect): SSLv3/TLS read finishedclient-stunnel-1 | 2022.09.15 00:08:09 LOG7[0]: TLS state (connect): SSLv3/TLS write finishedclient-stunnel-1 | 2022.09.15 00:08:09 LOG7[0]: 1 client connect(s) requestedclient-stunnel-1 | 2022.09.15 00:08:09 LOG7[0]: 1 client connect(s) succeededclient-stunnel-1 | 2022.09.15 00:08:09 LOG7[0]: 0 client renegotiation(s) requestedclient-stunnel-1 | 2022.09.15 00:08:09 LOG7[0]: 1 session reuse(s)Verify Validator Status
Overview
- In this section we will verify the state of the Akash Validator following successful integration of TMKMS and Stunnel
- Use Akash Console for the validations in this section
Verify Stunnel Proxy Service
- Navigate into your Akash Validator deployment within Akash Console
- Enter the
LOGStab of the deployment - From the
Servicesdrop down menu > selectproxy - With Stunnel logs isolated we should see successful TLS connection messages such as the examples below
proxy: 2022.09.15 00:08:10 LOG7[12]: TLS state (accept): SSLv3/TLS write finishedproxy: 2022.09.15 00:08:10 LOG7[12]: TLS state (accept): TLSv1.3 early dataproxy: 2022.09.15 00:08:10 LOG7[12]: TLS state (accept): TLSv1.3 early dataproxy: 2022.09.15 00:08:10 LOG7[12]: TLS state (accept): SSLv3/TLS read finishedproxy: 2022.09.15 00:08:10 LOG7[12]: 8 server accept(s) requestedproxy: 2022.09.15 00:08:10 LOG7[12]: 2 server accept(s) succeededproxy: 2022.09.15 00:08:10 LOG7[12]: 0 server renegotiation(s) requestedproxy: 2022.09.15 00:08:10 LOG7[12]: 4 session reuse(s)proxy: 2022.09.15 00:08:10 LOG7[12]: 1 internal session cache item(s)proxy: 2022.09.15 00:08:10 LOG7[12]: 0 internal session cache fill-up(s)proxy: 2022.09.15 00:08:10 LOG7[12]: 0 internal session cache miss(es)proxy: 2022.09.15 00:08:10 LOG7[12]: 0 external session cache hit(s)proxy: 2022.09.15 00:08:10 LOG7[12]: 0 expired session(s) retrievedproxy: 2022.09.15 00:08:10 LOG7[12]: New session callbackproxy: 2022.09.15 00:08:10 LOG6[12]: No peer certificate receivedproxy: 2022.09.15 00:08:10 LOG6[12]: Session id: A33315836C947E567A8BBA625BAB4C137F6B26DEAF54142D56E87775A44C26BAproxy: 2022.09.15 00:08:10 LOG7[12]: TLS state (accept): SSLv3/TLS write session ticketproxy: 2022.09.15 00:08:10 LOG6[12]: TLS accepted: previous session reusedproxy: 2022.09.15 00:08:10 LOG6[12]: TLSv1.3 ciphersuite: TLS_CHACHA20_POLY1305_SHA256 (256-bit encryption)proxy: 2022.09.15 00:08:10 LOG7[12]: Compression: null, expansion: nullproxy: 2022.09.15 00:08:10 LOG6[12]: Session id: A33315836C947E567A8BBA625BAB4C137F6B26DEAF54142D56E87775A44C26BAVerify Validator Status
- Navigate into your Akash Validator deployment within Akash Console
- Enter the
LOGStab of the deployment - From the
Servicesdrop down menu > selectnode - With Validator logs isolated we should see successful
executed blockandcommitted statemessages such as those below
node: [90m1:19AM[0m [32mINF[0m executed block [36mheight=[0m7627065 [36mmodule=[0mstate [36mnum_invalid_txs=[0m0 [36mnum_valid_txs=[0m3node: [90m1:19AM[0m [32mINF[0m commit synced [36mcommit=[0m436F6D6D697449447B5B32362031333220343820373520313930203320343720323238203136372038352031303520323520313533203539203630203234392031343720313236203938203136312032323220313620313336203230322032343220313137203139332032303620313234203830203131322032305D3A3734363133397Dnode: [90m1:19AM[0m [32mINF[0m committed state [36mapp_hash=[0m1A84304BBE032FE4A7556919993B3CF9937E62A1DE1088CAF275C1CE7C507014 [36mheight=[0m7627065 [36mmodule=[0mstate [36mnum_txs=[0m3node: [90m1:19AM[0m [32mINF[0m indexed block [36mheight=[0m7627065 [36mmodule=[0mtxindexnode: [90m1:19AM[0m [32mINF[0m Timed out [36mdur=[0m4875.841288 [36mheight=[0m7627066 [36mmodule=[0mconsensus [36mround=[0m0 [36mstep=[0m1node: [90m1:19AM[0m [32mINF[0m received proposal [36mmodule=[0mconsensus [36mproposal=[0m{"Type":32,"block_id":{"hash":"EA1BA91C01F647AC96B855177BE4696FF8B5A470237598A87275B395A1E5C58B","parts":{"hash":"79AF71041EA62A35DA4507A32491F4EF0ADC4E570869E9A5406208A33818EC97","total":1}},"height":7627066,"pol_round":-1,"round":0,"signature":"PBwZZYMEehs/k5jv8RnPSSvYVnMdCHB4UylPnZuxmhL1146okZMaU+huMjJYV8sjAUR6JNoJC8wlwrKHQuUkCA==","timestamp":"2022-09-15T01:20:16.268331046Z"}node: [90m1:20AM[0m [32mINF[0m received complete proposal block [36mhash=[0mEA1BA91C01F647AC96B855177BE4696FF8B5A470237598A87275B395A1E5C58B [36mheight=[0m7627066 [36mmodule=[0mconsensusnode: [90m1:20AM[0m [32mINF[0m finalizing commit of block [36mhash=[0mEA1BA91C01F647AC96B855177BE4696FF8B5A470237598A87275B395A1E5C58B [36mheight=[0m7627066 [36mmodule=[0mconsensus [36mnum_txs=[0m1 [36mroot=[0m1A84304BBE032FE4A7556919993B3CF9937E62A1DE1088CAF275C1CE7C507014node: [90m1:20AM[0m [32mINF[0m minted coins from module account [36mamount=[0m4816074uakt [36mfrom=[0mmint [36mmodule=[0mx/banknode: [90m1:20AM[0m [32mINF[0m executed block [36mheight=[0m7627066 [36mmodule=[0mstate [36mnum_invalid_txs=[0m0 [36mnum_valid_txs=[0m1node: [90m1:20AM[0m [32mINF[0m commit synced [36mcommit=[0m436F6D6D697449447B5B31393520323430203835203130372032382034362035332032303720313735203232322039372031343420383220363720313731203137332031303420323130203135342035382032353420323431203231302032343420323120313431203137392033312034352031343120323438203134385D3A3734363133417Dnode: [90m1:20AM[0m [32mINF[0m committed state [36mapp_hash=[0mC3F0556B1C2E35CFAFDE61905243ABAD68D29A3AFEF1D2F4158DB31F2D8DF894 [36mheight=[0m7627066 [36mmodule=[0mstate [36mnum_txs=[0m1node: [90m1:20AM[0m [32mINF[0m indexed block [36mheight=[0m7627066 [36mmodule=[0mtxindex