Deployments may be launched on the GPU Testnet via the Akash Console, Akash Console, and the Akash CLI. Follow the links provided below based on your preferred deployment tool.
Akash Console
Akash Console for GPU Testnet Overview
Akash Console is a web based application that makes it easy to deploy applications onto the Akash Network. Post deployment, Akash Console provides a dashboard to view the status and details of workloads. The dashboard also has the ability to perform administrative tasks including closing the deployment, updating the deployment, redeploying, and increasing the funding available to the deployment.
This guide will cover the following topics that are relevant for Akash Console use in the GPU Testnet:
- Akash Console Access
- GPU Testnet Settings
- Keplr Account Selection and Funding
- MInesweeper Deployment Example
Akash Console Access
Before Getting Started
The Keplr browser extension must be installed and with sufficient funds (5AKT minimum for a single deployment plus a small amount for transaction fees).
Follow our Keplr Wallet guide to create your first wallet if necessary.
Akash Console Access
The Akash Console web app is available via the following URL:
GPU Testnet Settings
Configure GPU Testnet Network Settings
- Prior to launching a deployment, we need need to configure a few settings for GPU Testnet use
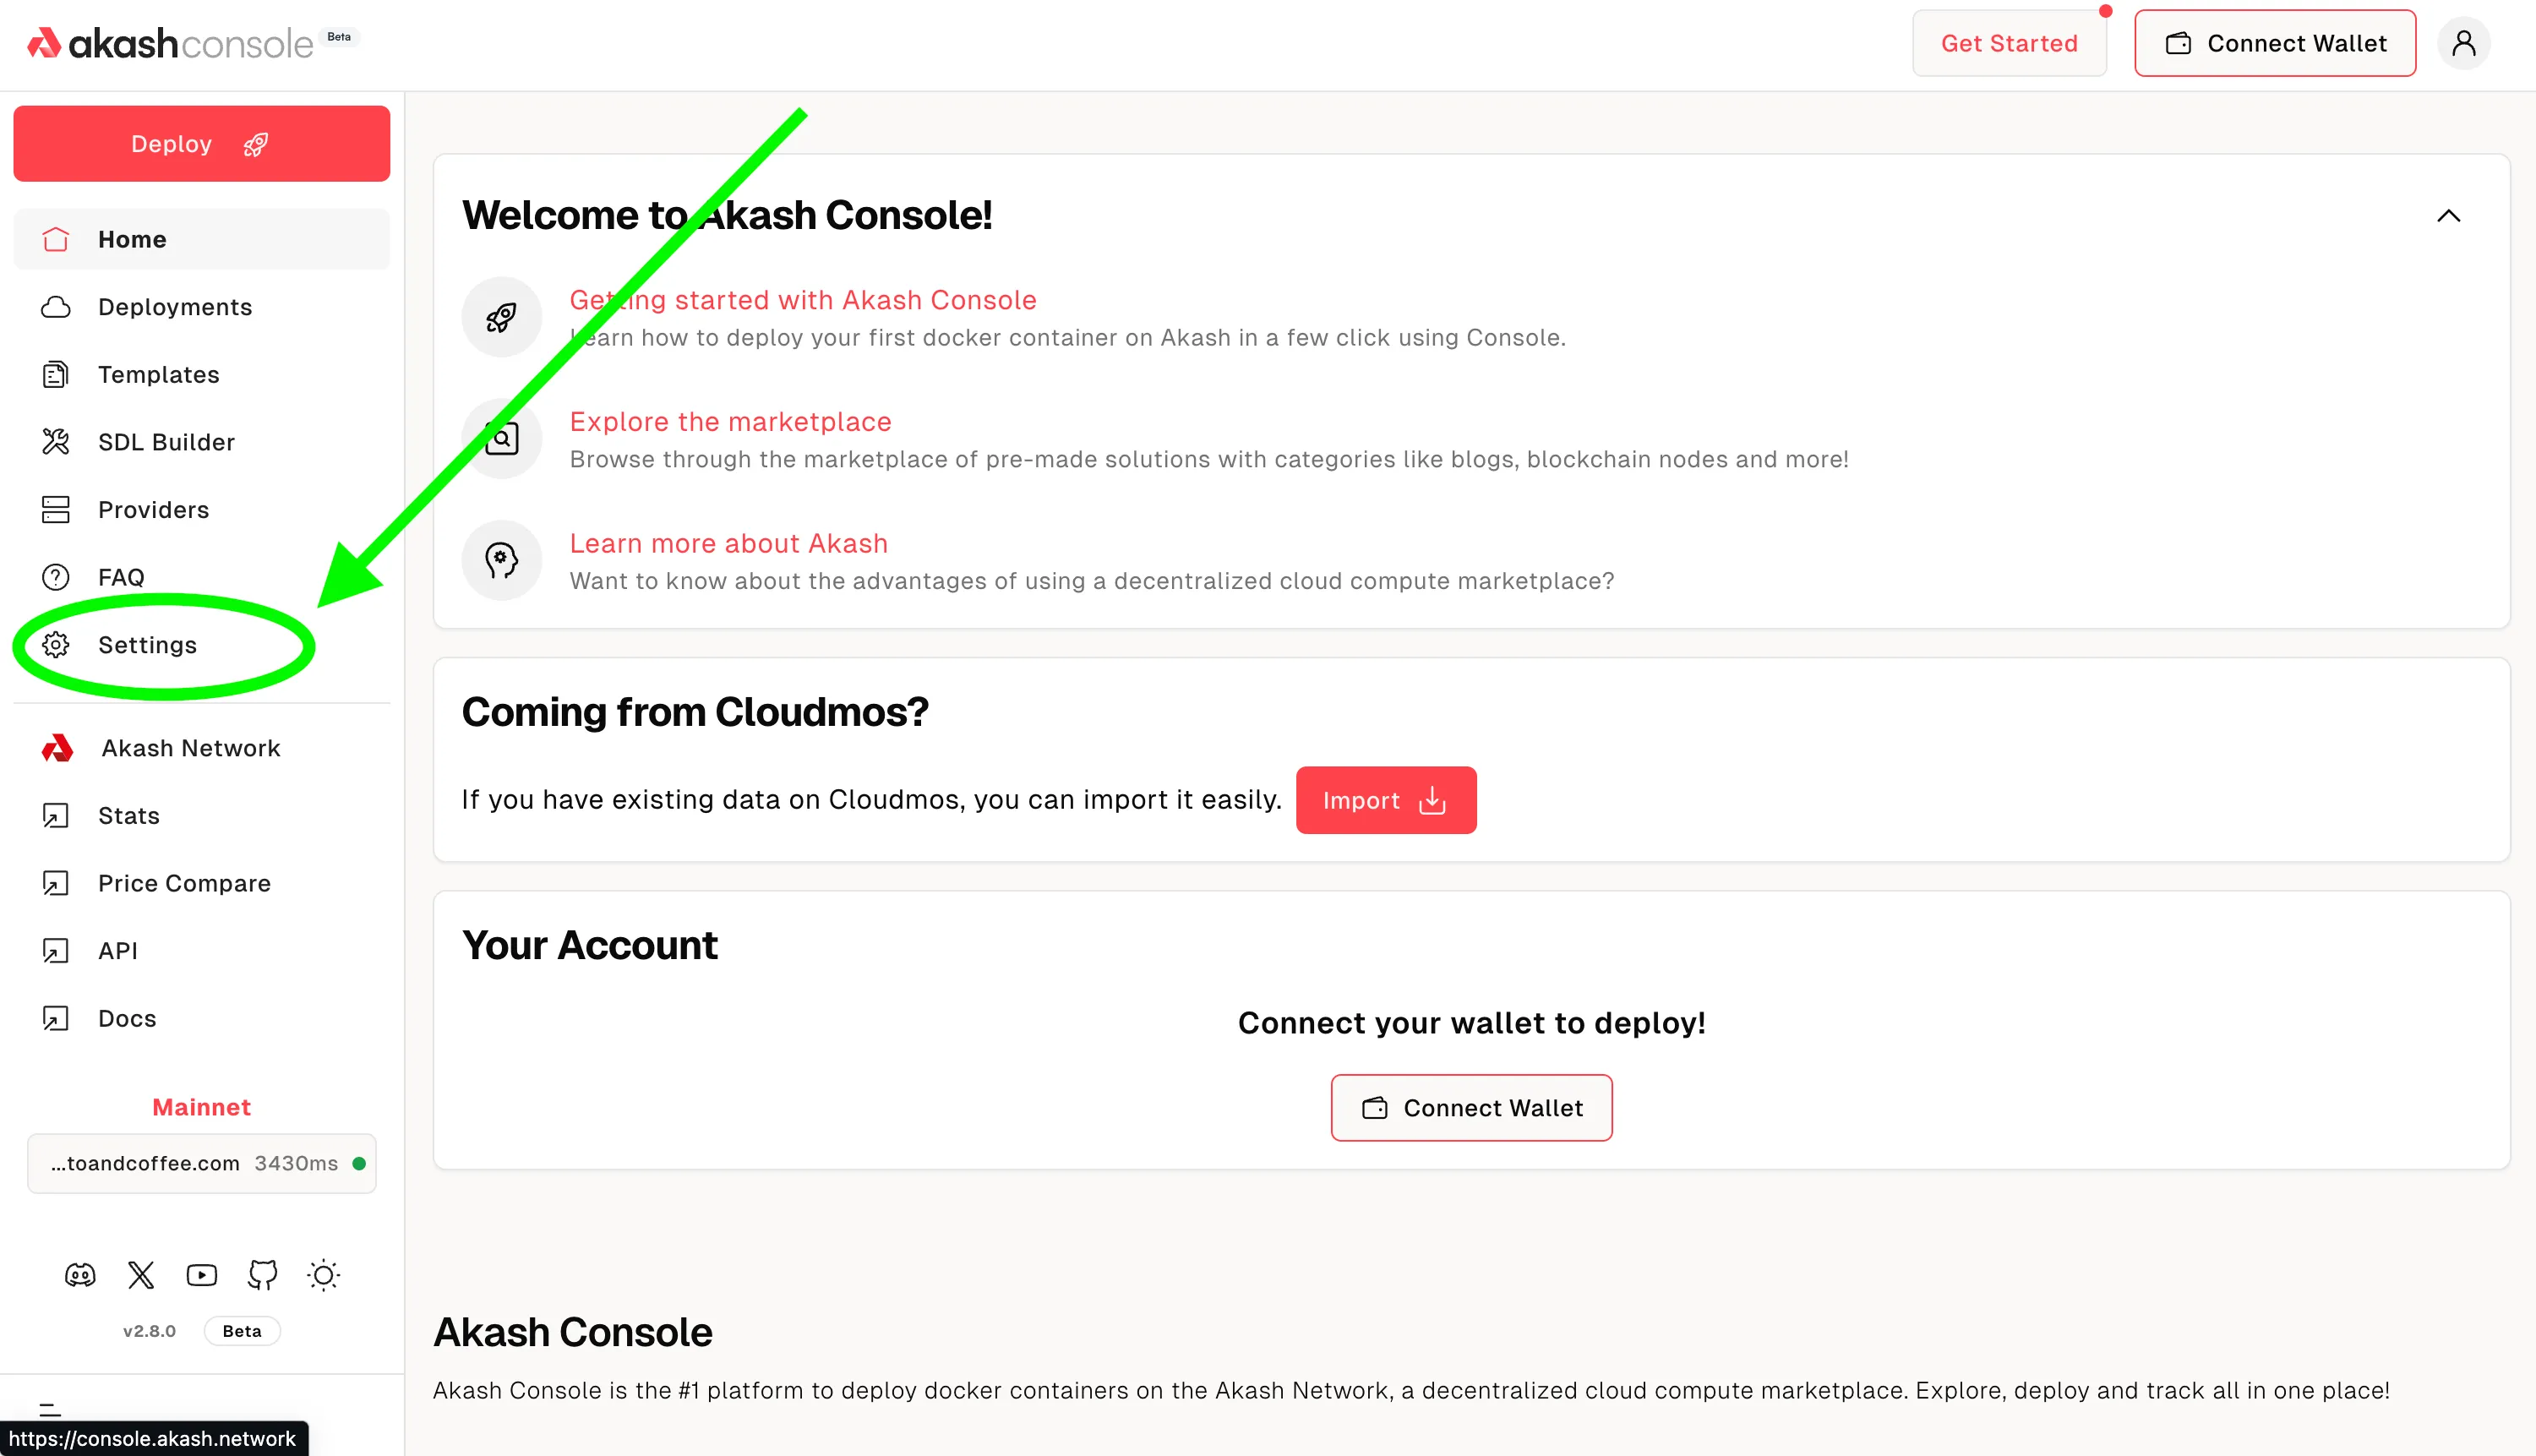
Access Settings
- Begin by accessing the Settings via selection of the gear icon and as depicted below
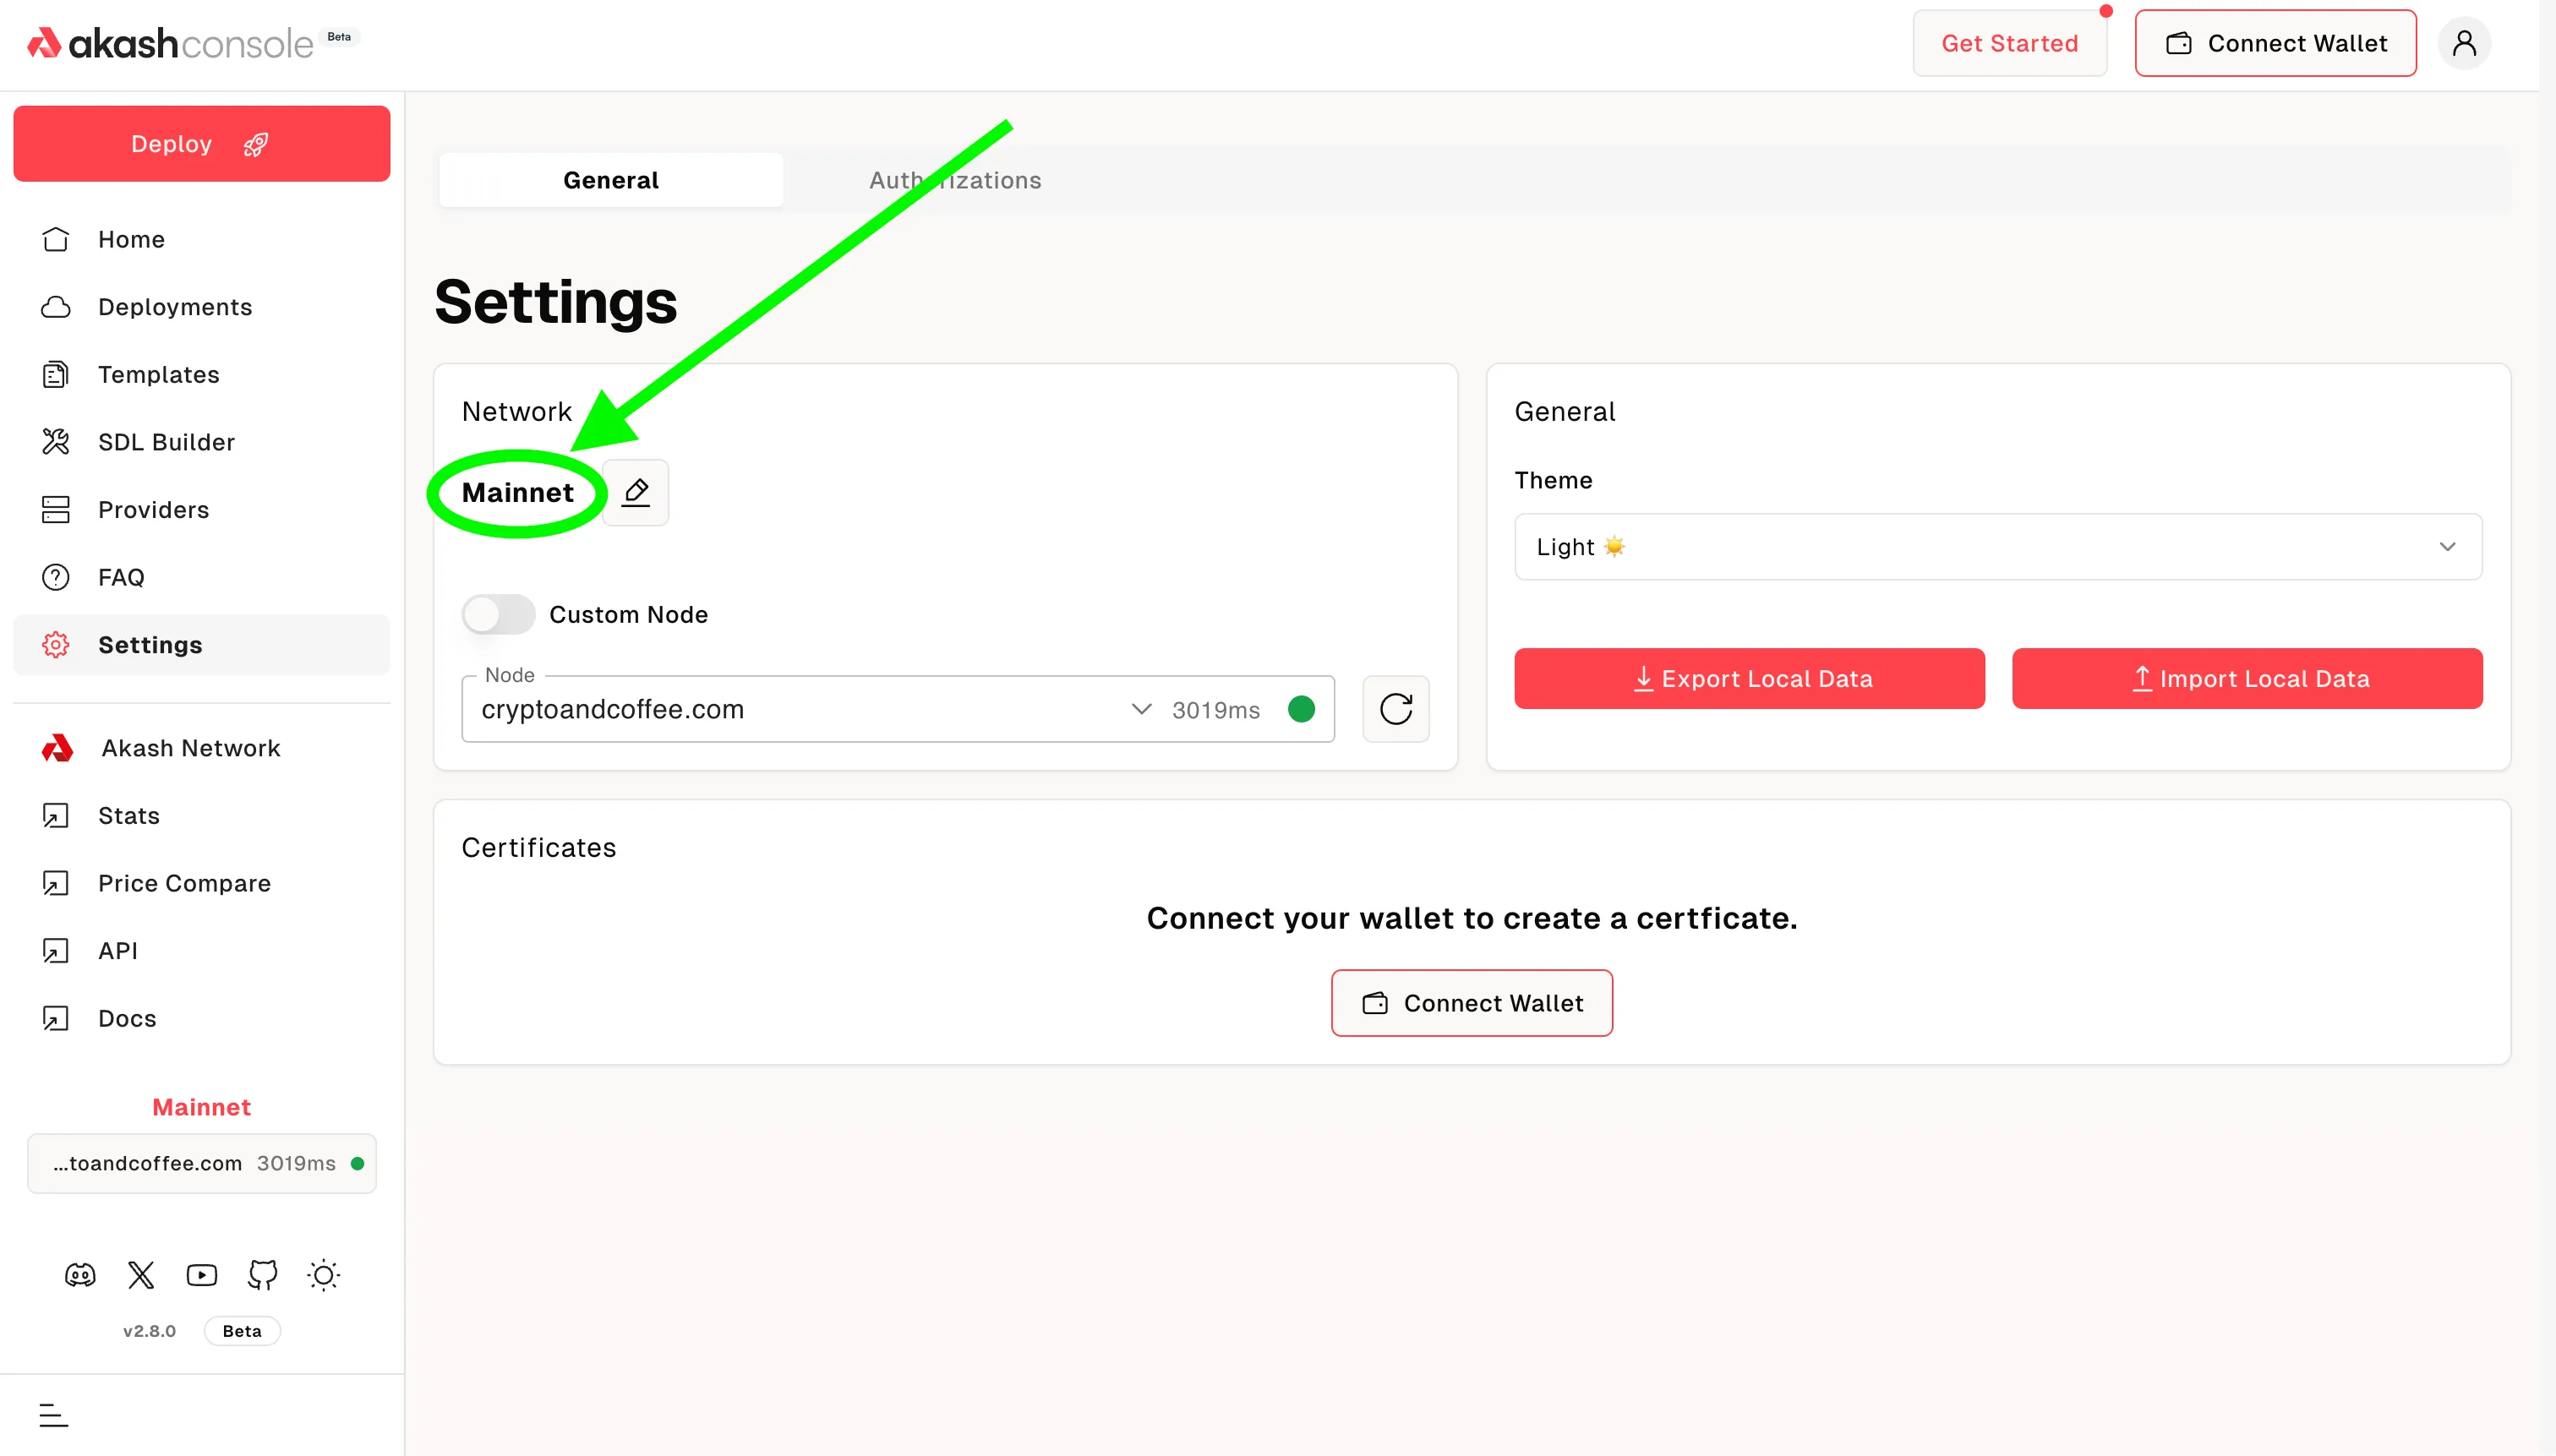
Initial Settings
- The Console is most likely current configured to interact with the Akash Mainnet
- In the depiction below we find this to be the case. The Console is connected to
Mainnet.
Update Settings for GPU Testnet Use
- To interact with the GPU Testnet via the Akash Console, select the
editicon (it looks like a pencil, see the diagram below) in theNetworksection.
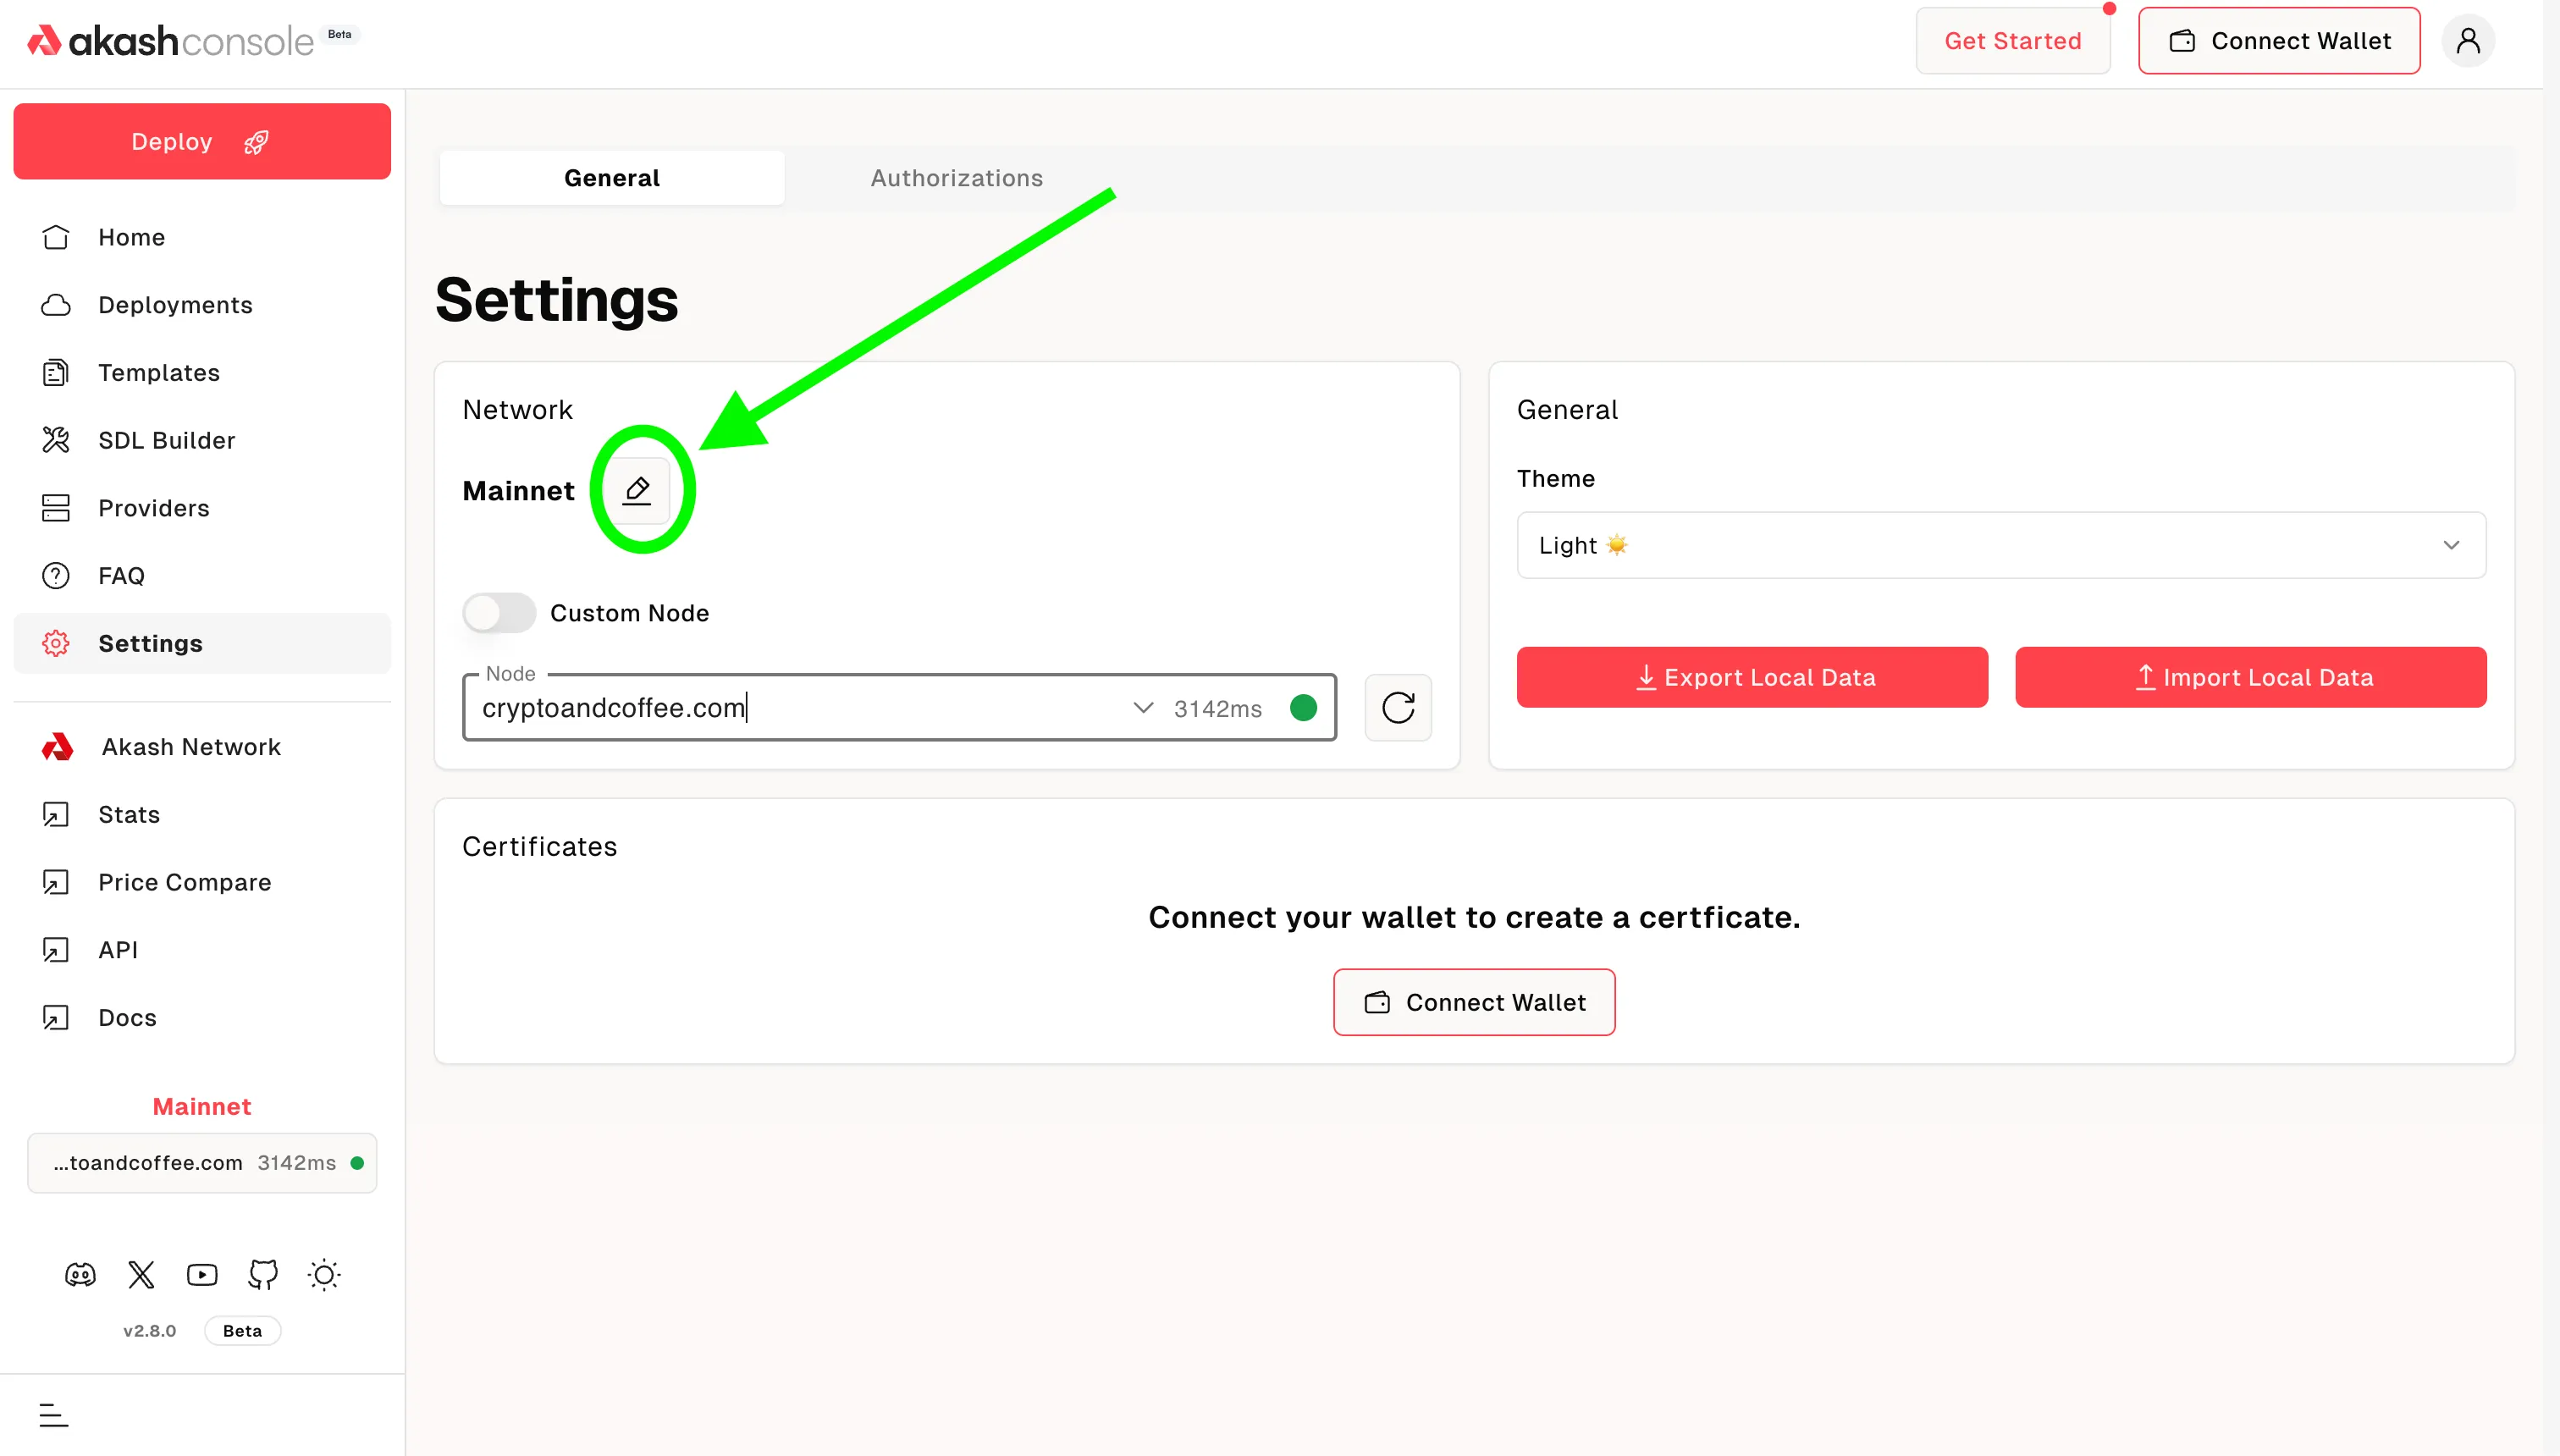
A box would pop-up, asking you to select network.
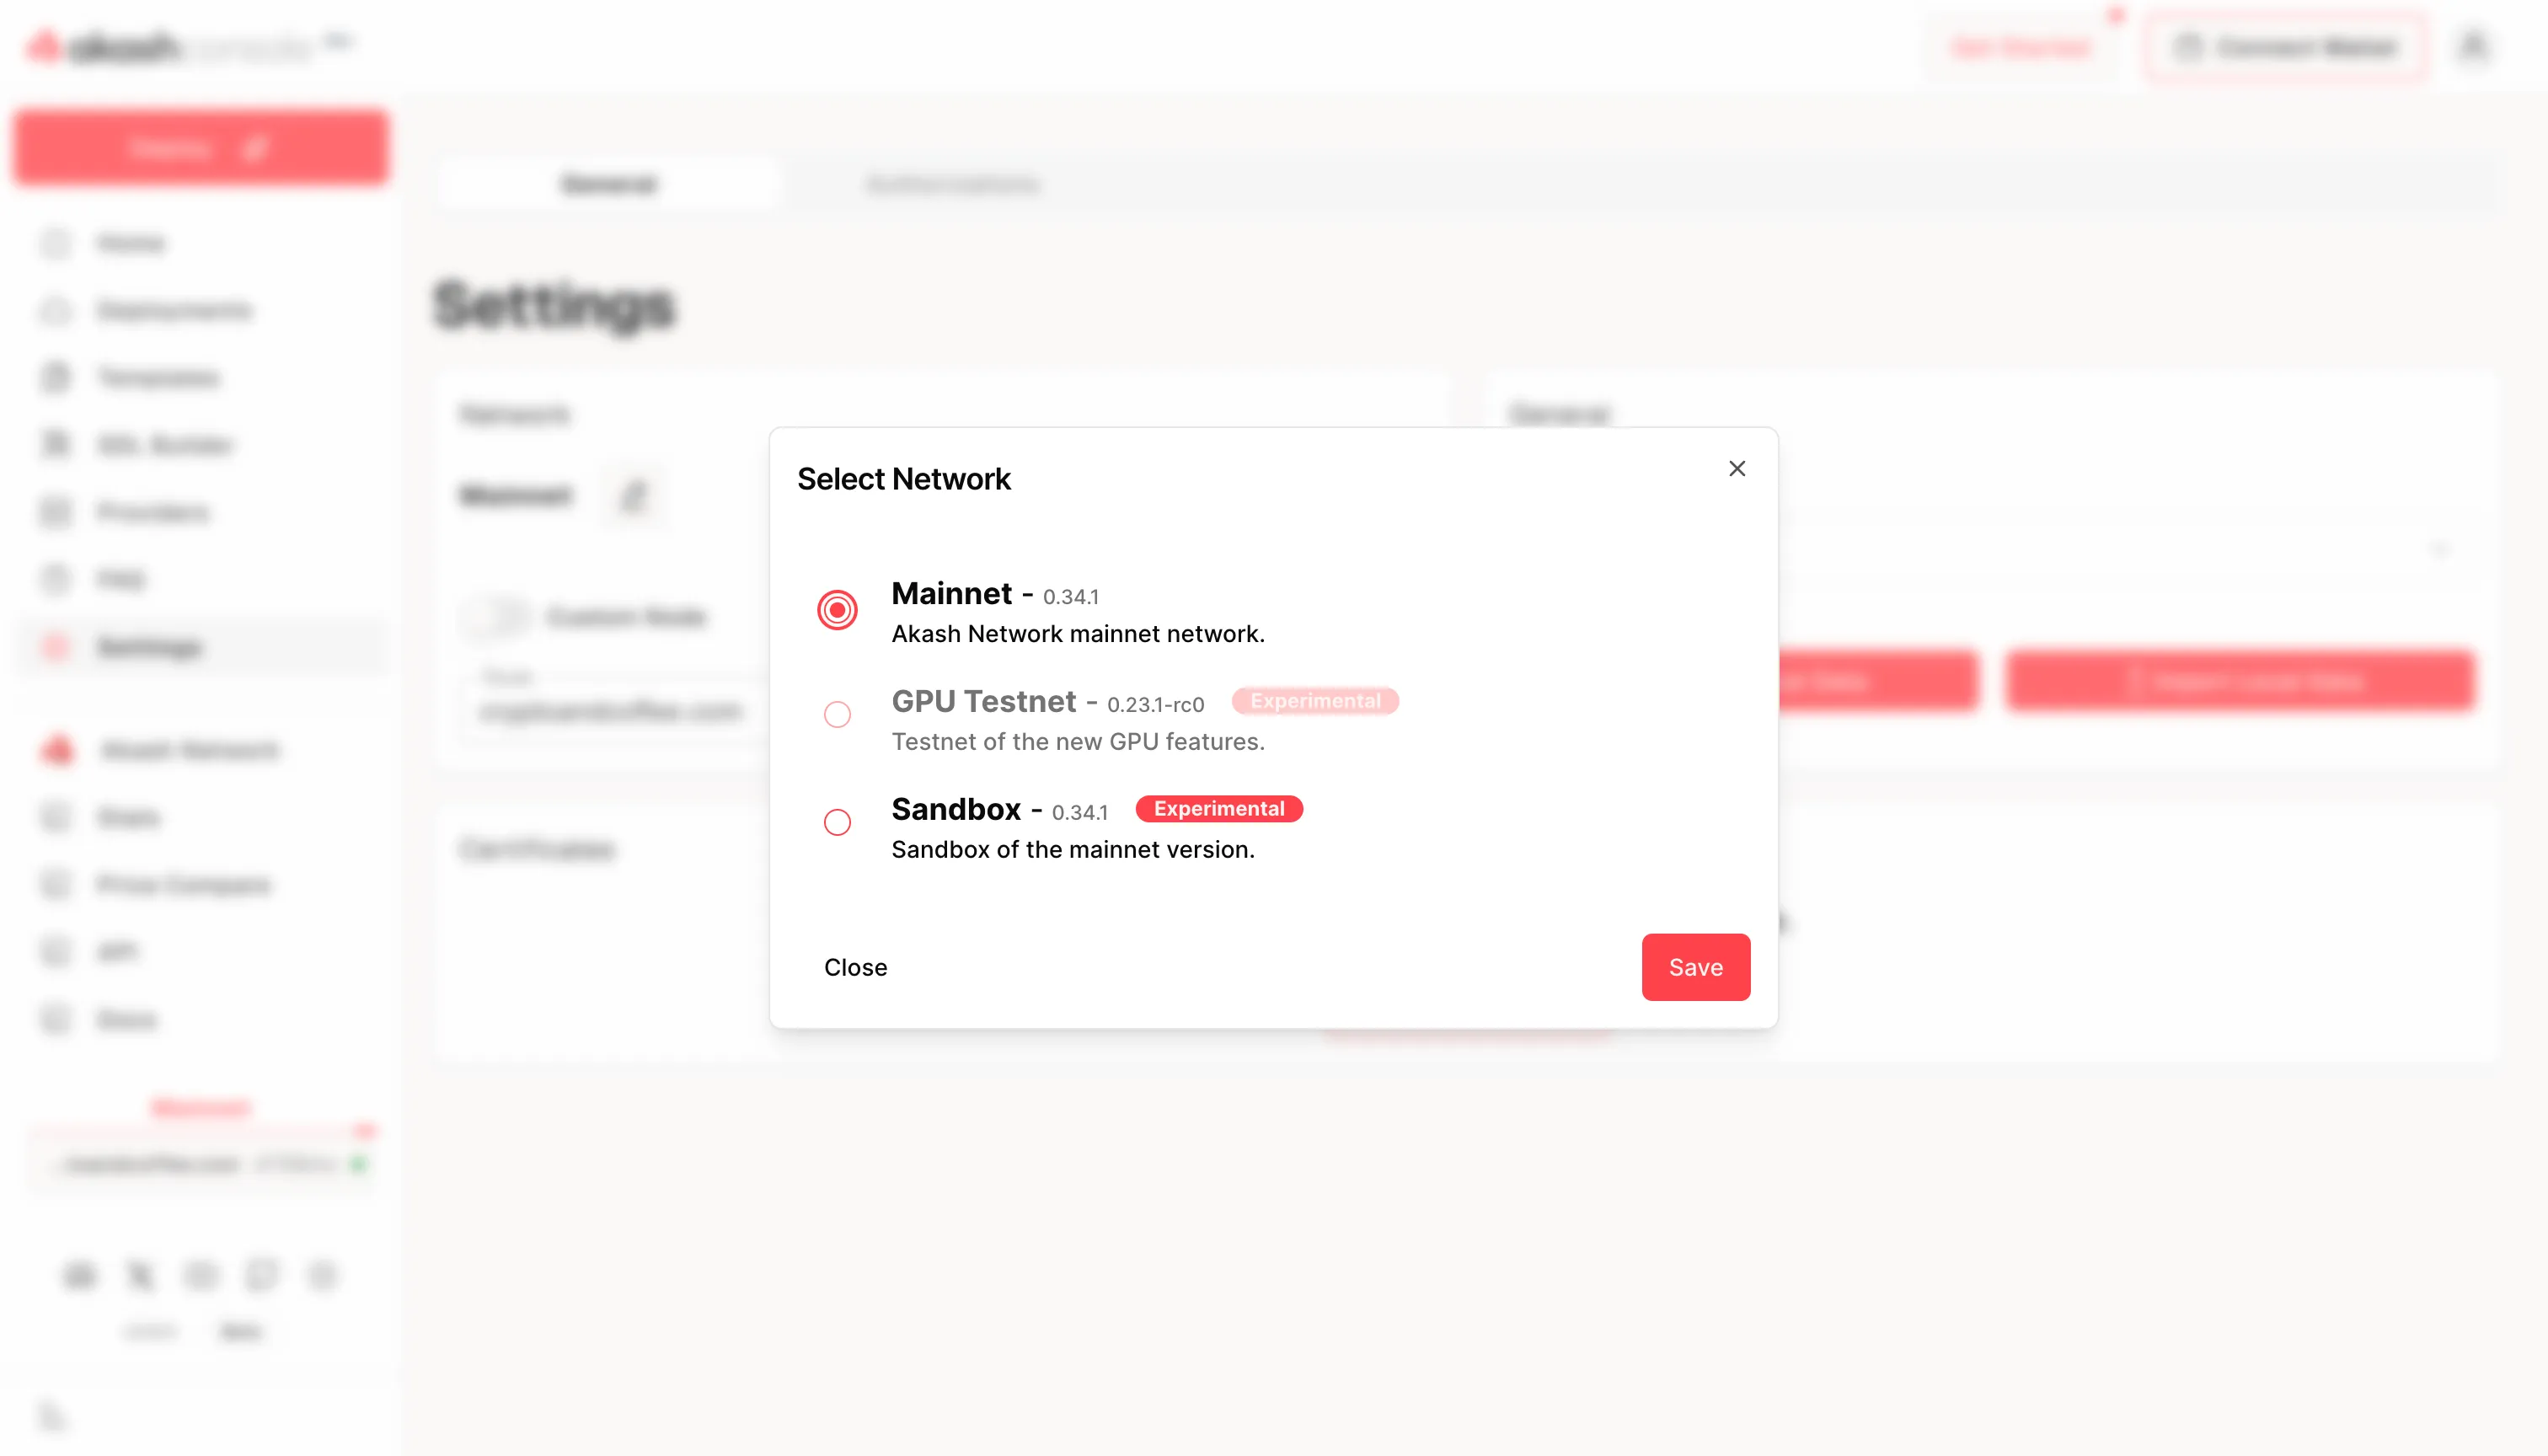
- Select the
Sandboxnetwork. - Click the
Savebutton.
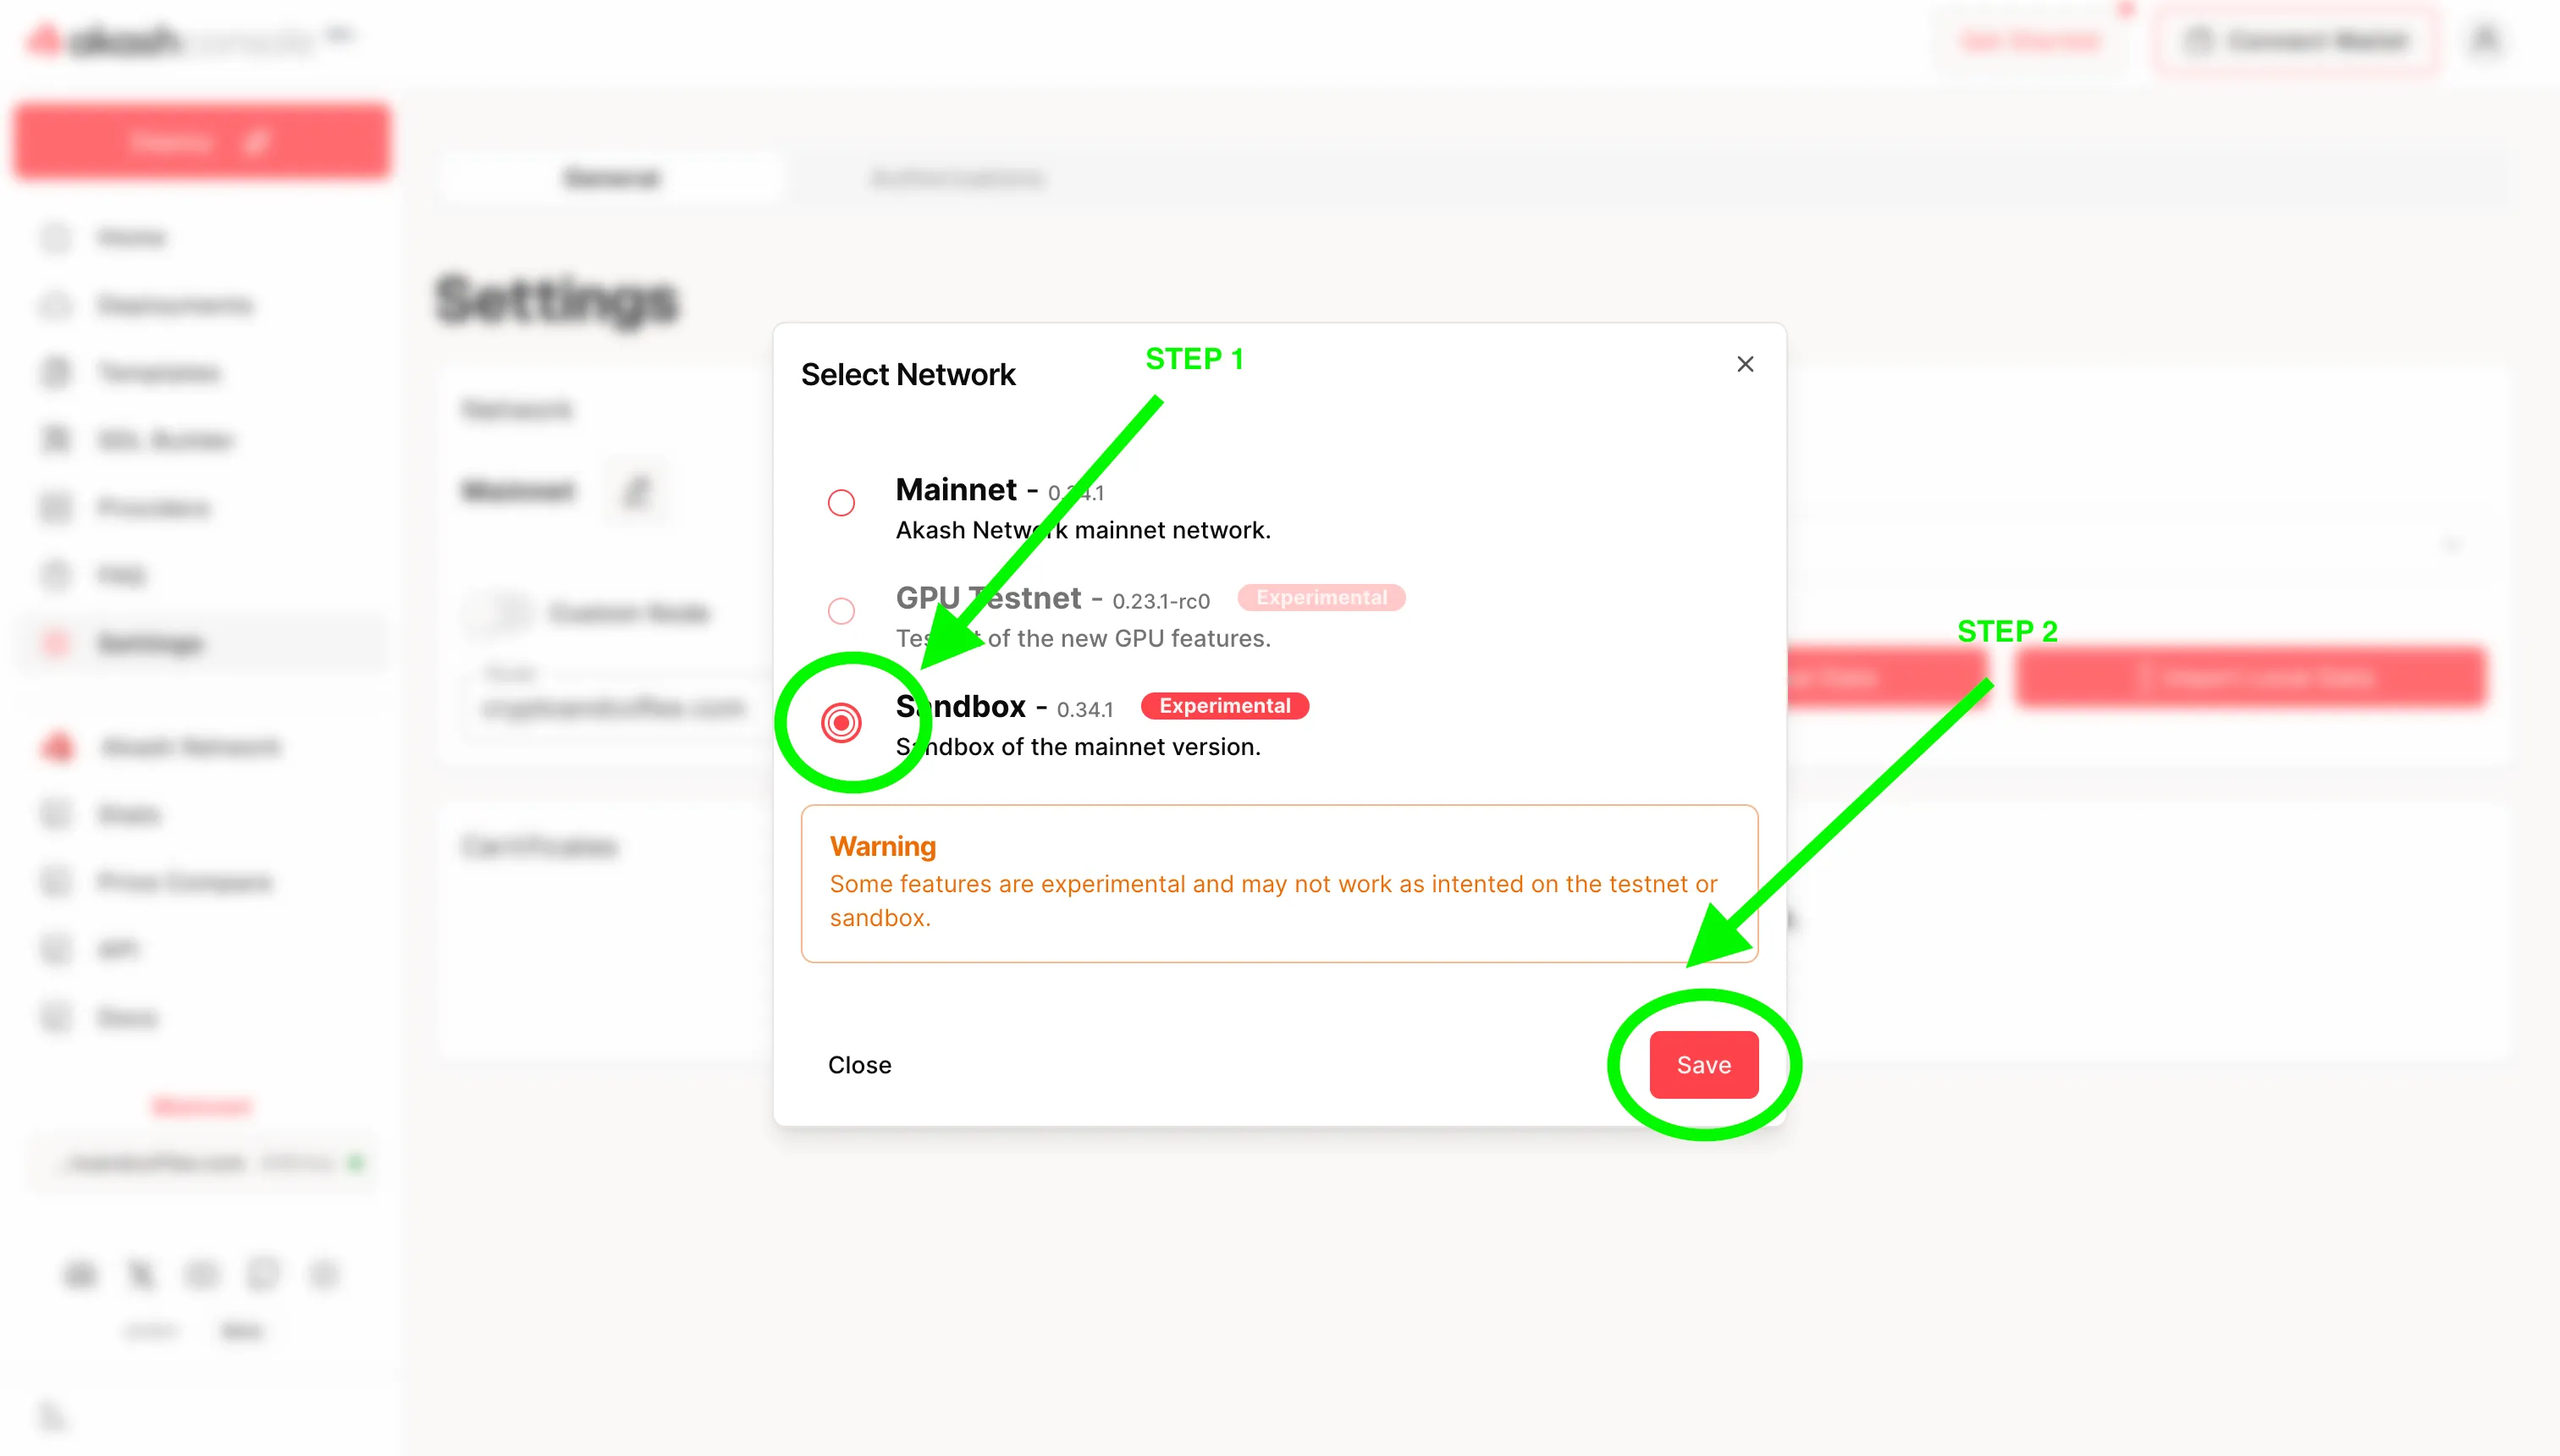
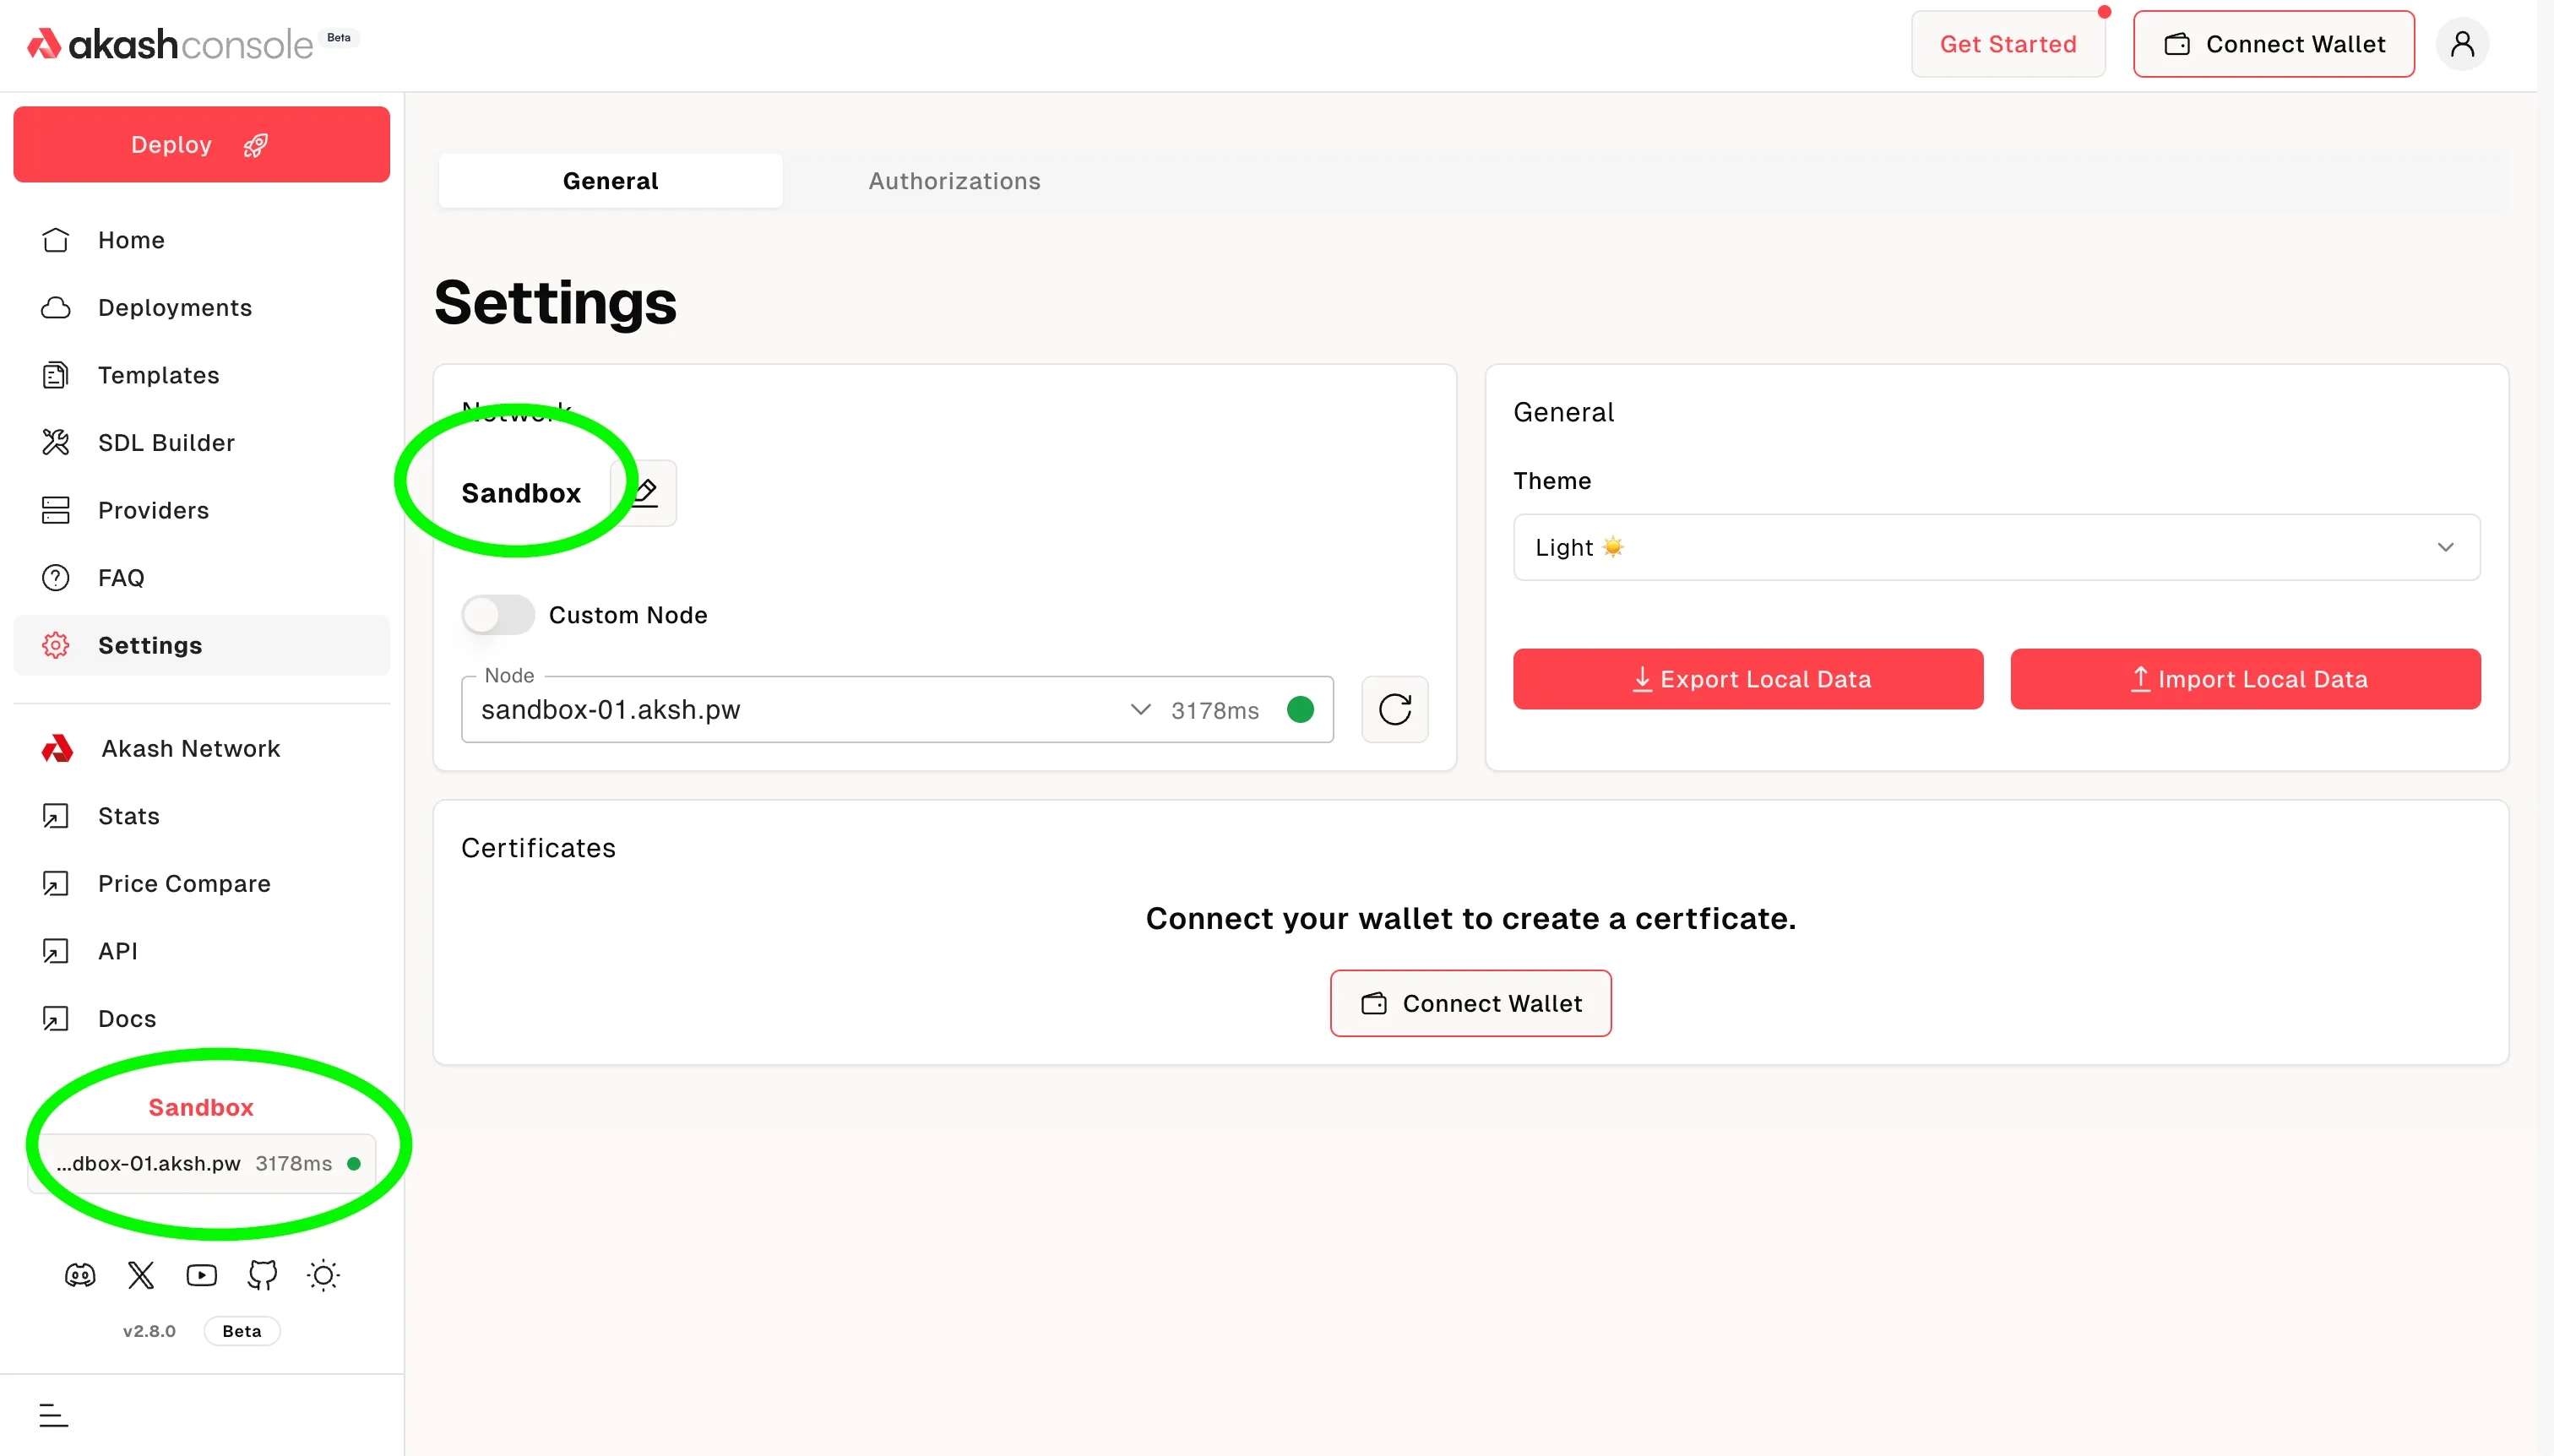
Your selected network would now be listed as Sandbox.
Keplr Account Selection and Funding
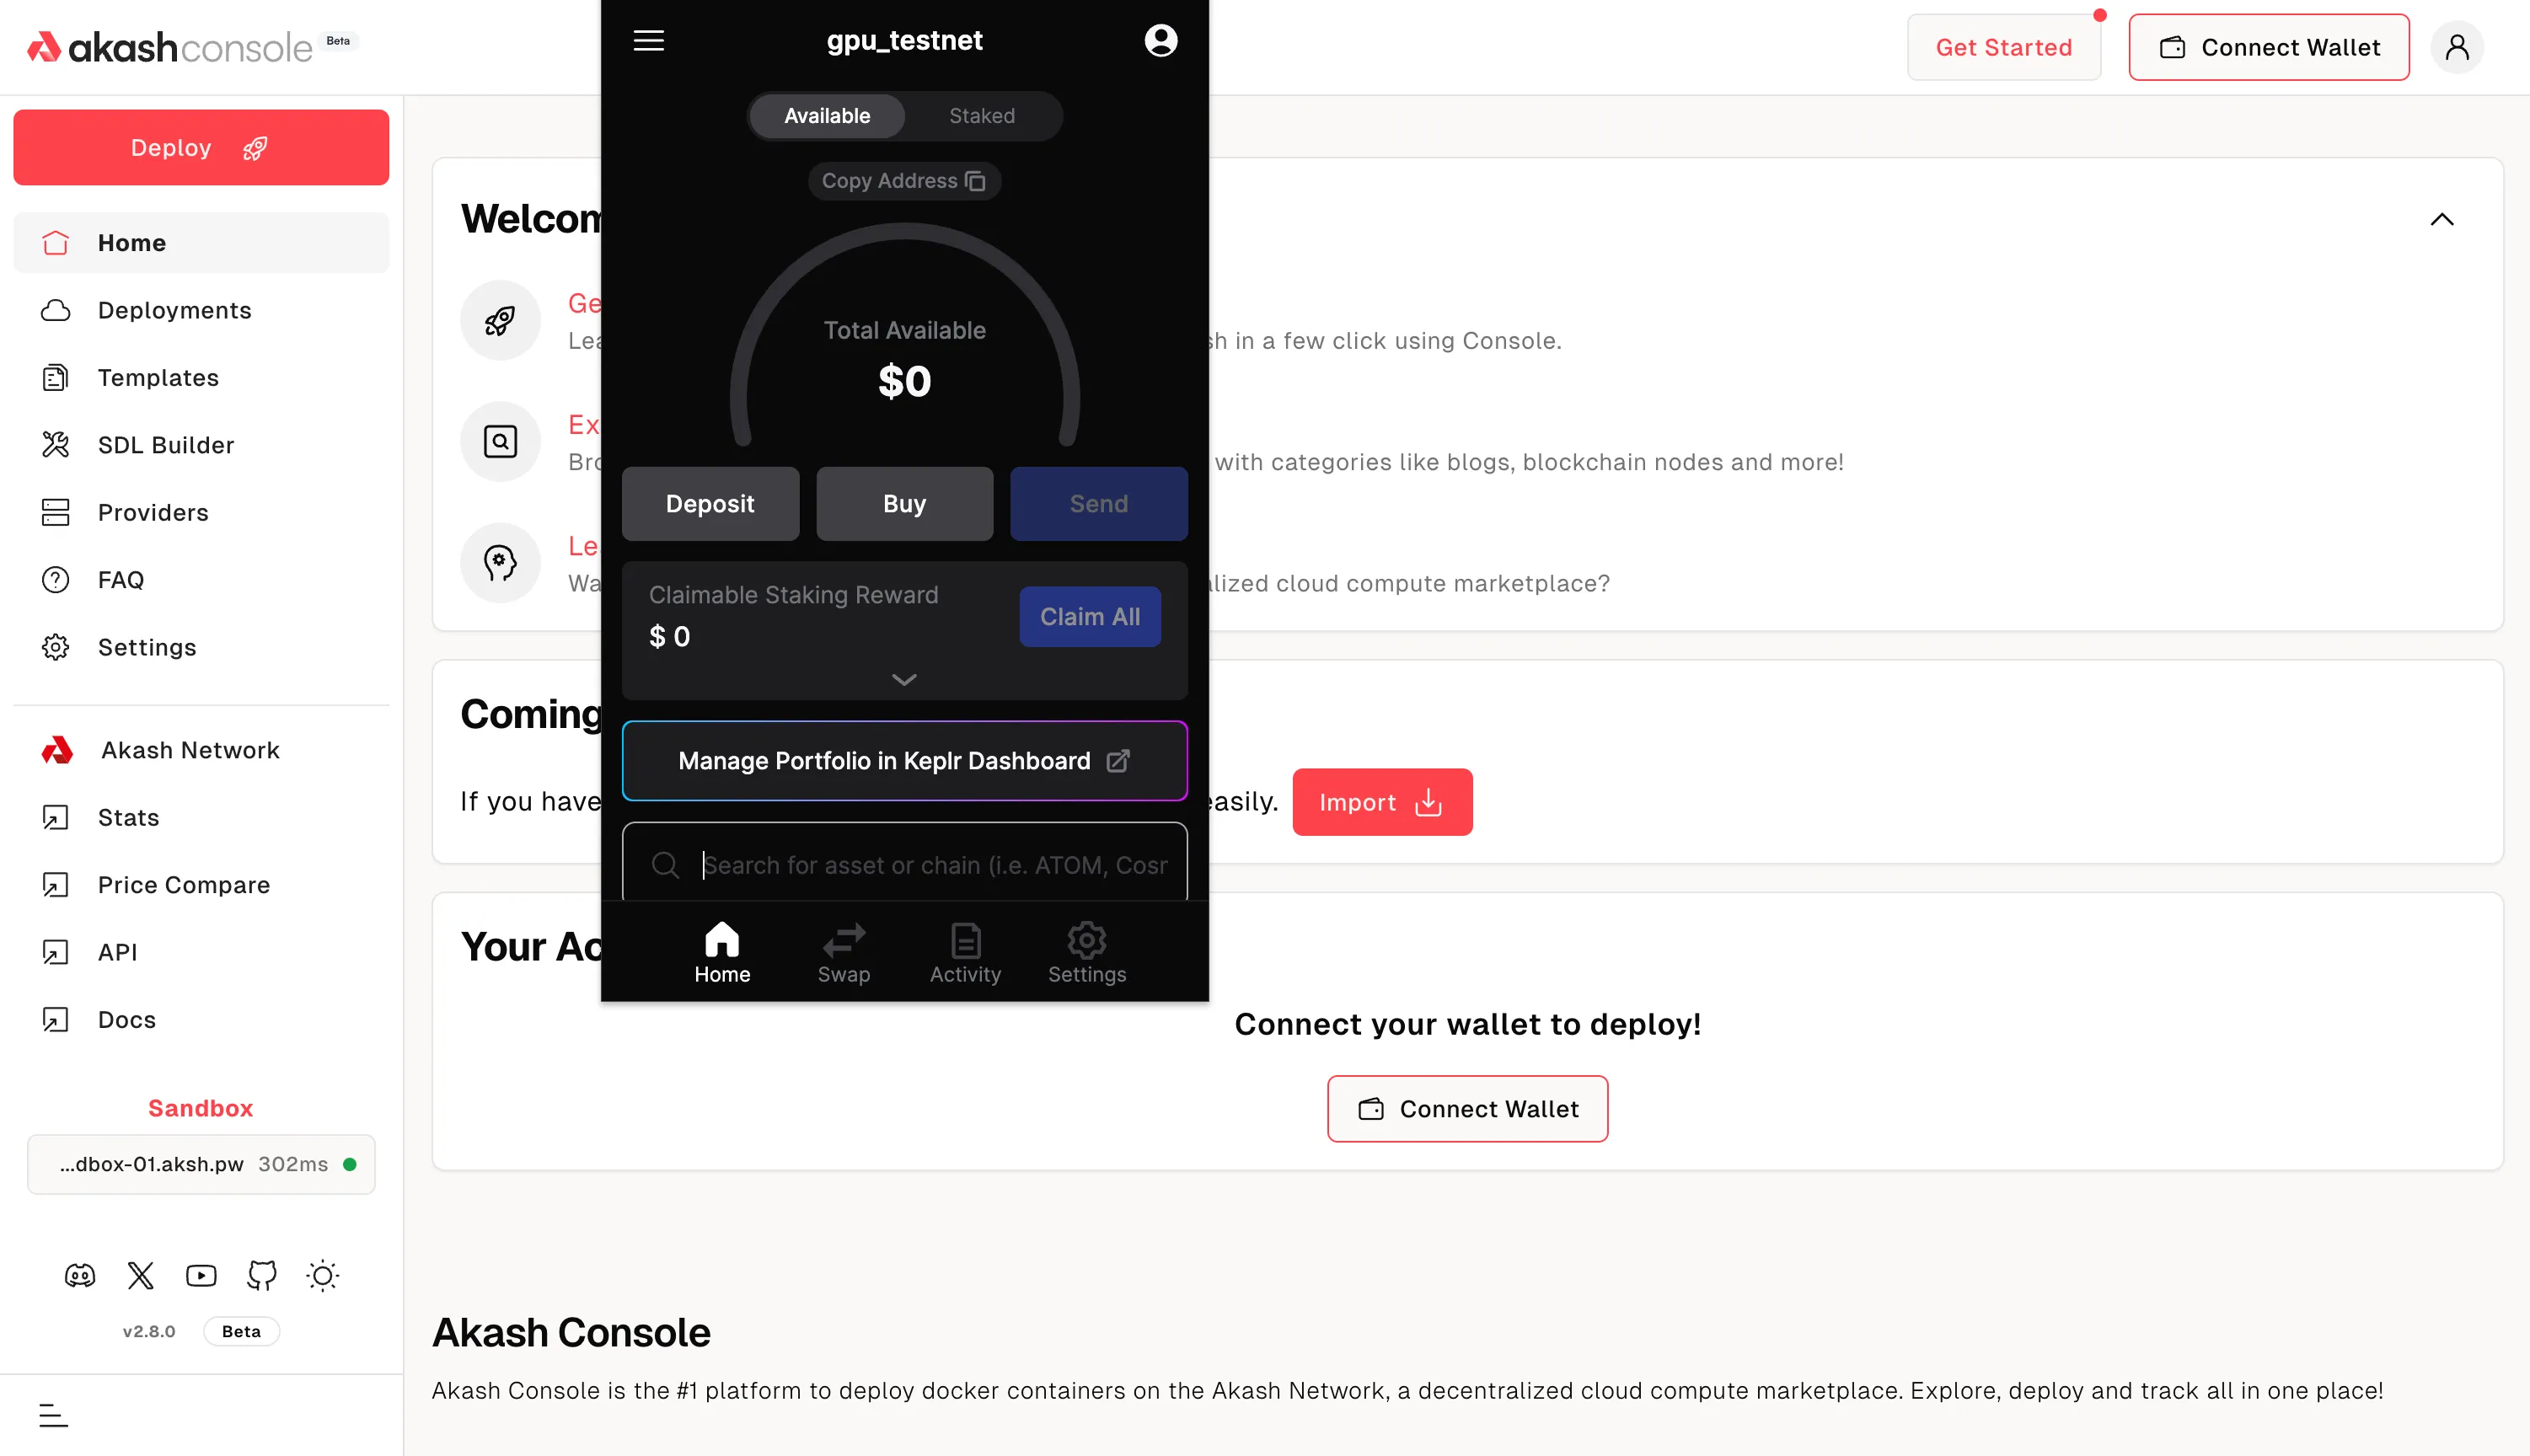
Keplr Account Selection
Select a pre-existing tAkash account within Keplr. If you do not have a pre-existing Akash account - use the Add Wallet feature within Keplr to create a new account.
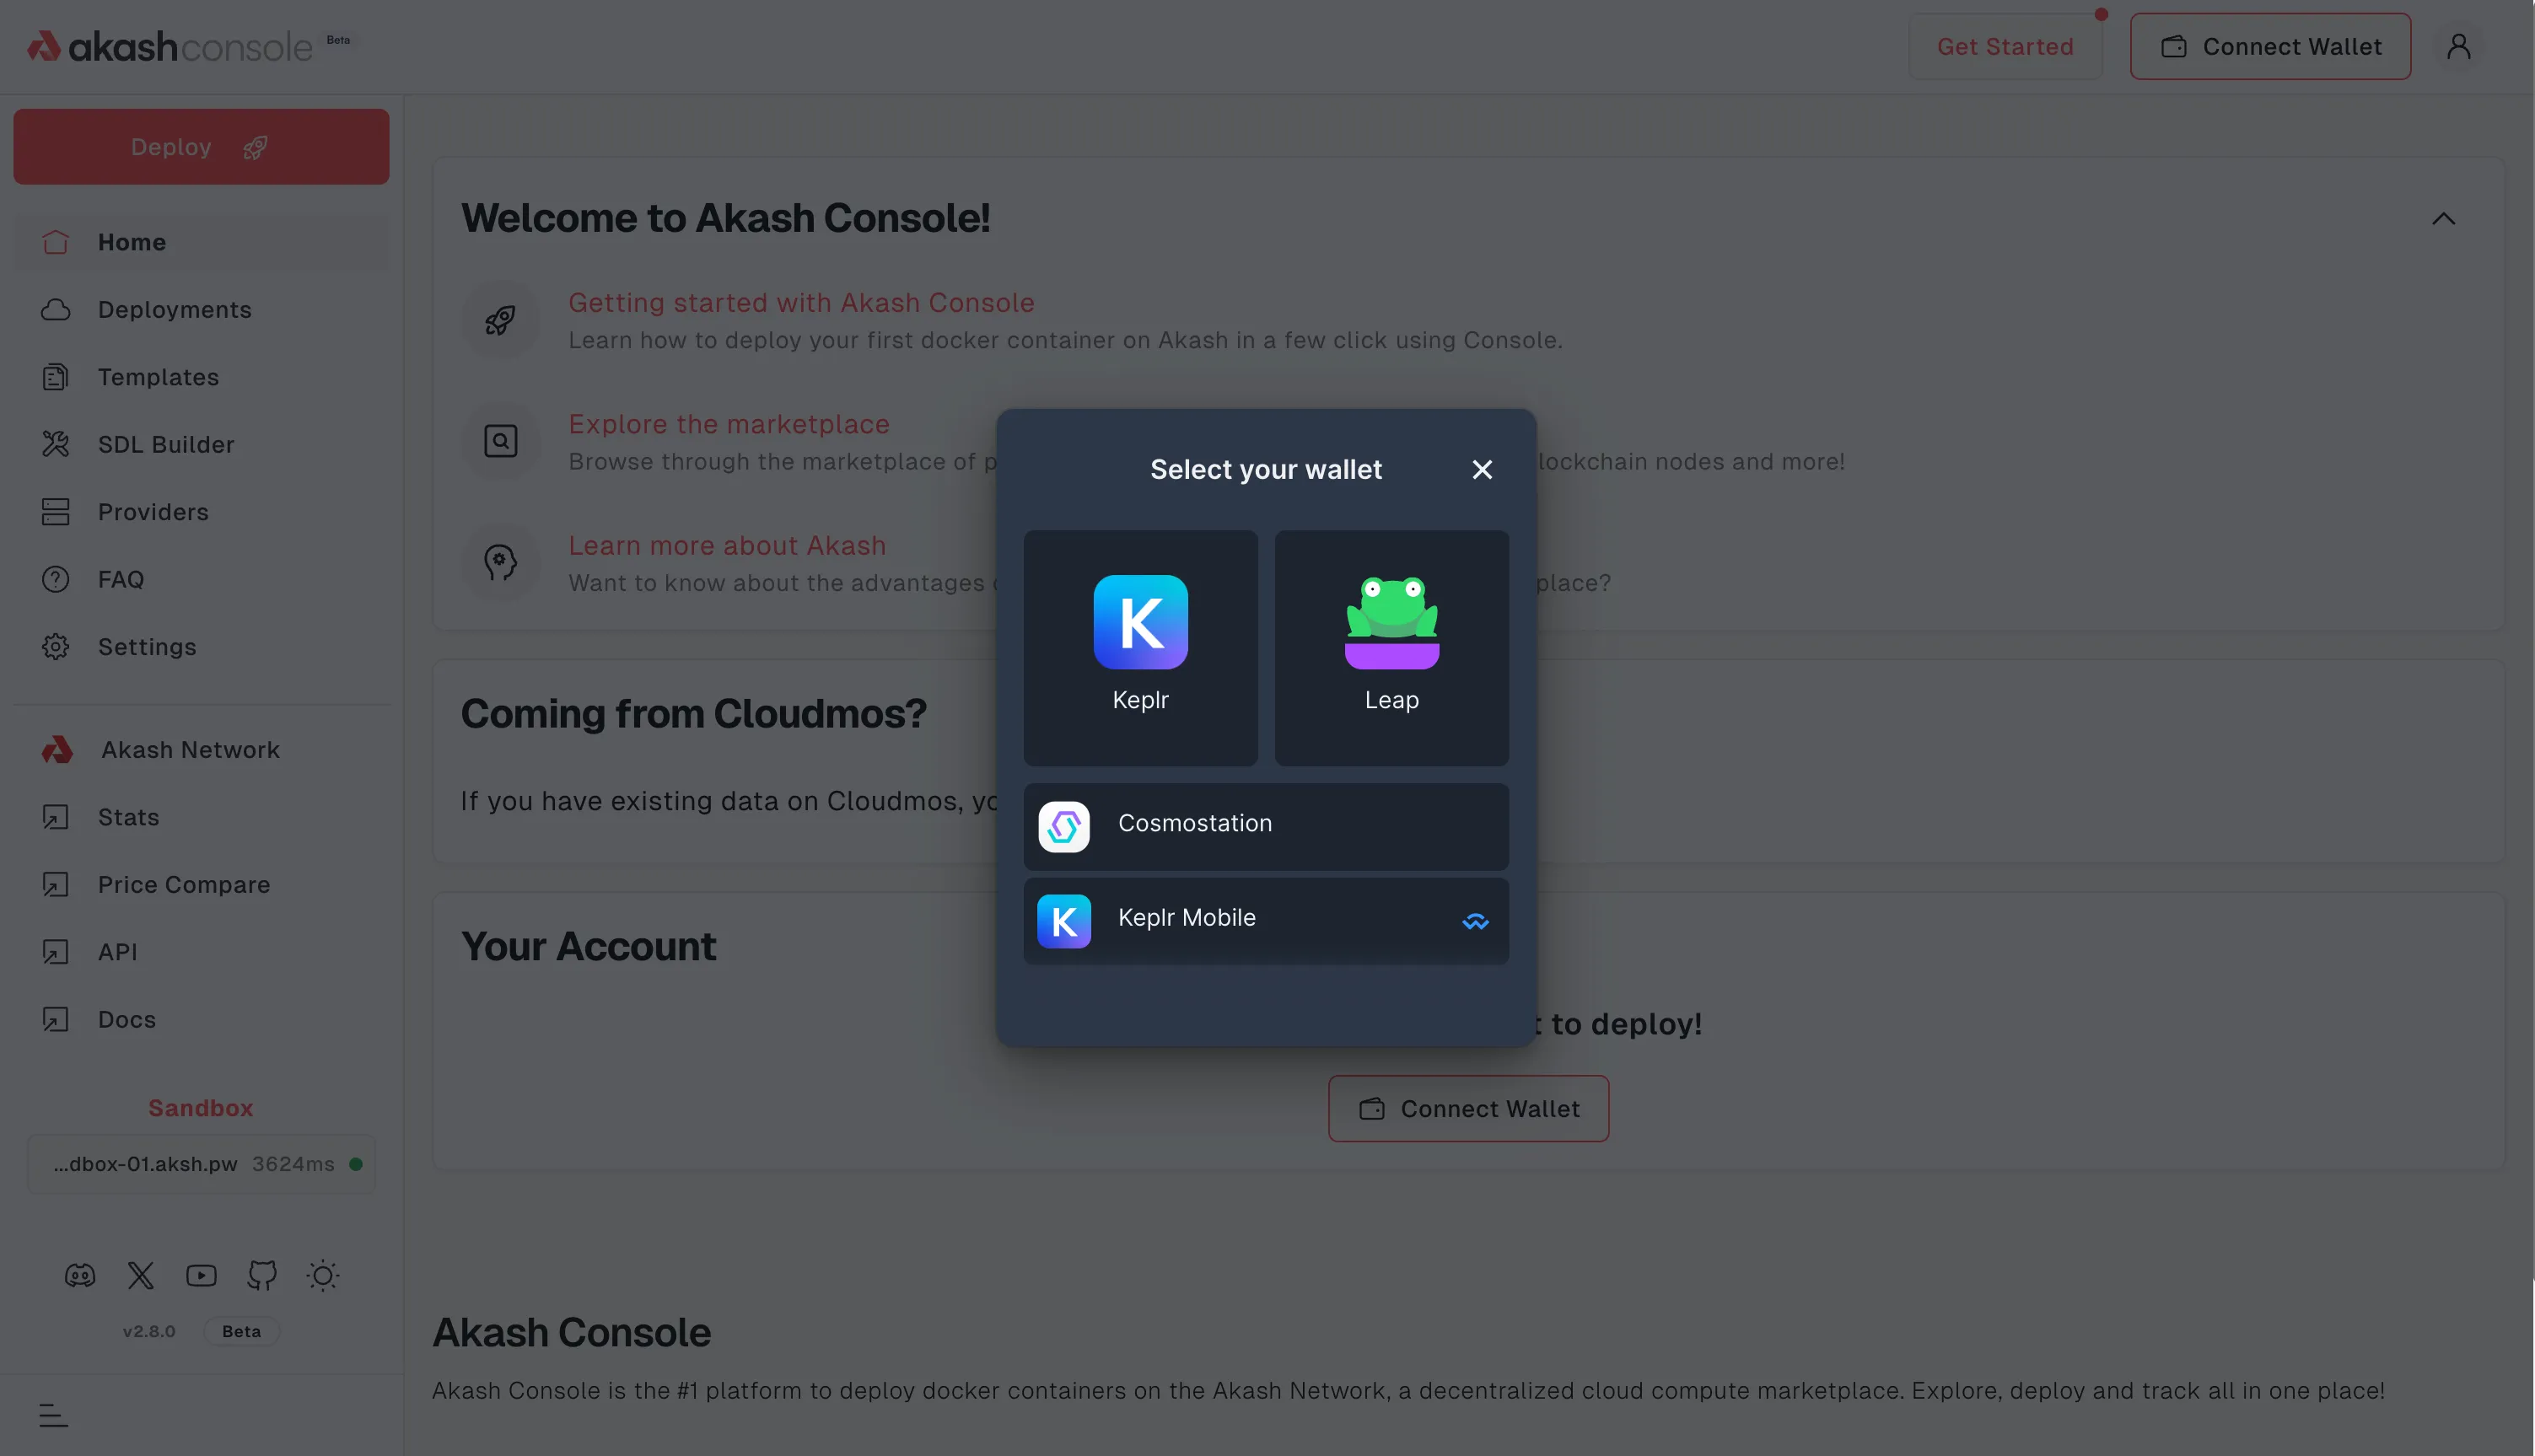
Connect Wallet
Use the Connect Wallet button to connect the account selected in Keplr in the prior step to the Akash Console. Select Keplr from the wallet selector.
Fund Selected Account via Testnet Faucet
Visit the Testnet faucet here to fund your provider account.
Enter the address of the account selected in previous step. The address of the account can be copied from the Keplr wallet.
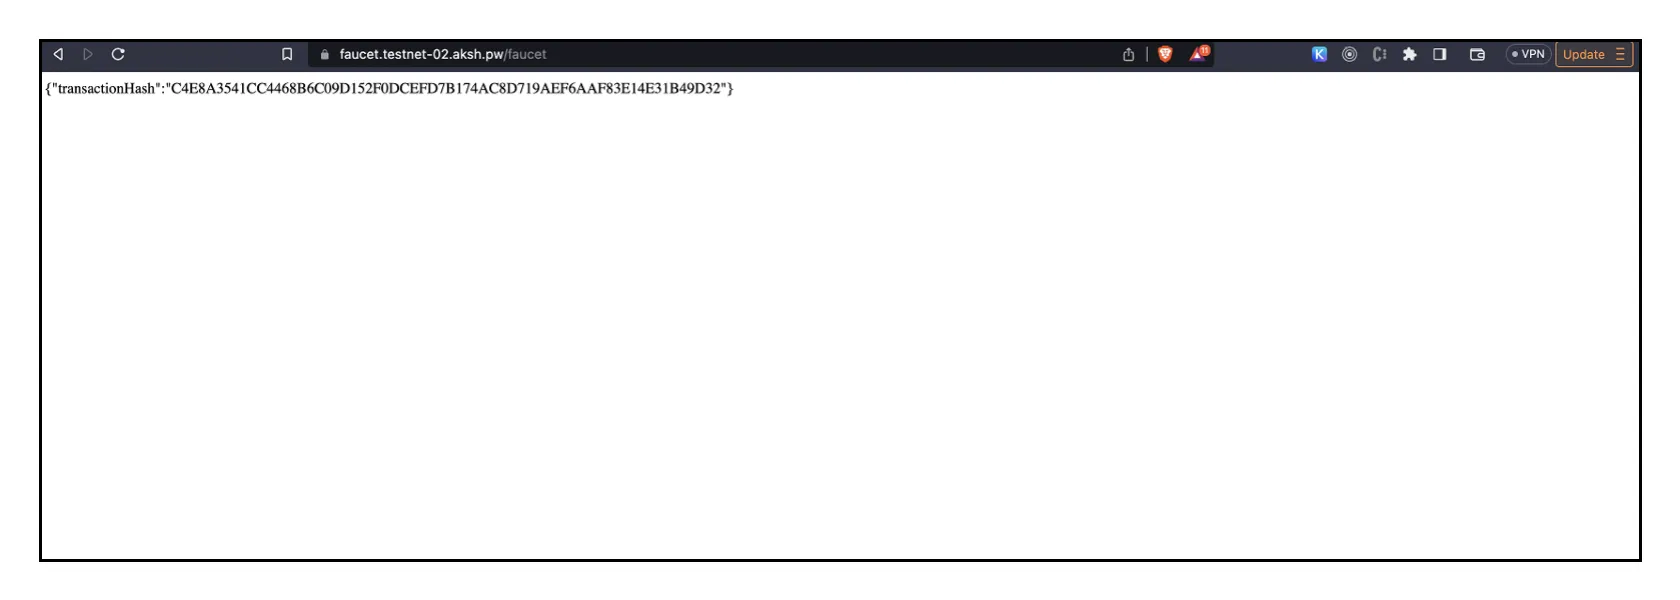
Example Use of Akash Testnet Faucet
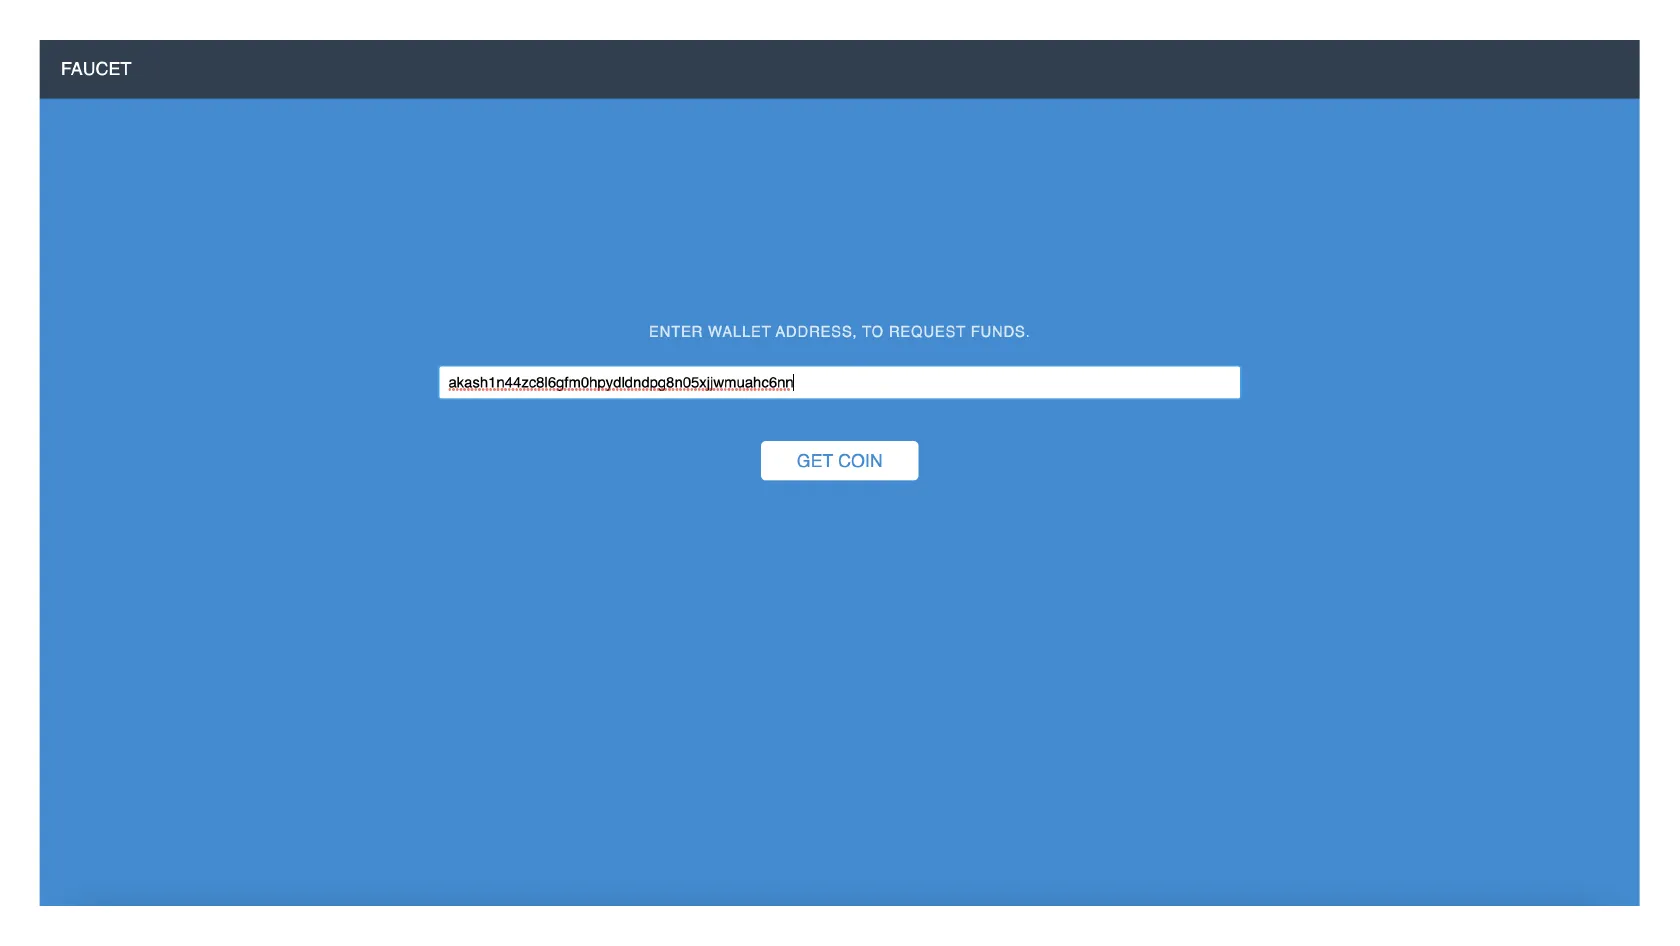
Example/Expected Faucet Output
The following screen shot shows an example/expected output following successful submission to the Testnet faucet. Note that the displayed transaction hash will be unique and different than the one displayed in this example. Receipt of this screen confirms successful funding of your account with 25AKT.
Minesweeper Deployment Example
In this section we will use the Akash Console to launch an example Minesweeper deployment on the Akash Testnet. You can follow the same process for any other workload so long as it is containerized and you have an appropriate SDL.
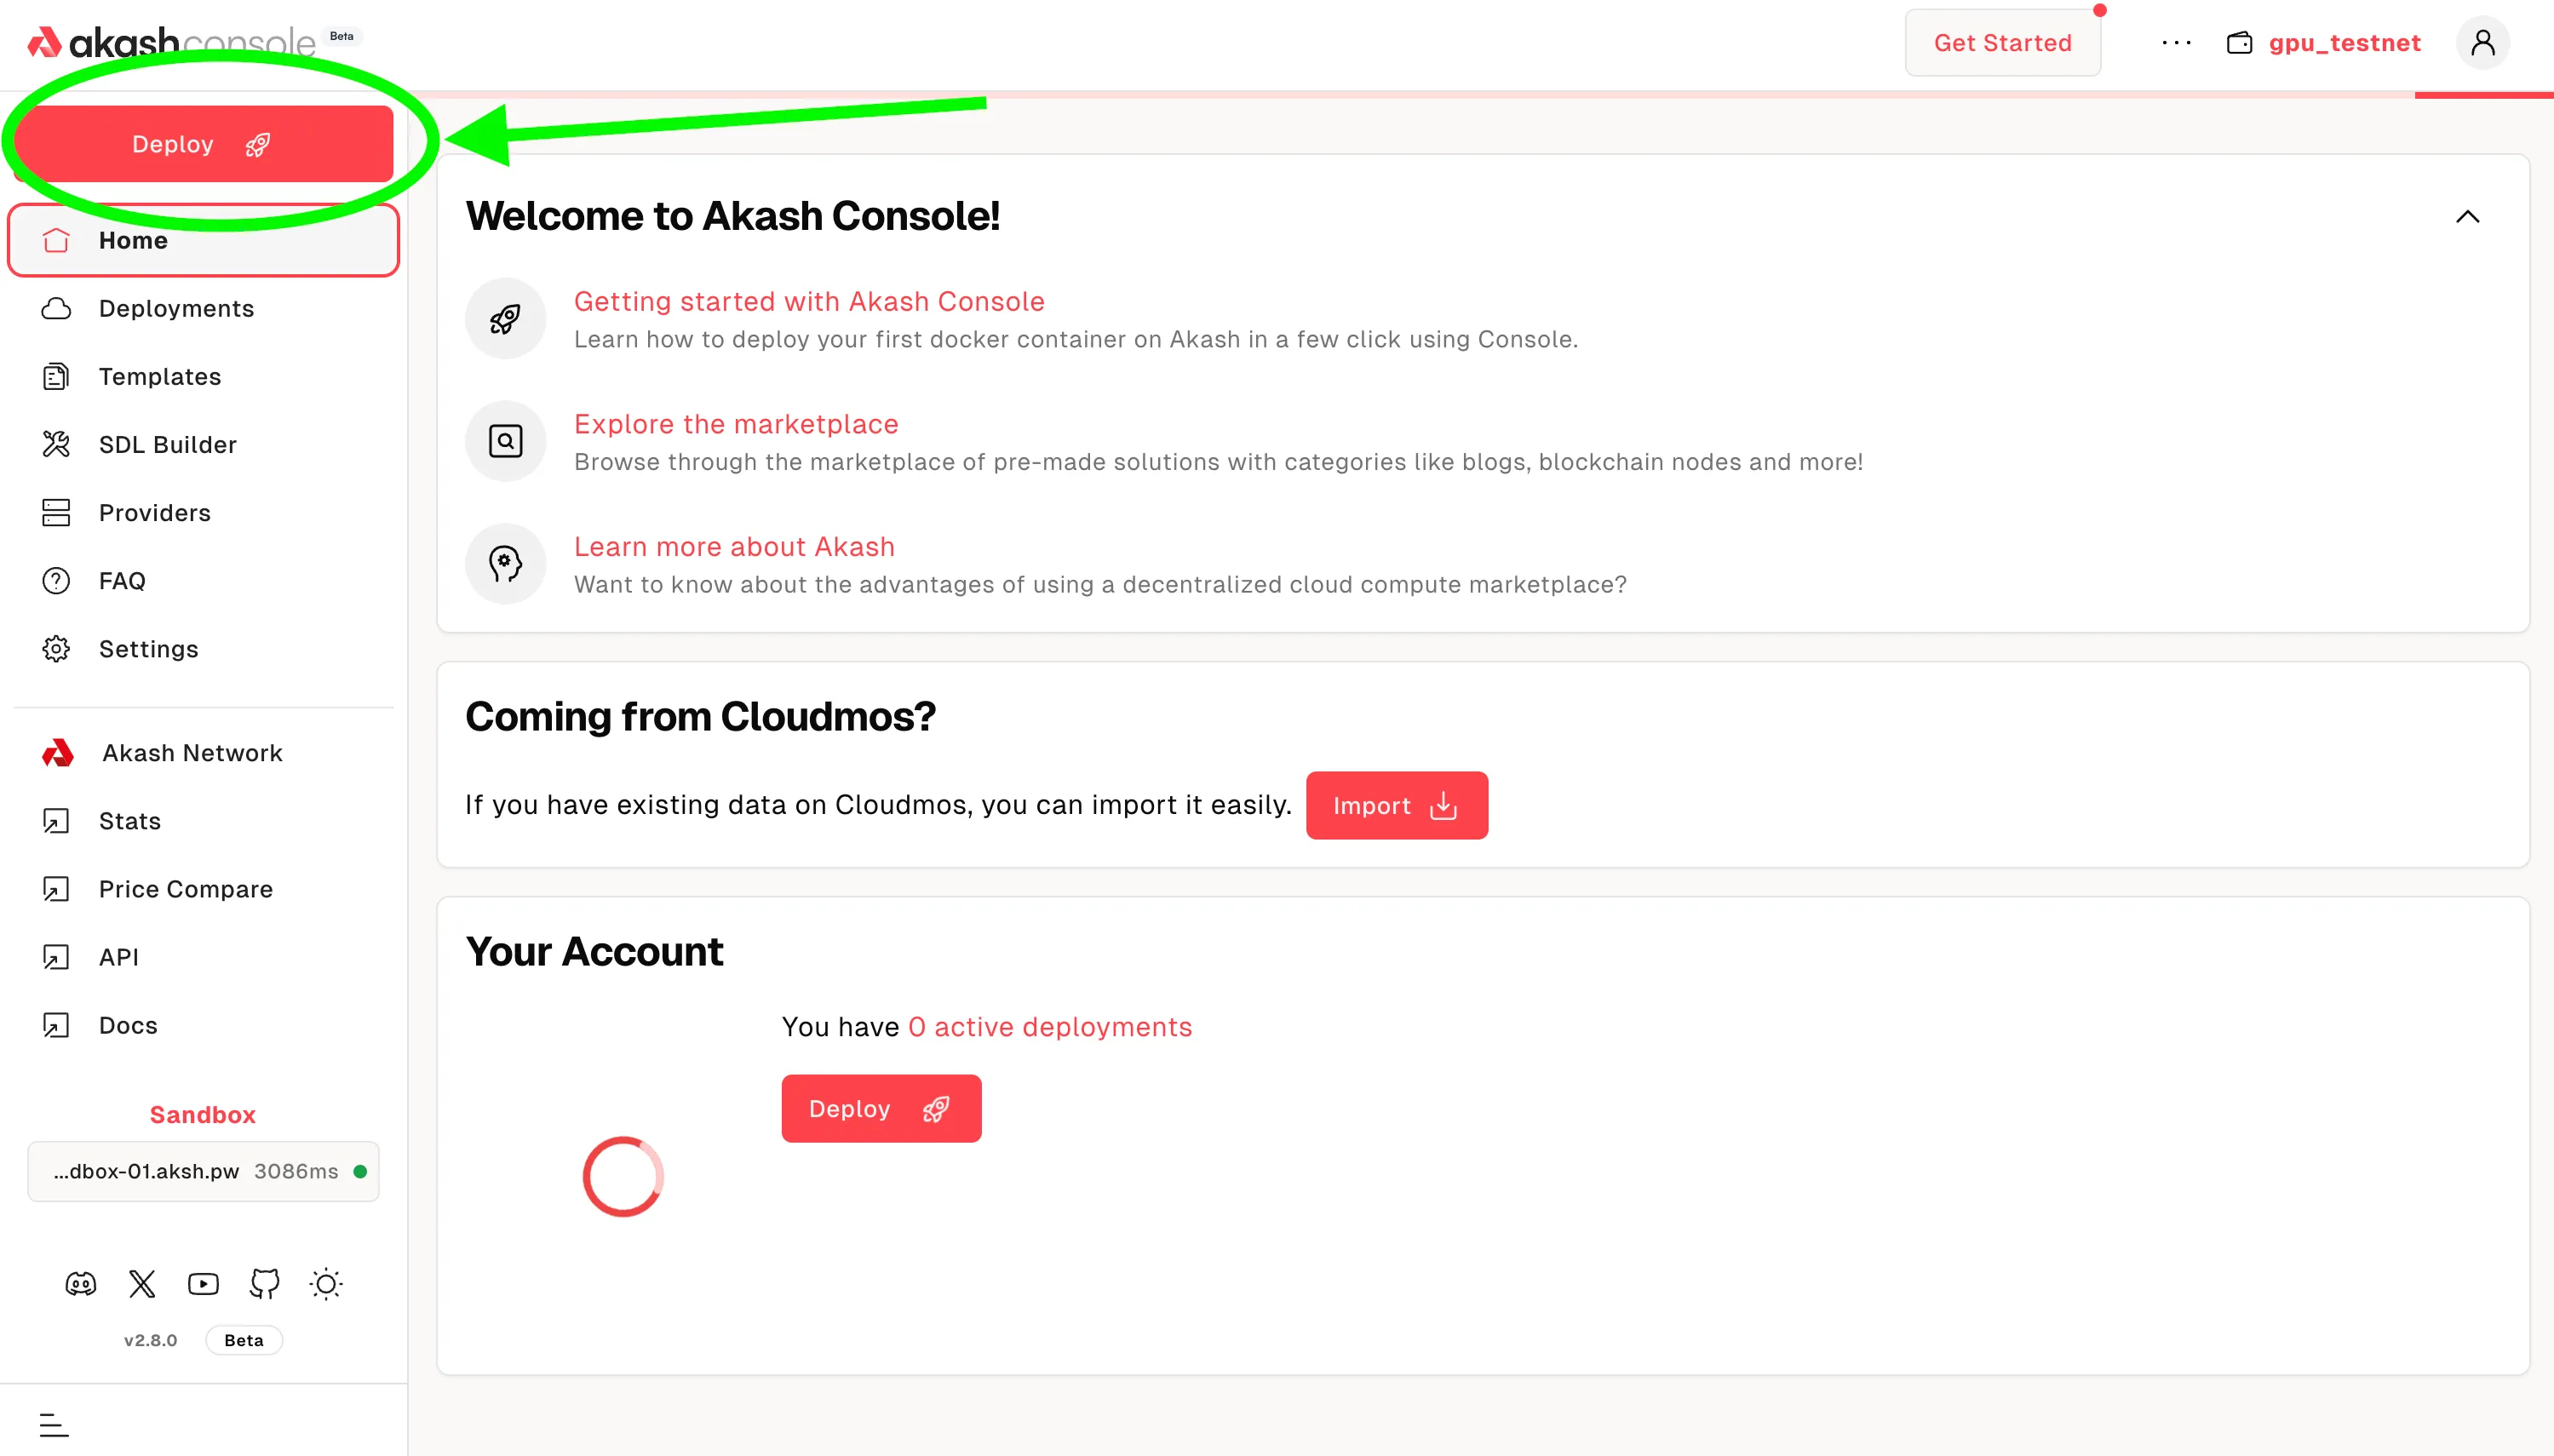
STEP 1 - Create the Deployment
- Begin the process of creating a new deployment by clicking opn the
Deploybutton on the top left corner of the page.
- A number of deployment types are presented in the gallery
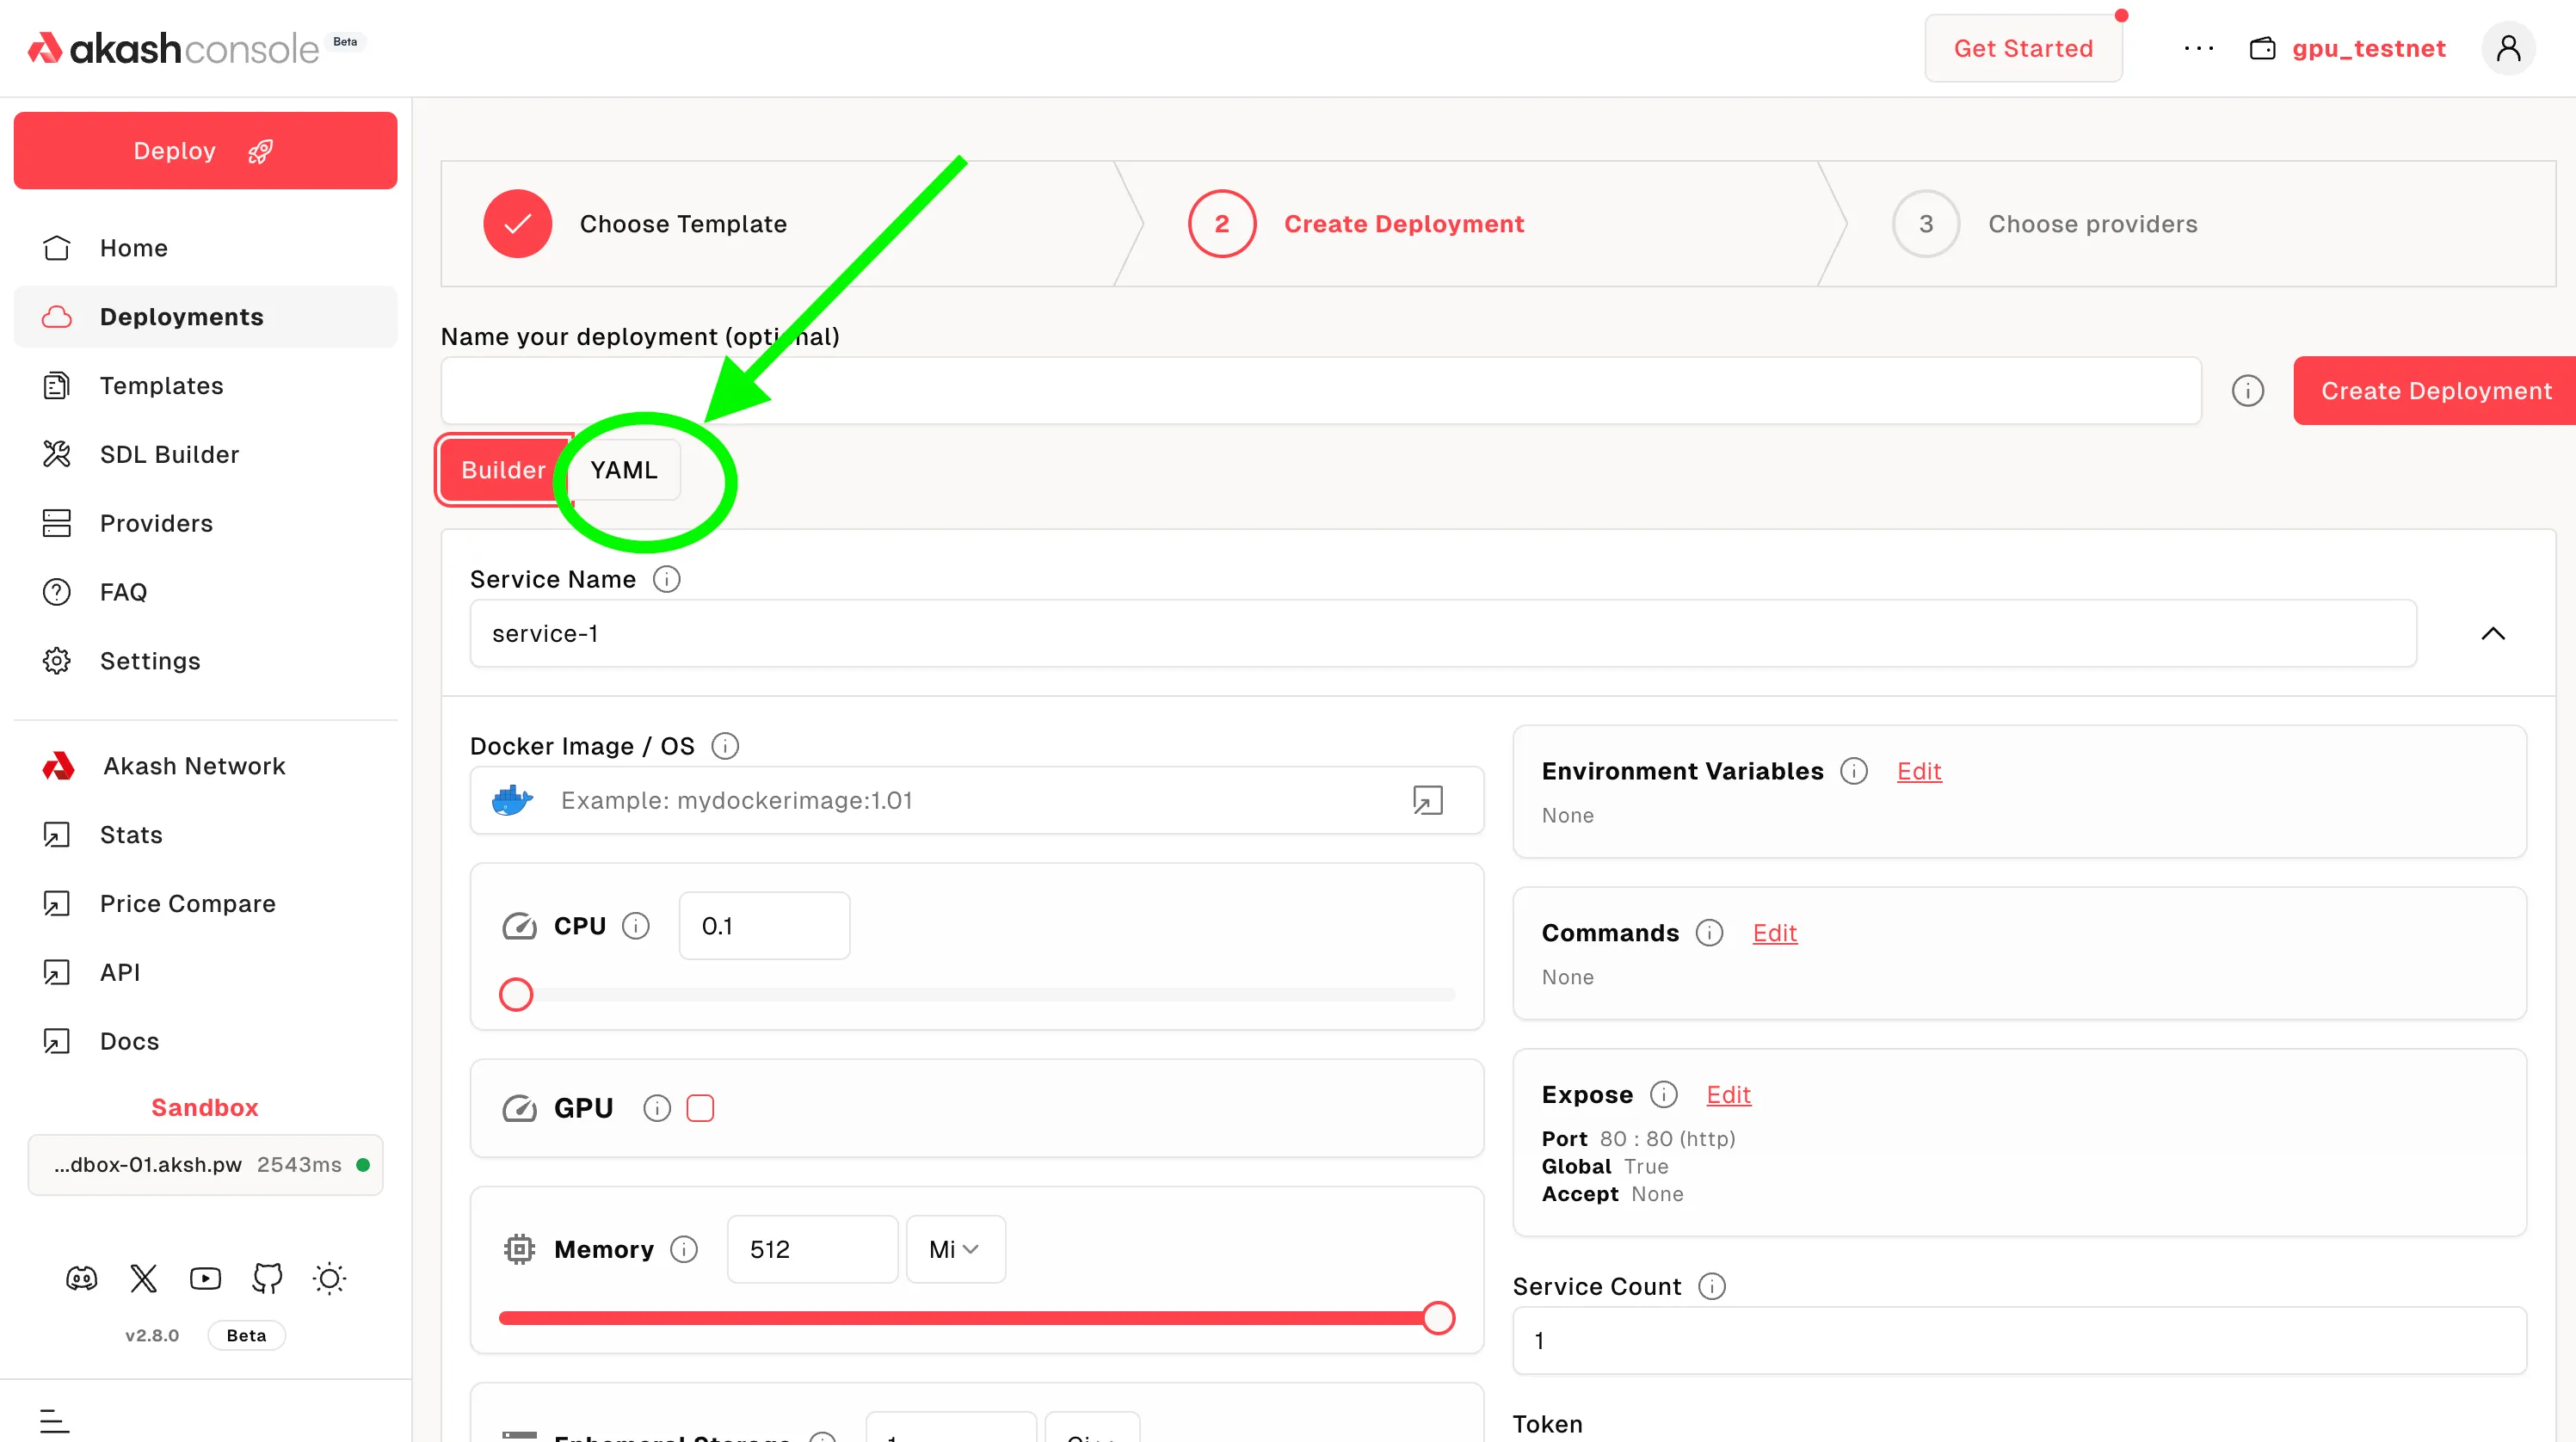
- For our purposes we will import a SDL for the Minesweeper deployment example. Select
Build your templateto proceed.

You would be redirected to the page below. Click on the YAML button.
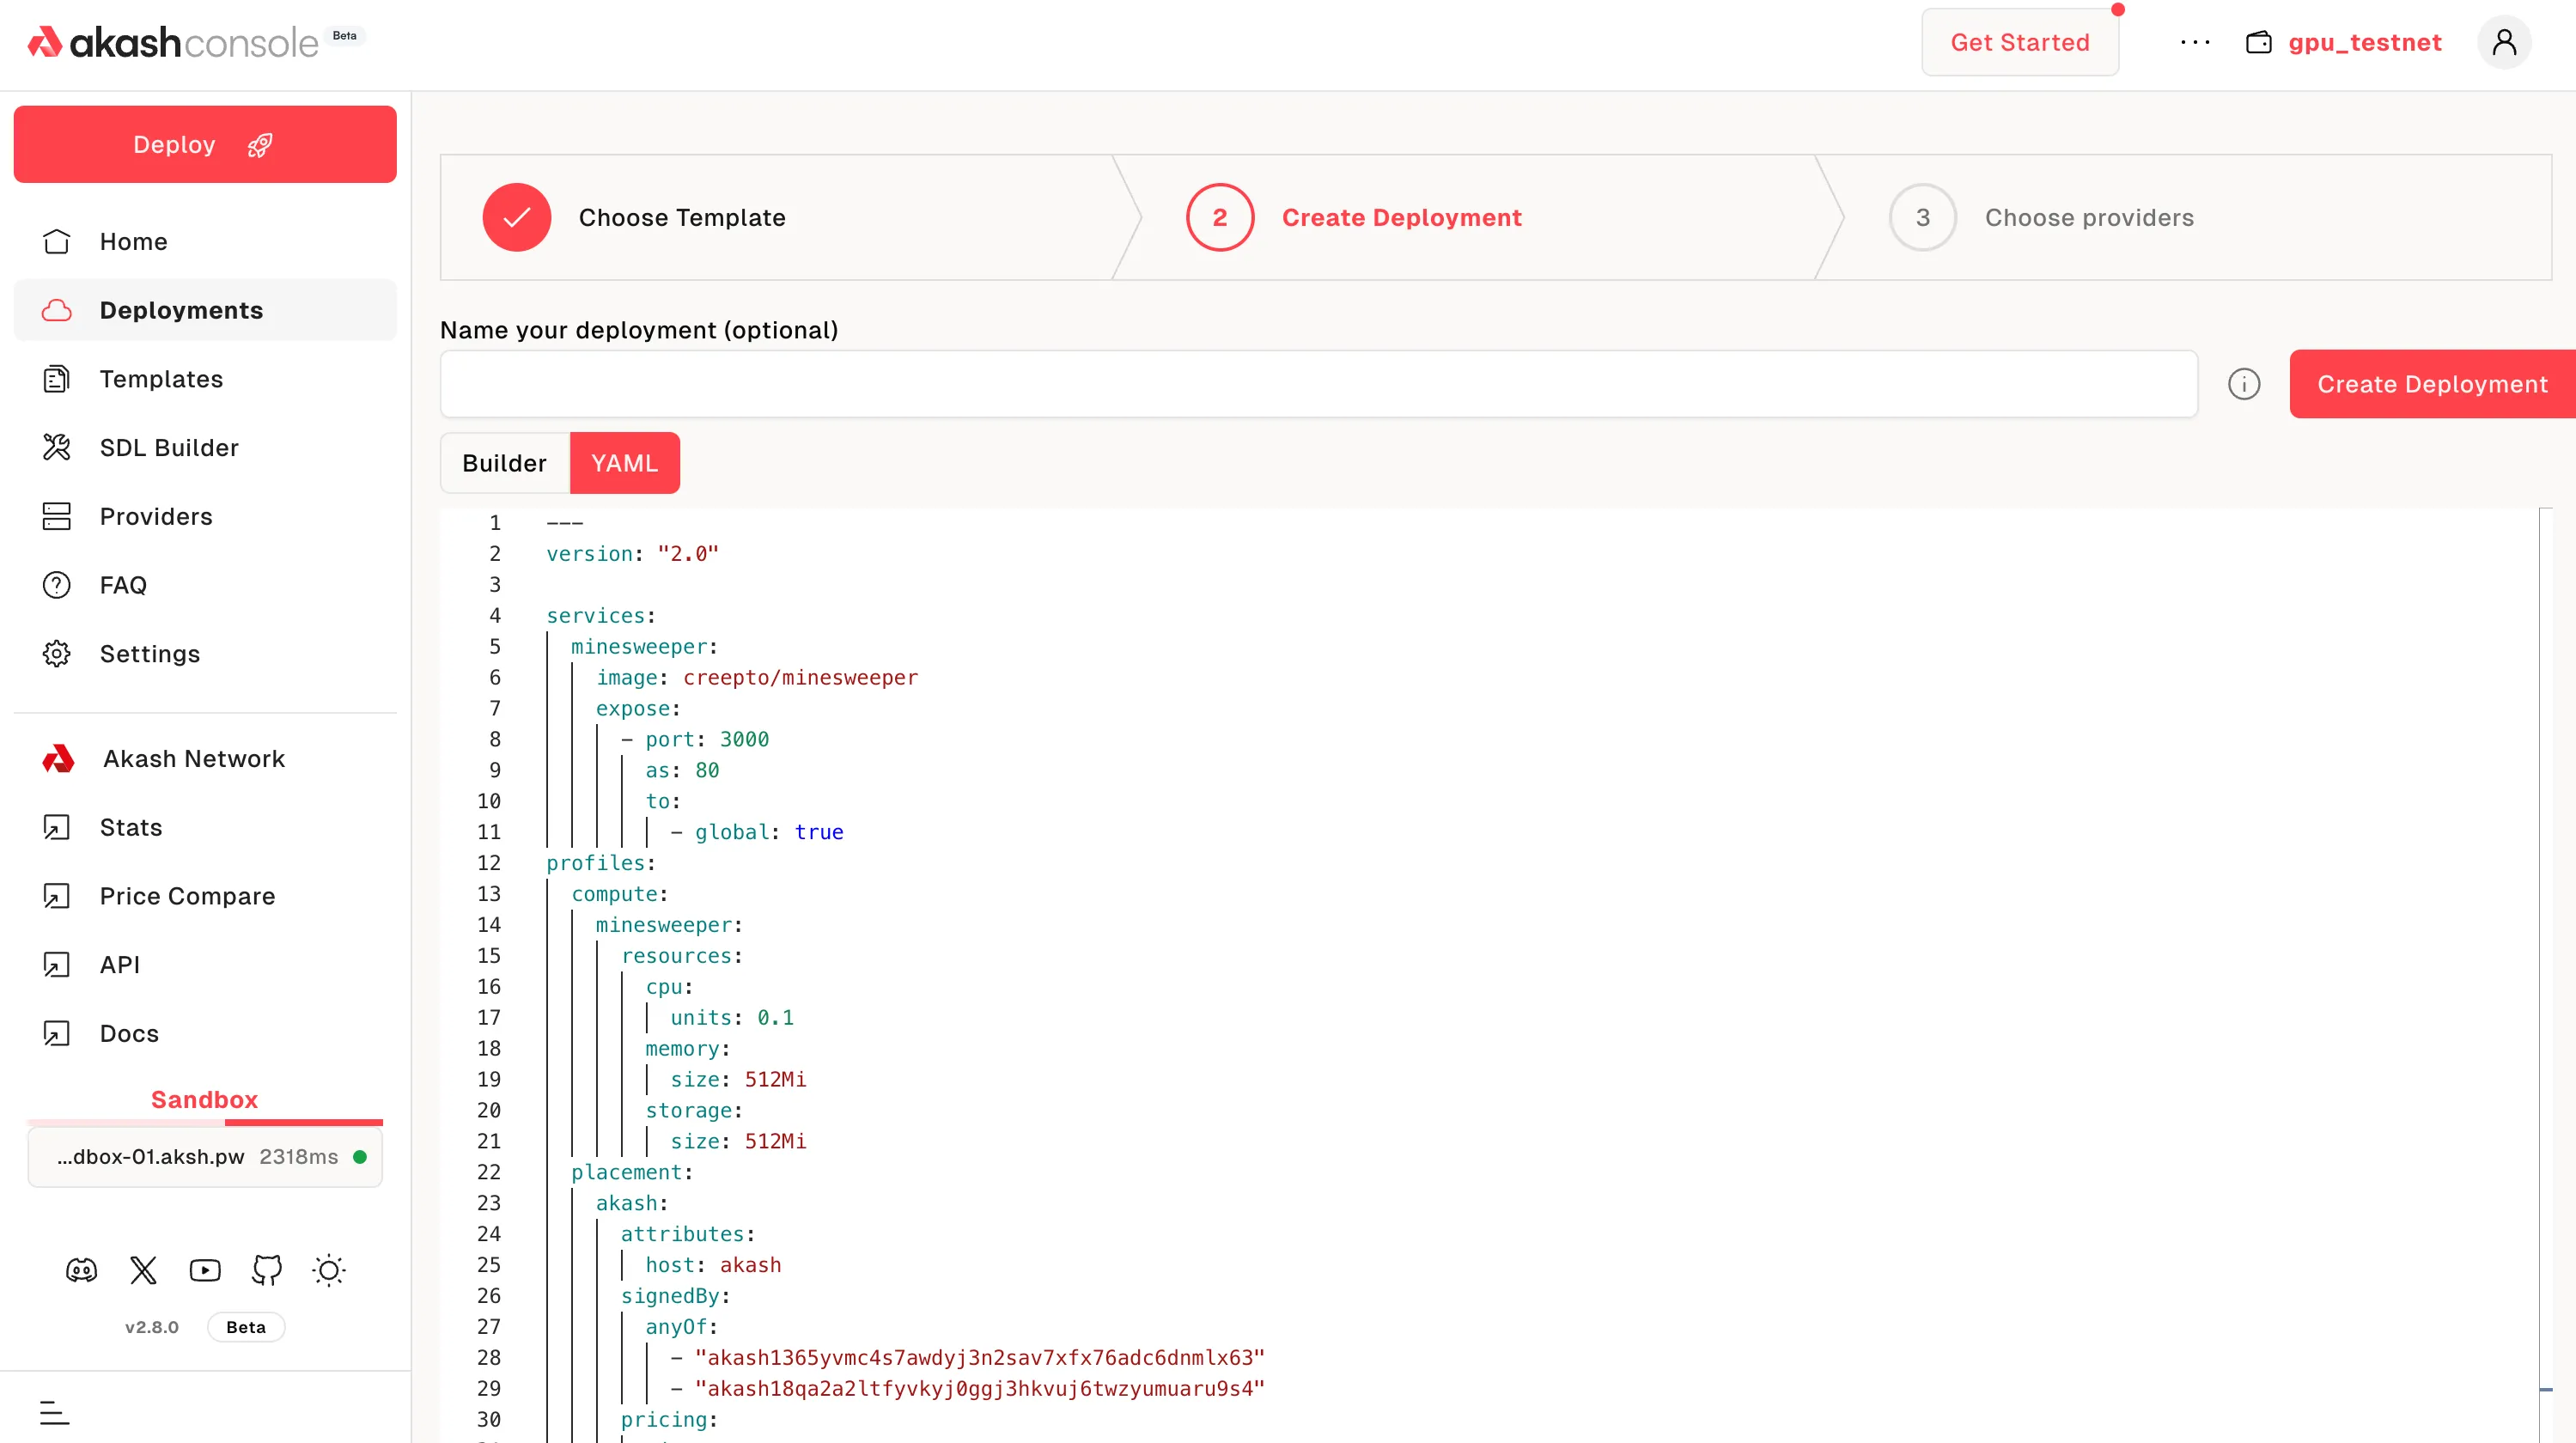
Copy Awesome Akash Minesweeper SDL
- The Minesweeper SDL (Stack Definition Language) file - which is the recipe for an Akash Deployment - can be found in the Awesome Akash repository here.
- Copy the contents of the SDL into the YAML C editor as demonstrated below.
- Select
Save & Closewhen complete
Name Deployment and Proceed
- Optionally assign the deployment a useful/descript name
- Select
Create Deploymentwhen complete to proceed to the next step
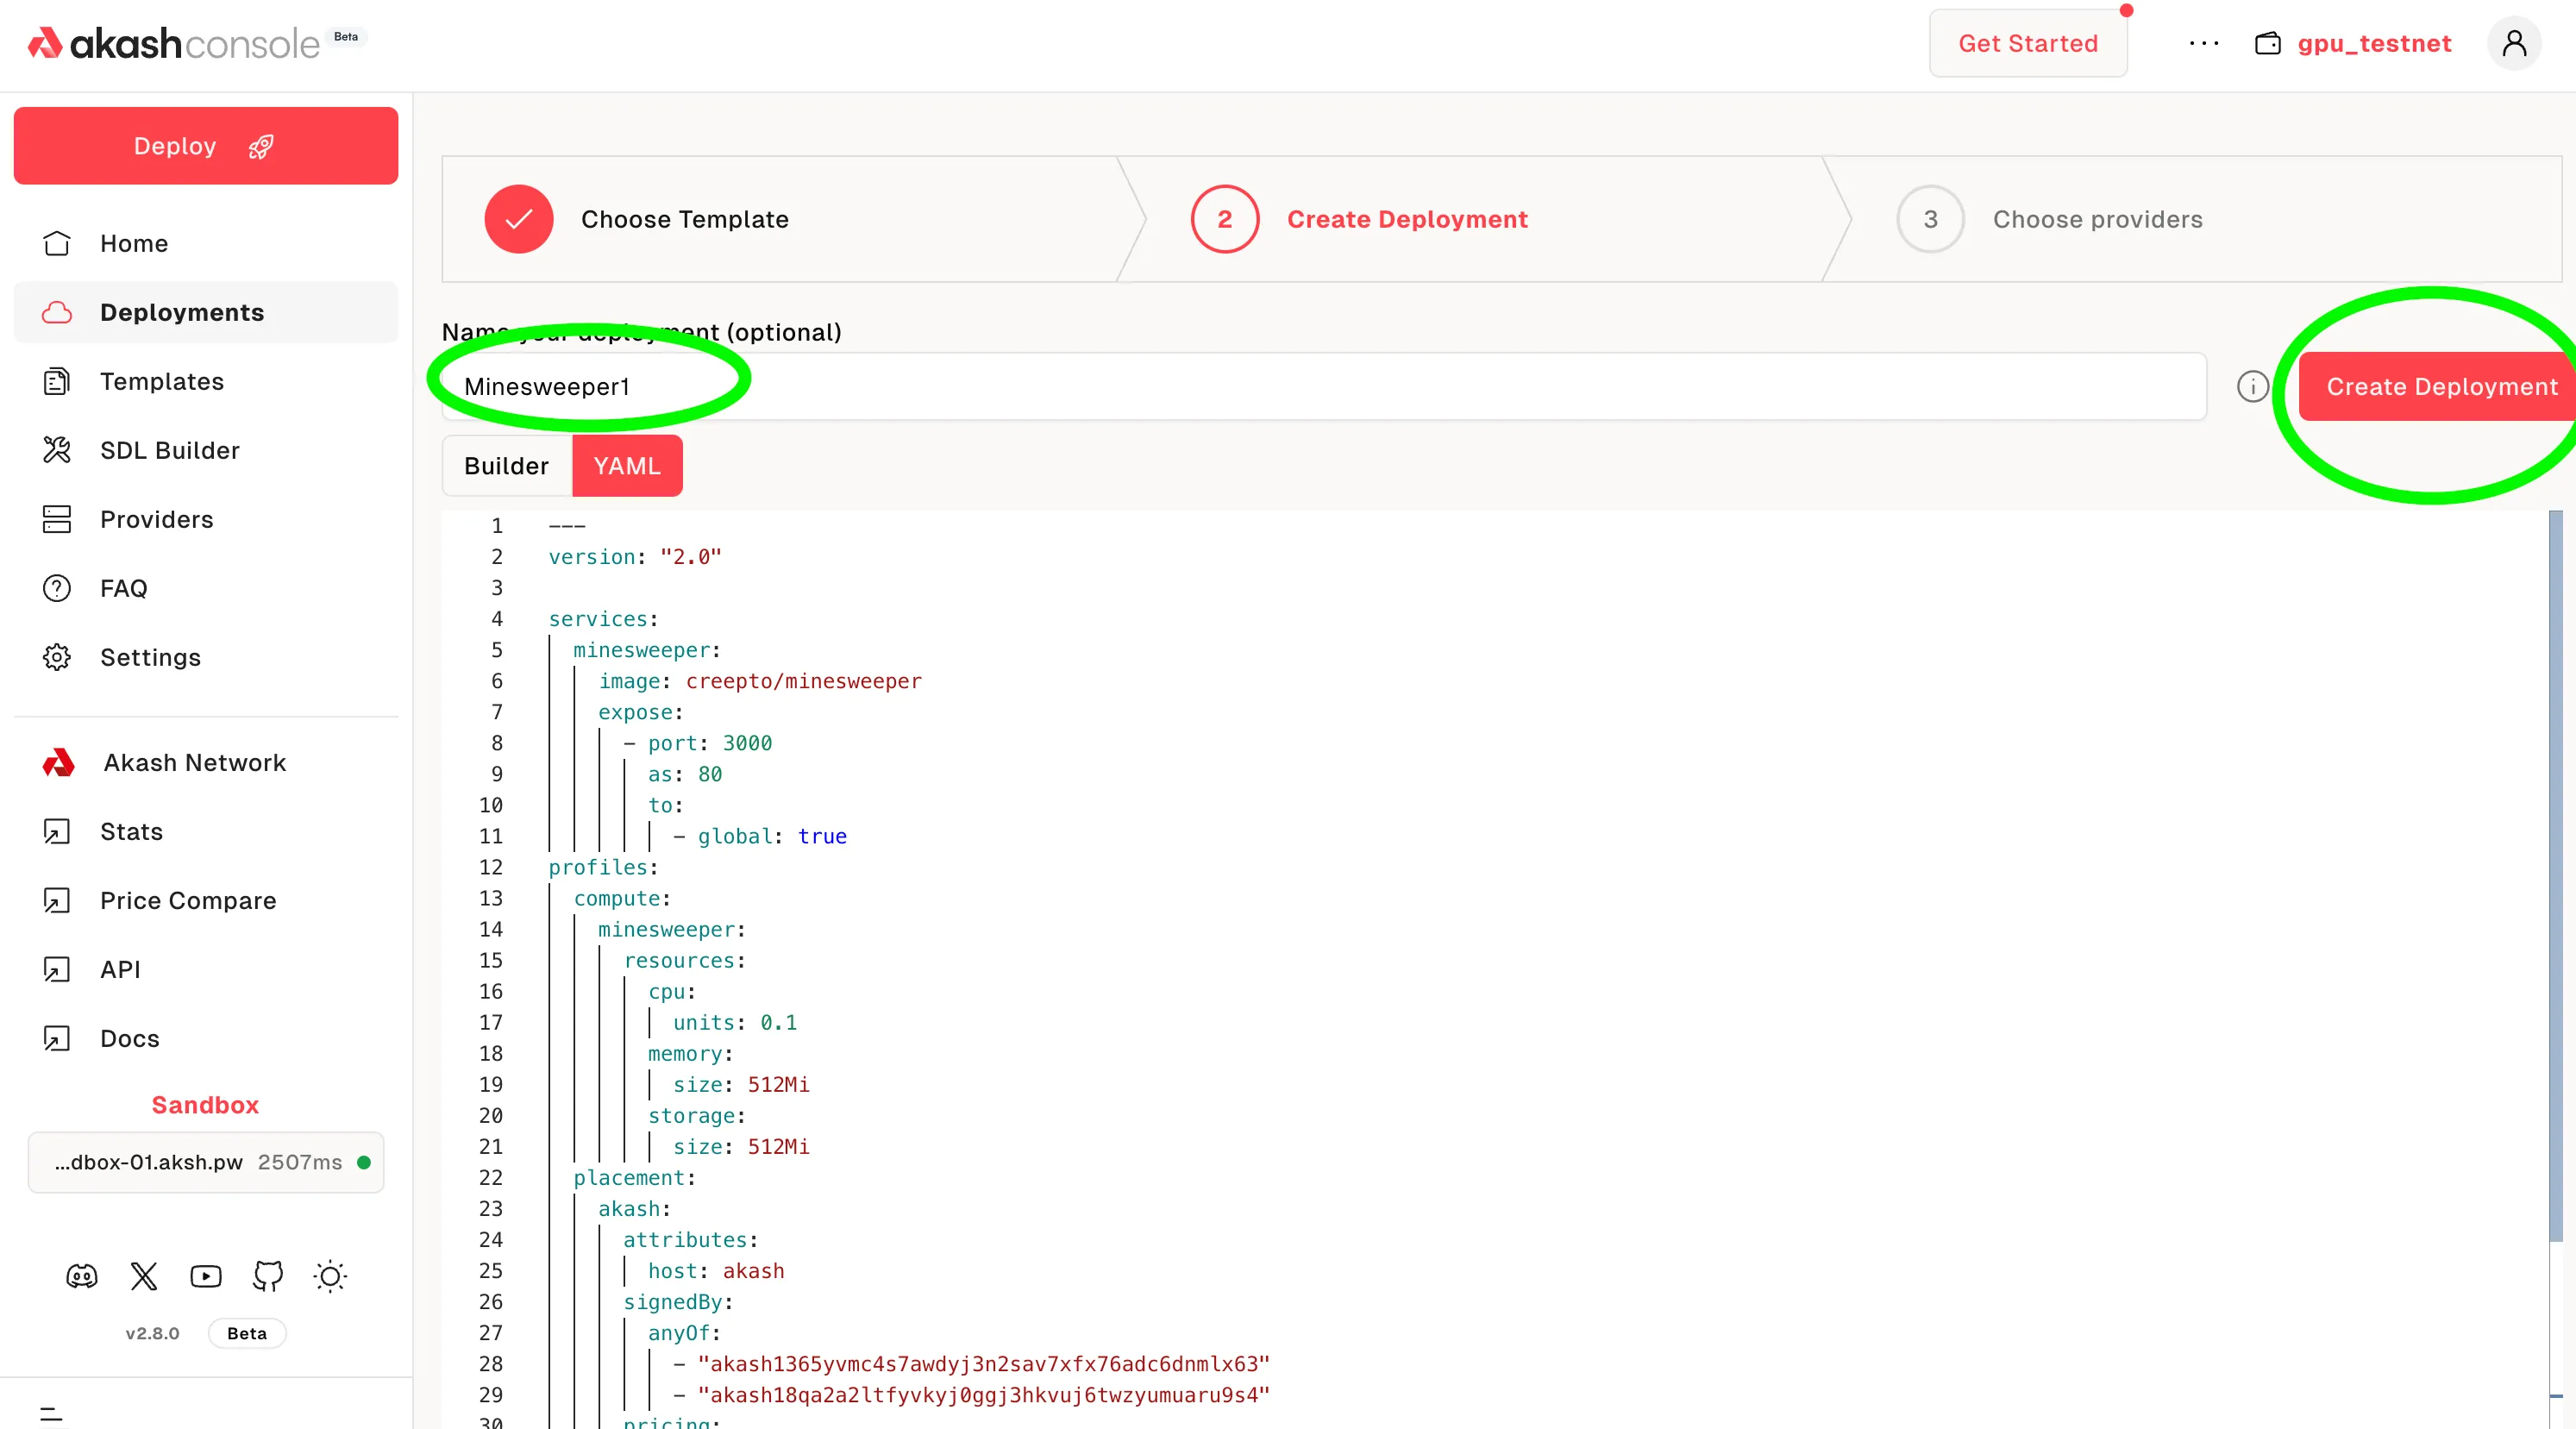
- You’ll be required to make a minimum deposit of 5 AKT or 5 USDC. Enter at least that amount and click on the
Continuebutton.
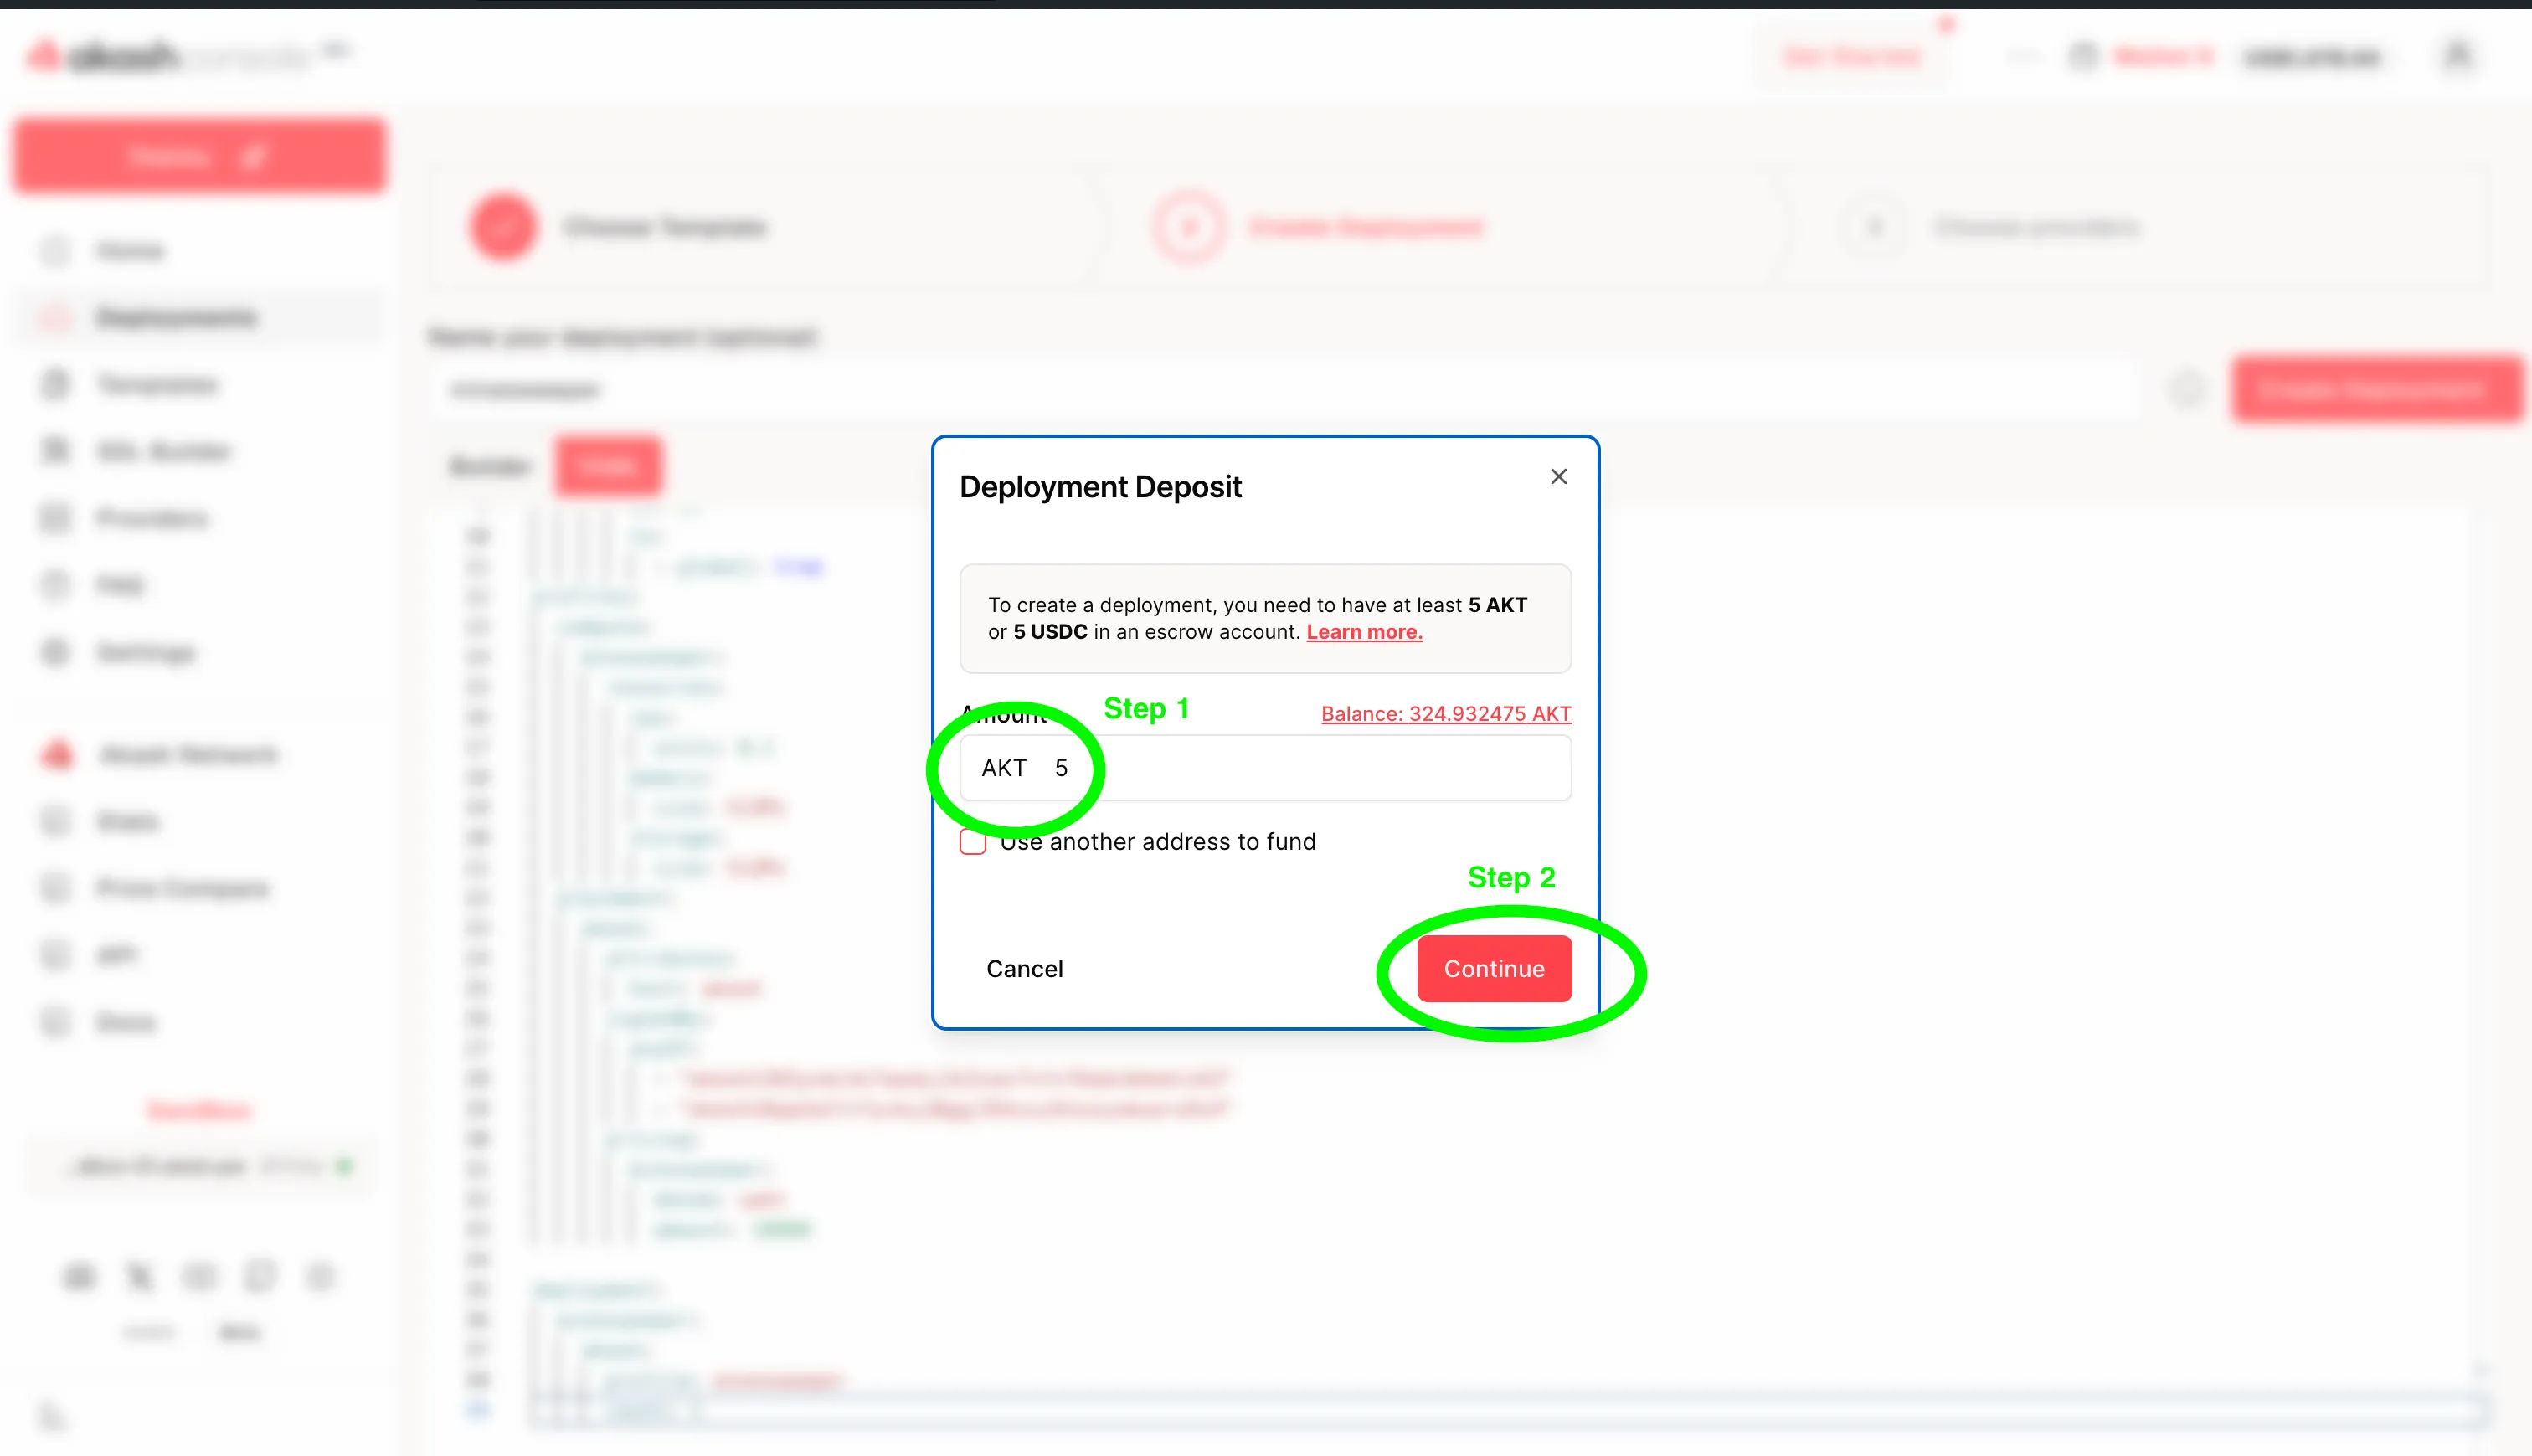
- You then approve the transaction. If you are having trouble with the transaction being completed, try setting the
gas feesto eithermediumorhigh.
![]()
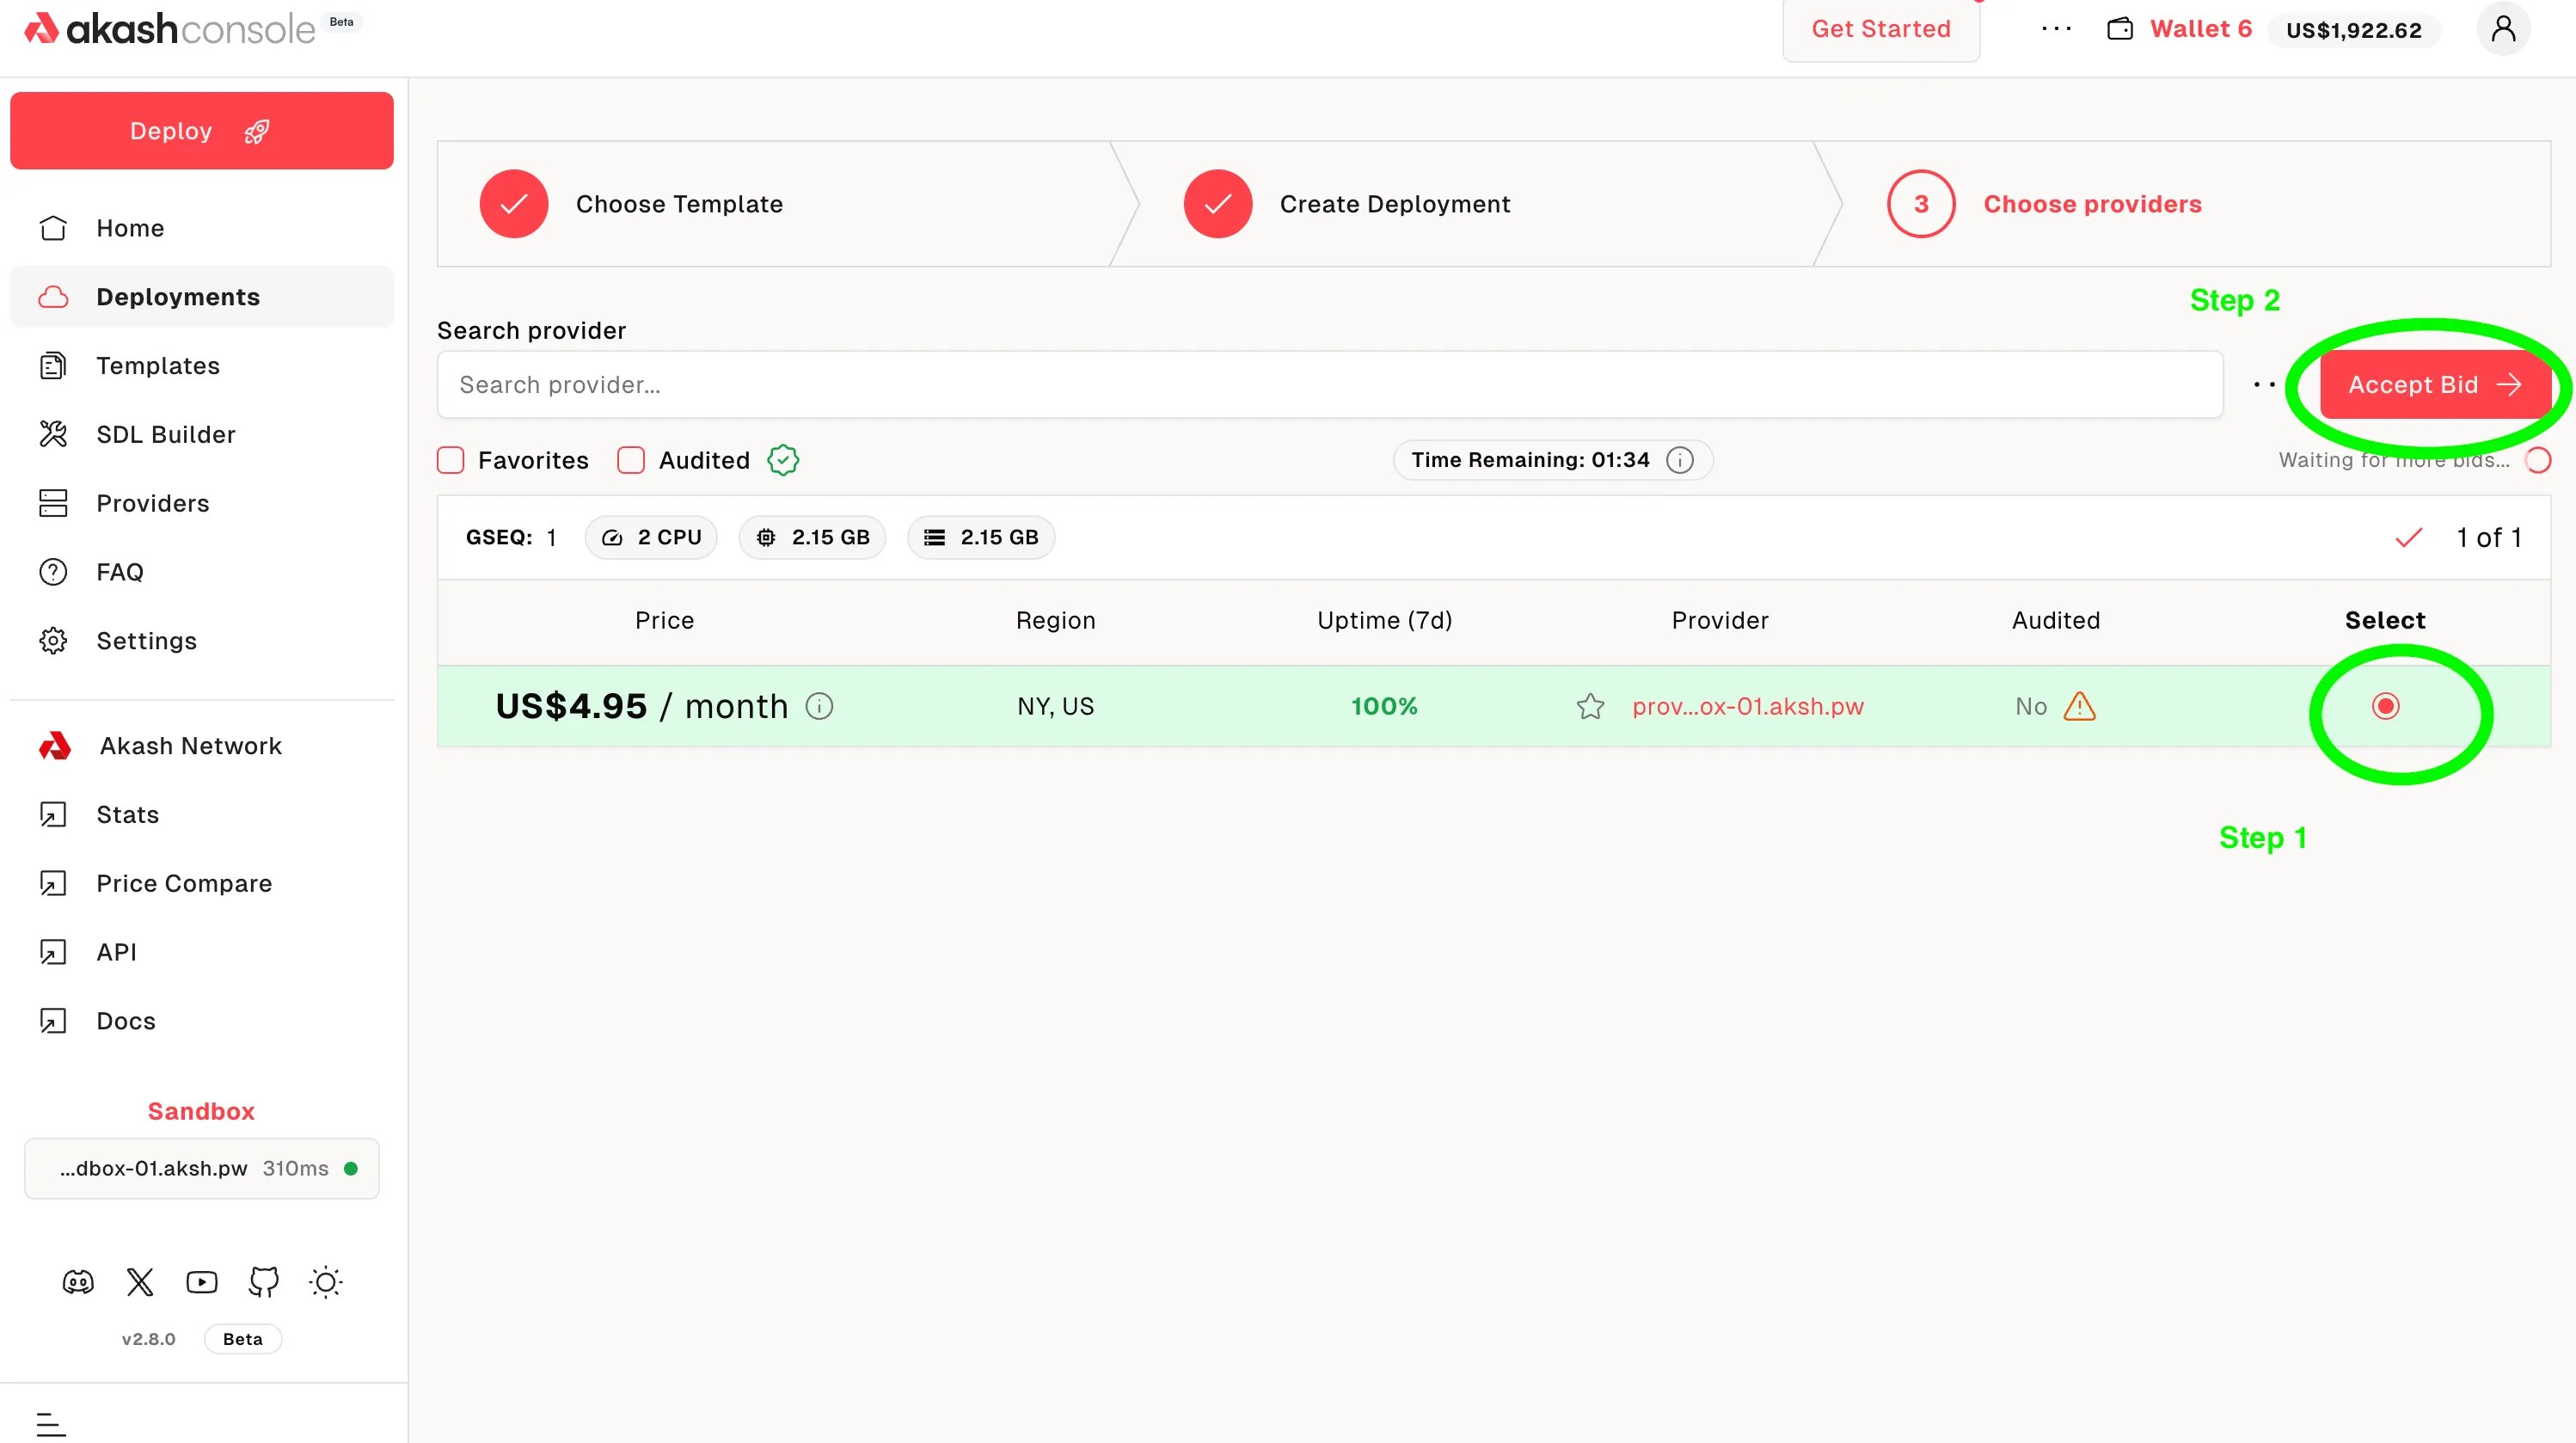
STEP 2 - Select Provider
- You would be redirected to the Providers page.
- A list of Akash providers who bid on the deployment is presented
- Select the Akash provider of your choice
- Select
Submit Deploy Requestto complete the deployment process - Accept Keplr gas fee prompt to proceed
NOTE - ensure to select
ALLinstead of the defaultOnly Auditedselection near the top right of the pane for Testnet purposes. This will allow bids from all providers to display.
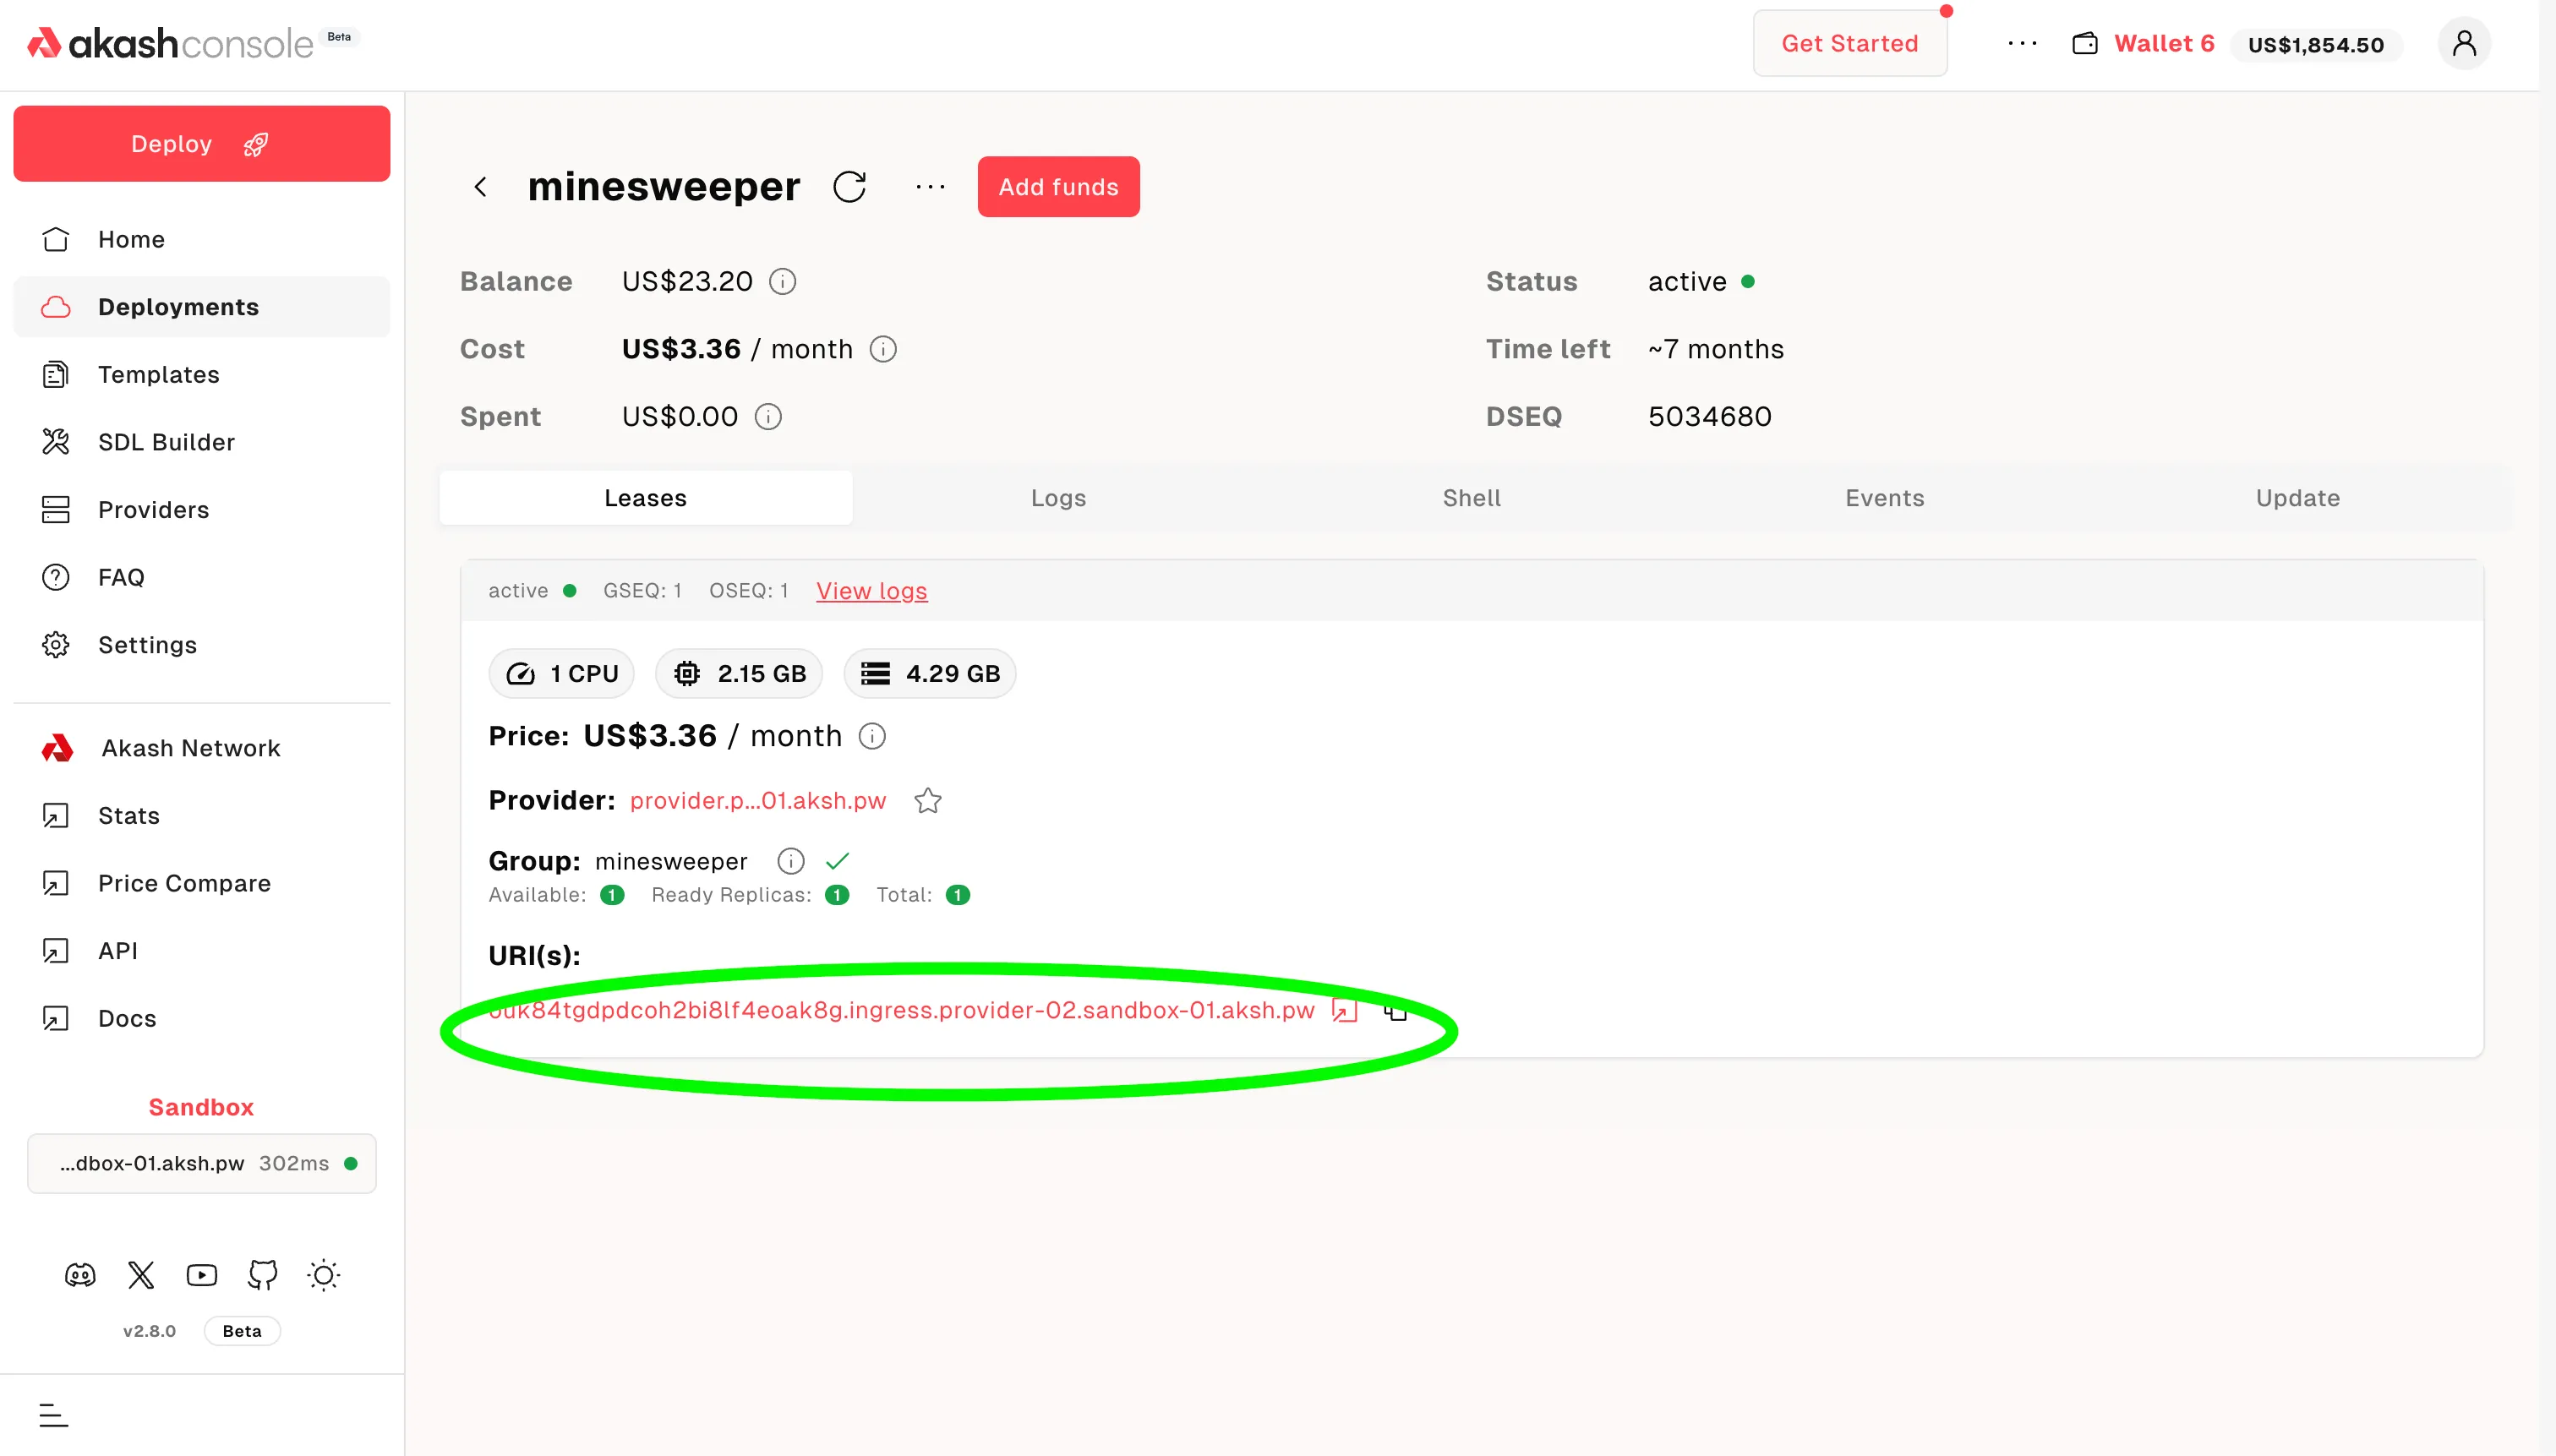
STEP 3 - Deployment Confirmation and Testing
- Following successful deployment of the Minesweeper SDL to the selected Akash provider, a status page will be presented as depicted in the example below
- This page can be used to view logs of the deployment and obtain general deployment info
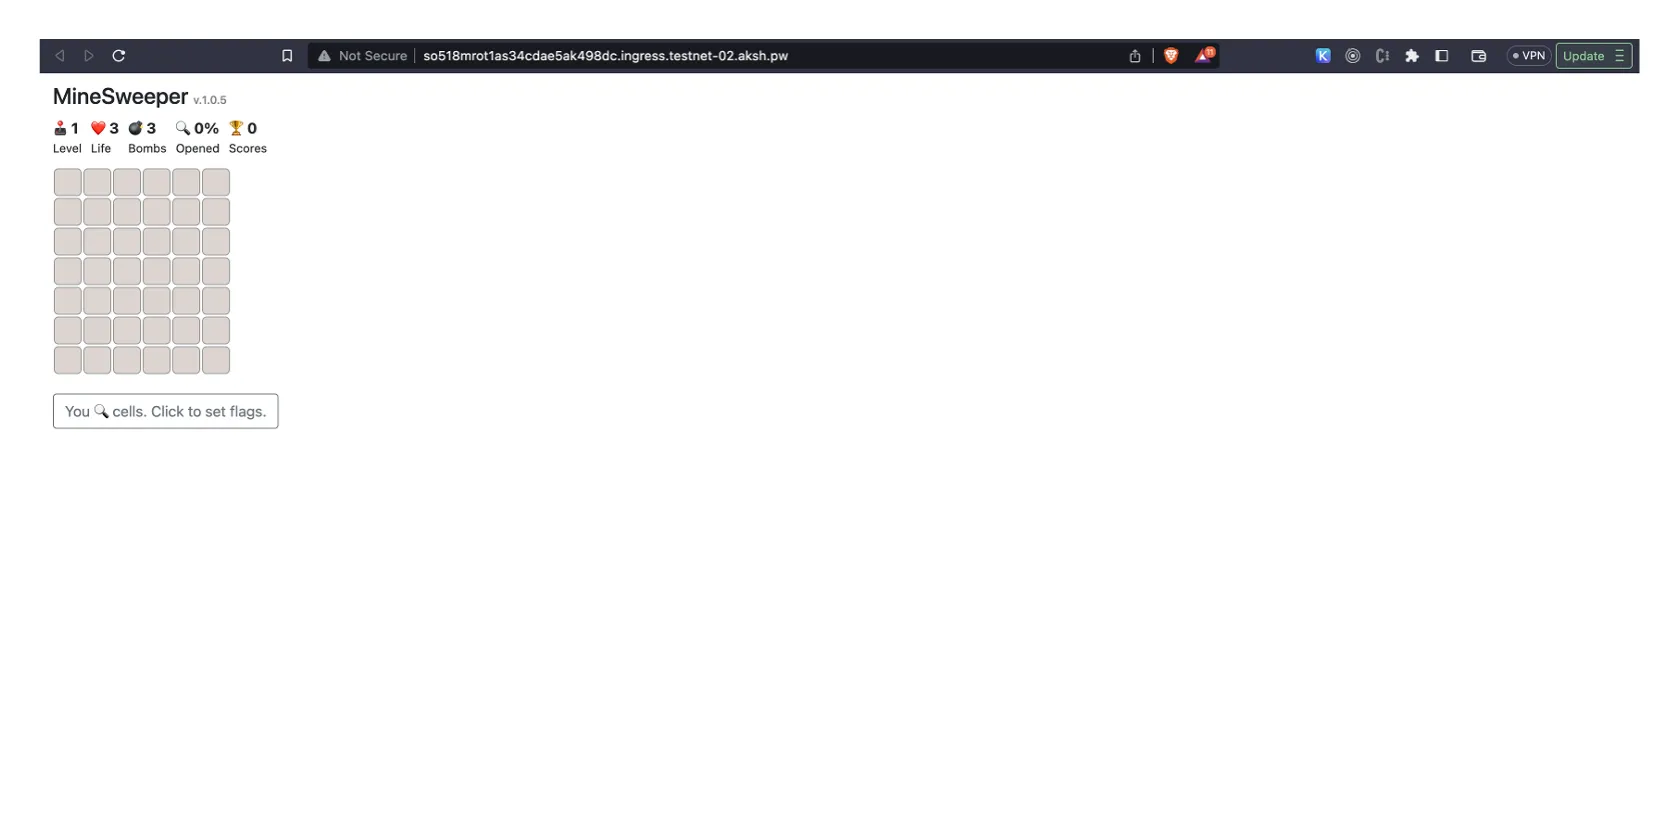
- Allow the deployment a couple of minutes to fully deploy and then test Minesweeper by selecting the generated URL of the deployment
Select URL to Test Deployment
Expected Result of Initial Deployment Testing
Summary and Next Steps
- This completes our walk through of a example SDL and associated deployment onto the Akash Testnet network
- The steps presented in this guide can be used for any future deployments and associated SDLs
Akash CLI for GPU Testnet
Explore detailed steps and options of the Akash CLI. In this guide we will define each environment variable and use within each command.
Overview of Getting Started with Akash CLI Steps
- Install Akash
- Create an Account
- Fund your Account
- Configure your Network
- Create your Configuration
- Create your Certificate
- Create your Deployment
- View your Bids
- Create a Lease
- Send the Manifest
- Update the Deployment
- Close Deployment
Install Akash CLI
Select a tab below to view instructions for MacOS, Linux, or compiling from source.
MacOS
Download Akash Binary
NOTE - in the commands below we download the Akash binary for version 0.6.4 and the darwin_all. If an alternate binary is needed, visit this GitHub Release page and find/replace the link used appropriately
cd ~/Downloads
wget https://github.com/akash-network/provider/releases/download/v0.6.4/provider-services_0.6.4_darwin_all.zip
unzip provider-services_0.6.4_darwin_all.zip
Move the Akash Binary
Move the binary file into a directory included in your path
sudo mv provider-services /usr/local/binVerify Akash Installation
Verify the installation by using a simple command to check the Akash version
provider-services versionExpect/Example Output
v0.6.4Download Akash Binary
NOTE - in the commands below we download the Akash binary for version
0.6.4and aAMD-64architecture. If an alternate binary is needed, visit this GitHub Release page and find/replace the link used appropriately.
cd ~
apt install jq -y
apt install unzip -y
wget https://github.com/akash-network/provider/releases/download/v0.3.1-rc1/provider-services_0.6.4_linux_amd64.zip
unzip provider-services_0.6.4_linux_amd64.zip
mkdir bin; mv provider-services /root/bin/
Add Akash Install Location to User’s Path
Add the software’s install location to the user’s path for easy use of Akash commands.
NOTE: Below we provide the steps to add the Akash install directory to a user’s path on a Linux Ubuntu server. Please take a look at a guide for your operating system and how to add a directory to a user’s path.
Open the user’s path file in an editor:
vi /etc/environmentView within text editor prior to the update:
PATH="/usr/local/sbin:/usr/local/bin:/usr/sbin:/usr/bin:/sbin:/bin:/usr/games:/usr/local/games:/snap/bin"Add the following directory, which is the Akash install location, to PATH. In this example the active user is root. If logged in as another username, replace /root with your current/home directory.
/root/binView within the text editor following the update:
PATH="/usr/local/sbin:/usr/local/bin:/usr/sbin:/usr/bin:/sbin:/bin:/usr/games:/usr/local/games:/snap/bin:/root/bin"Make the Path Active in the Current Session
. /etc/environmentVerify Akash Install
Display the version of Akash software installed. This confirms the software installed and that the new user path addition worked.
provider-services versionExpected/Example Result
v0.6.4Create an Account
Configure the name of your key. The command below will set the name of your key to myWallet, run the below command and replace myWallet with a name of your choice:
AKASH_KEY_NAME=myWalletVerify you have the shell variables set up . The below command should return the name you’ve used:
echo $AKASH_KEY_NAMEWe now need to point Akash to where the keys are stored for your configuration. To do this we will set the AKASH_KEYRING_BACKEND environmental variable.
AKASH_KEYRING_BACKEND=osCopy and paste this command into Terminal to create an Akash account:
provider-services keys add $AKASH_KEY_NAMERead the output and save your mnemonic phrase is a safe place. Let’s set a Shell Variable in Terminal AKASH_ACCOUNT_ADDRESS to save your account address for later.
export AKASH_ACCOUNT_ADDRESS="$(provider-services keys show $AKASH_KEY_NAME -a)"
echo $AKASH_ACCOUNT_ADDRESS
Note that if you close your Terminal window this variable will not be saved.
Fund your Account
Fund Created Account via Testnet Faucet
Visit the Testnet faucet here to fund your provider account.
Enter the address of the myWallet account created in previous steps as prompted by the faucet.
Example/Expected Faucet Output
The following screen shot shows an example/expected output following successful submission to the Testnet faucet. Note that the displayed transaction hash will be unique and different than the one displayed in this example. Receipt of this screen confirms successful funding of your account with 25AKT.
Configure your Network
Configure the Testnet Chain ID and RPC Node
export AKASH_CHAIN_ID=sandbox-01export AKASH_NODE=https://rpc.sandbox-01.aksh.pw:26657Confirm your network variables are setup
Your values may differ depending on the network you’re connecting to.
echo $AKASH_NODE $AKASH_CHAIN_ID $AKASH_KEYRING_BACKENDYou should see something similar to:
https://rpc.sandbox-01.aksh.pw:26657 sandbox-01 osSet Additional Environment Variables
Set the below set of environment variables to ensure smooth operations
| Variable | Description | Recommended Value |
|---|---|---|
| AKASH_GAS | Gas limit to set per-transaction; set to “auto” to calculate sufficient gas automatically | auto |
| AKASH_GAS_ADJUSTMENT | Adjustment factor to be multiplied against the estimate returned by the tx simulation | 1.15 |
| AKASH_GAS_PRICES | Gas prices in decimal format to determine the transaction fee | 0.025uakt |
| AKASH_SIGN_MODE | Signature mode | amino-json |
export AKASH_GAS=autoexport AKASH_GAS_ADJUSTMENT=1.25export AKASH_GAS_PRICES=0.025uaktexport AKASH_SIGN_MODE=amino-jsonCheck your Account Balance
Check your account has sufficient balance by running:
provider-services query bank balances --node $AKASH_NODE $AKASH_ACCOUNT_ADDRESSYou should see a response similar to:
balances:- amount: "25000000" denom: uaktpagination: next_key: null total: "0"Your account must have a minimum balance of 0.5 AKT to create a deployment. This 0.5 AKT funds the escrow account associated with the deployment and is used to pay the provider for their services. It is recommended you have more than this minimum balance to pay for transaction fees. For more information on escrow accounts, see here
Create your Configuration
Create a deployment configuration deploy.yml to deploy an example GPU enabled workload via the steps and SDL provided in this section.
Akash GPU Enabled Manifest/SDL
You may use the sample deployment file as-is or modify it for your own needs as described in our SDL (Stack Definition Language) documentation.
EXAMPLE GPU ENABLED SDL:
cat > deploy.yml <<EOF---version: "2.0"
services:  gpu-test:    # Nvidia cuda compatibility https://docs.nvidia.com/deploy/cuda-compatibility/    # for nvidia 510 drivers    ## image: nvcr.io/nvidia/k8s/cuda-sample:vectoradd-cuda10.2    # for nvidia 525 drivers use below image    image: nvcr.io/nvidia/k8s/cuda-sample:vectoradd-cuda11.6.0    command:      - "sh"      - "-c"    args:      - 'sleep infinity'    expose:      - port: 3000        as: 80        to:          - global: trueprofiles:  compute:    gpu-test:      resources:        cpu:          units: 1        memory:          size: 1Gi        gpu:          units: 1          attributes:            vendor:              nvidia:                - model: a4000        storage:          - size: 512Mi  placement:    westcoast:      pricing:        gpu-test:          denom: uakt          amount: 100000deployment:  gpu-test:    westcoast:      profile: gpu-test      count: 1EOF
Create your Certificate
In this step we will create a local certificate and then store the certification on the block chain
- Ensure that prior steps in this guide have been completed and that you have a funded wallet before attempting certificate creation.
- Your certificate needs to be created only once per account and can be used across all deployments.
Generate Cert
- Note: If it errors with
Error: certificate error: cannot overwrite certificate, then add--overwriteshould you want to overwrite the cert. Normally you can ignore that error and proceed with publishing the cert (next step).
provider-services tx cert generate client --from $AKASH_KEY_NAMEPublish Cert to the Blockchain
provider-services tx cert publish client --from $AKASH_KEY_NAMECreate your Deployment
Akash Deployment
To deploy on Akash, run:
provider-services tx deployment create deploy.yml --from $AKASH_KEY_NAMEYou should see a response similar to:
{ "height":"140325", "txhash":"2AF4A01B9C3DE12CC4094A95E9D0474875DFE24FD088BB443238AC06E36D98EA", "codespace":"", "code":0, "data":"0A130A116372656174652D6465706C6F796D656E74", "raw_log":"[{\"events\":[{\"type\":\"akash.v1\",\"attributes\":[{\"key\":\"module\",\"value\":\"deployment\"},{\"key\":\"action\",\"value\":\"deployment-created\"},{\"key\":\"version\",\"value\":\"2b86f778de8cc9df415490efa162c58e7a0c297fbac9cdb8d6c6600eda56f17e\"},{\"key\":\"owner\",\"value\":\"akash1vn06ycjjnvsvl639fet9lajjctuturrtx7fvuj\"},{\"key\":\"dseq\",\"value\":\"140324\"},{\"key\":\"module\",\"value\":\"market\"},{\"key\":\"action\",\"value\":\"order-created\"},{\"key\":\"owner\",\"value\":\"akash1vn06ycjjnvsvl639fet9lajjctuturrtx7fvuj\"},{\"key\":\"dseq\",\"value\":\"140324\"},{\"key\":\"gseq\",\"value\":\"1\"},{\"key\":\"oseq\",\"value\":\"1\"}]},{\"type\":\"message\",\"attributes\":[{\"key\":\"action\",\"value\":\"create-deployment\"},{\"key\":\"sender\",\"value\":\"akash1vn06ycjjnvsvl639fet9lajjctuturrtx7fvuj\"},{\"key\":\"sender\",\"value\":\"akash1vn06ycjjnvsvl639fet9lajjctuturrtx7fvuj\"}]},{\"type\":\"transfer\",\"attributes\":[{\"key\":\"recipient\",\"value\":\"akash17xpfvakm2amg962yls6f84z3kell8c5lazw8j8\"},{\"key\":\"sender\",\"value\":\"akash1vn06ycjjnvsvl639fet9lajjctuturrtx7fvuj\"},{\"key\":\"amount\",\"value\":\"5000uakt\"},{\"key\":\"recipient\",\"value\":\"akash14pphss726thpwws3yc458hggufynm9x77l4l2u\"},{\"key\":\"sender\",\"value\":\"akash1vn06ycjjnvsvl639fet9lajjctuturrtx7fvuj\"},{\"key\":\"amount\",\"value\":\"5000000uakt\"}]}]}]", "logs":[ { "msg_index":0, "log":"", "events":[ { "type":"akash.v1", "attributes":[ { "key":"module", "value":"deployment" }, { "key":"action", "value":"deployment-created" }, { "key":"version", "value":"2b86f778de8cc9df415490efa162c58e7a0c297fbac9cdb8d6c6600eda56f17e" }, { "key":"owner", "value":"akash1vn06ycjjnvsvl639fet9lajjctuturrtx7fvuj" }, { "key":"dseq", "value":"140324" }, { "key":"module", "value":"market" }, { "key":"action", "value":"order-created" }, { "key":"owner", "value":"akash1vn06ycjjnvsvl639fet9lajjctuturrtx7fvuj" }, { "key":"dseq", "value":"140324" }, { "key":"gseq", "value":"1" }, { "key":"oseq", "value":"1" } ] }, { "type":"message", "attributes":[ { "key":"action", "value":"create-deployment" }, { "key":"sender", "value":"akash1vn06ycjjnvsvl639fet9lajjctuturrtx7fvuj" }, { "key":"sender", "value":"akash1vn06ycjjnvsvl639fet9lajjctuturrtx7fvuj" } ] }, { "type":"transfer", "attributes":[ { "key":"recipient", "value":"akash17xpfvakm2amg962yls6f84z3kell8c5lazw8j8" }, { "key":"sender", "value":"akash1vn06ycjjnvsvl639fet9lajjctuturrtx7fvuj" }, { "key":"amount", "value":"5000uakt" }, { "key":"recipient", "value":"akash14pphss726thpwws3yc458hggufynm9x77l4l2u" }, { "key":"sender", "value":"akash1vn06ycjjnvsvl639fet9lajjctuturrtx7fvuj" }, { "key":"amount", "value":"5000000uakt" } ] } ] } ], "info":"", "gas_wanted":"100000", "gas_used":"94653", "tx":null, "timestamp":""}Find your Deployment #
Find the Deployment Sequence (DSEQ) in the deployment you just created. You will need to replace the AKASH_DSEQ with the number from your deployment to configure a shell variable.
export AKASH_DSEQ=CHANGETHISNow set the Order Sequence (OSEQ) and Group Sequence (GSEQ). Note that if this is your first time deploying on Akash, OSEQ and GSEQ will be 1.
AKASH_OSEQ=1AKASH_GSEQ=1Verify we have the right values populated by running:
echo $AKASH_DSEQ $AKASH_OSEQ $AKASH_GSEQView your Bids
After a short time, you should see bids from providers for this deployment with the following command:
provider-services query market bid list --owner=$AKASH_ACCOUNT_ADDRESS --node $AKASH_NODE --dseq $AKASH_DSEQ --state=openChoose a Provider
Note that there are bids from multiple different providers. In this case, both providers happen to be willing to accept a price of 1 uAKT. This means that the lease can be created using 1 uAKT or 0.000001 AKT per block to execute the container. You should see a response similar to:
bids:- bid: bid_id: dseq: "140324" gseq: 1 oseq: 1 owner: akash1vn06ycjjnvsvl639fet9lajjctuturrtx7fvuj provider: akash10cl5rm0cqnpj45knzakpa4cnvn5amzwp4lhcal created_at: "140326" price: amount: "1" denom: uakt state: open escrow_account: balance: amount: "50000000" denom: uakt id: scope: bid xid: akash1vn06ycjjnvsvl639fet9lajjctuturrtx7fvuj/140324/1/1/akash10cl5rm0cqnpj45knzakpa4cnvn5amzwp4lhcal owner: akash10cl5rm0cqnpj45knzakpa4cnvn5amzwp4lhcal settled_at: "140326" state: open transferred: amount: "0" denom: uakt- bid: bid_id: dseq: "140324" gseq: 1 oseq: 1 owner: akash1vn06ycjjnvsvl639fet9lajjctuturrtx7fvuj provider: akash1f6gmtjpx4r8qda9nxjwq26fp5mcjyqmaq5m6j7 created_at: "140326" price: amount: "1" denom: uakt state: open escrow_account: balance: amount: "50000000" denom: uakt id: scope: bid xid: akash1vn06ycjjnvsvl639fet9lajjctuturrtx7fvuj/140324/1/1/akash1f6gmtjpx4r8qda9nxjwq26fp5mcjyqmaq5m6j7 owner: akash1f6gmtjpx4r8qda9nxjwq26fp5mcjyqmaq5m6j7 settled_at: "140326" state: open transferred: amount: "0" denom: uaktFor this example, we will choose akash10cl5rm0cqnpj45knzakpa4cnvn5amzwp4lhcal Run this command to set the provider shell variable:
AKASH_PROVIDER=akash10cl5rm0cqnpj45knzakpa4cnvn5amzwp4lhcalVerify we have the right value populated by running:
echo $AKASH_PROVIDERCreate a Lease
Create a lease for the bid from the chosen provider above by running this command:
provider-services tx market lease create --dseq $AKASH_DSEQ --provider $AKASH_PROVIDER --from $AKASH_KEY_NAMEConfirm the Lease
You can check the status of your lease by running:
provider-services query market lease list --owner $AKASH_ACCOUNT_ADDRESS --node $AKASH_NODE --dseq $AKASH_DSEQNote the bids will close automatically after 5 minutes, and you may get the response:
bid not openIf this happens, close your deployment and open a new deployment again. To close your deployment run this command:
provider-services tx deployment close --dseq $AKASH_DSEQ --owner $AKASH_ACCOUNT_ADDRESS --from $AKASH_KEY_NAMEIf your lease was successful you should see a response that ends with:
state: activePlease note that once the lease is created, the provider will begin debiting your deployment’s escrow account, even if you have not completed the deployment process by uploading the manifest in the following step.
Update the Deployment
Update the Manifest
Update the deploy.yml manifest file with the desired change.
NOTE:** Not all attributes of the manifest file are eligible for deployment update. If the hardware specs of the manifest are updated (I.e. CPU count), a re-deployment of the workload is necessary. Other attributes, such as deployment image and funding, are eligible for updates.
Issue Transaction for On Chain Update
provider-services tx deployment update deploy.yml --dseq $AKASH_DSEQ --from $AKASH_KEY_NAMESend Updated Manifest to Provider
provider-services send-manifest deploy.yml --dseq $AKASH_DSEQ --provider $AKASH_PROVIDER --from $AKASH_KEY_NAMEClose Deployment
Close the Deployment
Should you need to close the deployment follow this step.
provider-services tx deployment close --from $AKASH_KEY_NAME