Within this guide we provide paths to check your Akash Provider health status following initial build and throughout the lifetime of the provider.
The guide is broken down into the following sections:
- Prerequisites
- Provider Status and Attributes Endpoints
- Launch a Test Deployment on Provider
- Inbound Communication Verifications
- Shell Access Verification
- Provider DNS Verification
- Provider Logs
- Verify Current Provider Settings
- Additional Verifications
- Contact Technical Support
Prerequisites
In prep for the Akash Provider checkup steps performed in this guide, please ensure the following prerequisites are in place:
Familiarity with Akash Console
For ease of test deployments within this guide and as they relate to verification of your Provider, we will use the Akash Console application.
If you are not familiar with the Akash Console - please use this guide to complete the installation, ensure you have a deployment wallet funded with a small amount of AKT, and make a quick test deployment.
Alternatively the verifications in this guide could be completed using the Akash CLI if you prefer and which is covered in this guide. But the steps below will be detailed assuming Akash Console use.
Obtain Provider Address
In most cases your Akash provider address is likely known and was captured during the provider installation steps. If you do not know your provider’s address, which will be necessary for verifications as we proceed, it may be obtained in the Akash Console and in the Provider sections shown below.
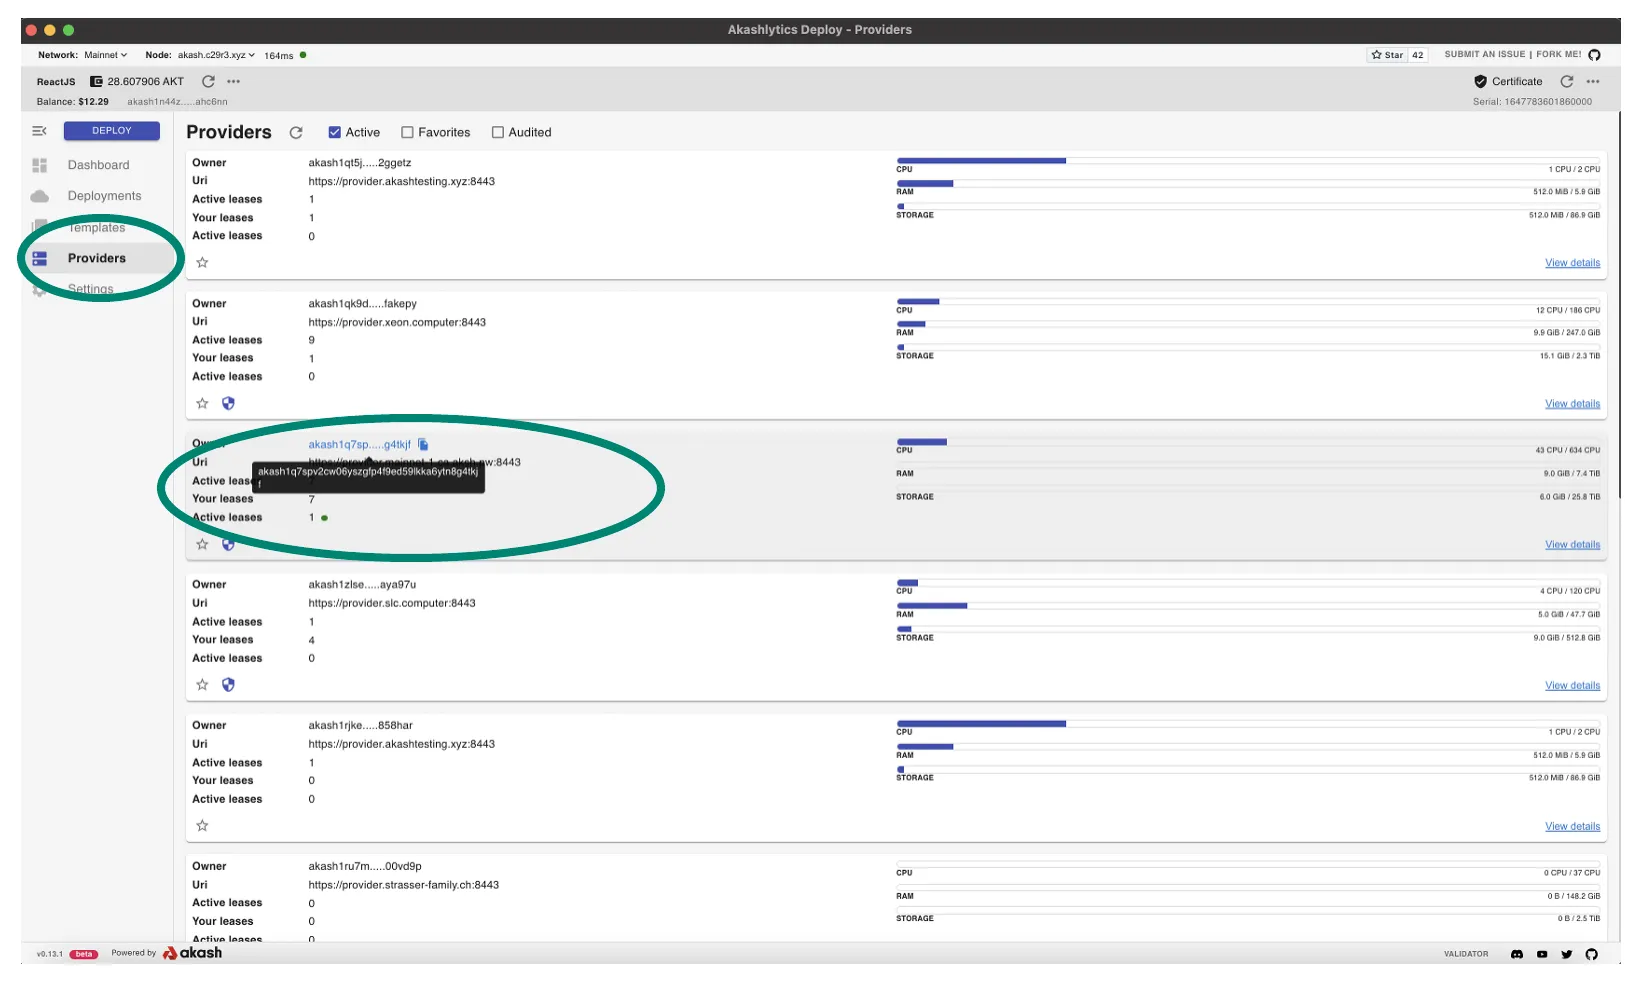
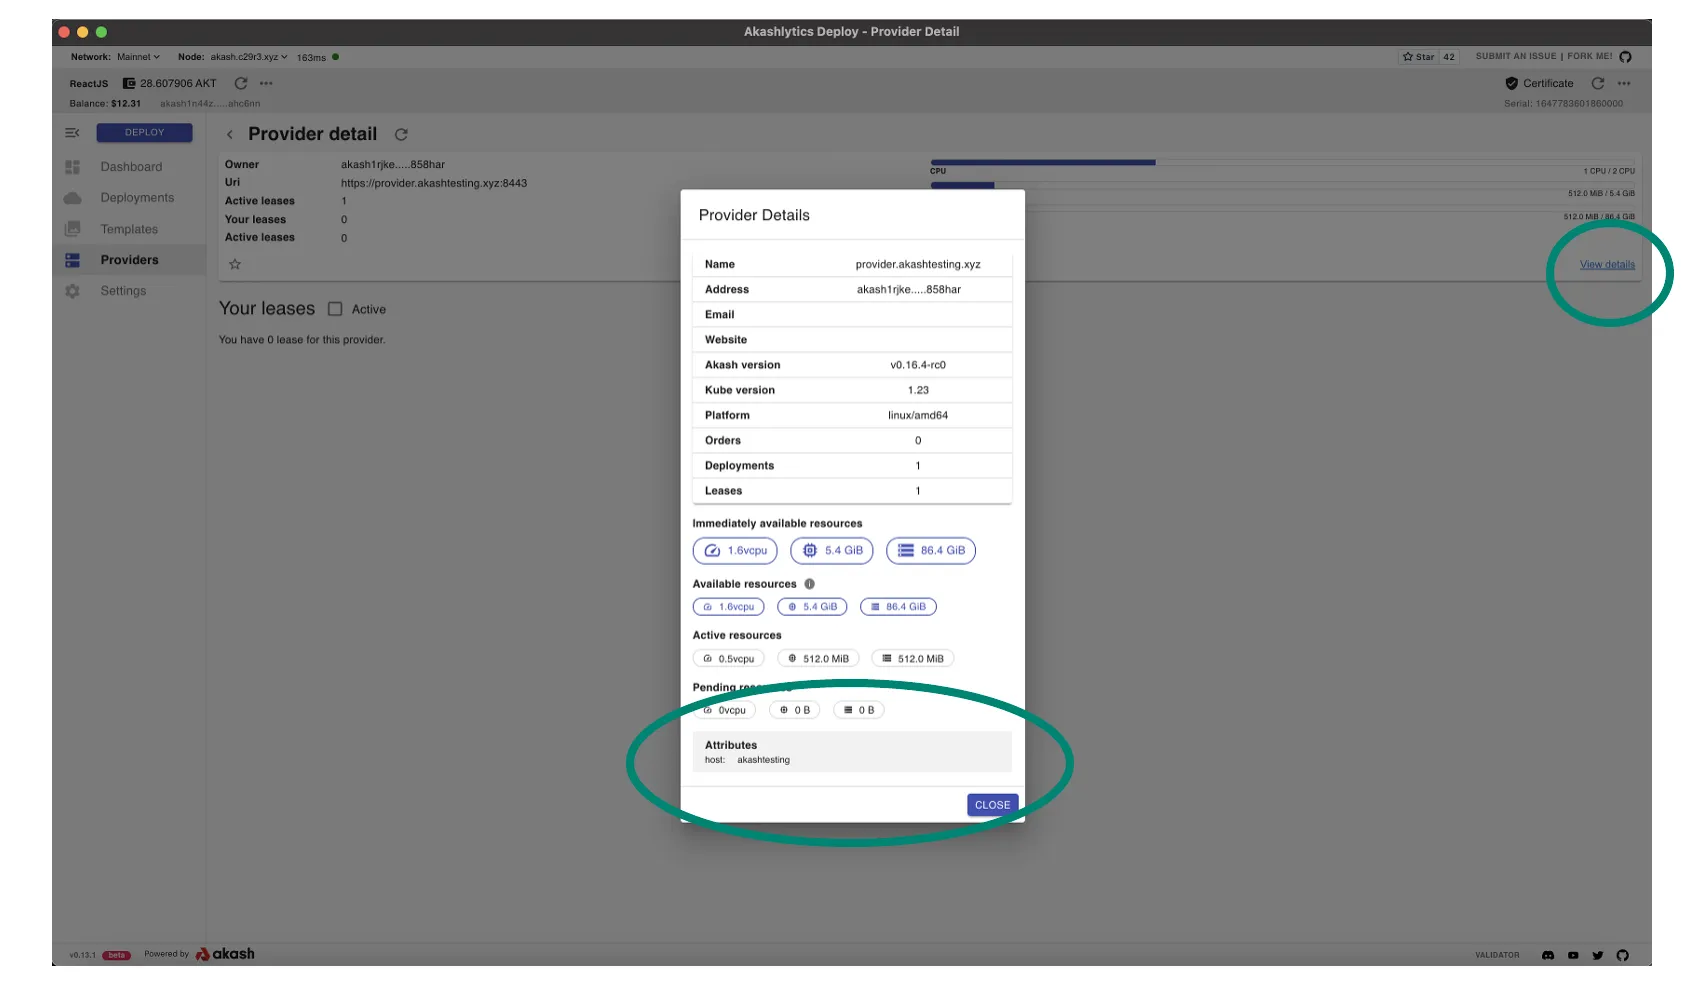
Familiarity with Your Provider’s Attributes
As test deployments are launched within this guide, we want to ensure that our provider will bid on those deployments. Ensure you are familiar with your provider’s attribute list. The active attributes for a provider can be obtained by drilling into the details within the Akash Console Provider list by selecting your instance from the list and then drilling into the details as shown.
Akash Provider Status and Attributes Endpoints
The section details the provider REST and gRPC endpoints that may be used following initial build and ongoing health verifications.
Provider Status gRPC Endpoint
This endpoint provides detailed info on a Proviider’s total allocatable and currently allocated host resources including GPU model type/status and CPU/memory/storage levels on a per node basis.
NOTE - to use this endpoint ensure that gRPC Curl is installed on the machine executing the command
Template
grpcurl -insecure <provider-domain>:8444 akash.provider.v1.ProviderRPC.GetStatusExample
grpcurl -insecure provider.hurricane.akash.pub:8444 akash.provider.v1.ProviderRPC.GetStatusProvider Status Endpoint
This endpoint provides high level details on the status of the Provider including the number of active leases and the hardware specs of those leases.
Template
curl -ks https://<provider-domain>:8443/statusExample
curl -ks https://provider.hurricane.akash.pub:8443/statusProvider Version Endpoint
This endpoint is not necessarily useful for a general health check following Provider install but may become useful if/when detailed package versions need to be reviewed in troubleshooting exercises. The lengthy output of this endpoint reveals Akash Provider, Go, and many other packages versions involved in the implementation.
Template
curl -ks https://<provider-domain>:8443/versionExample
curl -ks https://provider.hurricane.akash.pub:8443/versionSTEP 1 - Launch a Test Deployment on Provider
In the first step of our checkup, we will launch a test deployment that our provider should bid on. We will subsequently accept the bid from our provider, ensure that the lease was created successfully, and then fully test access to the deployment for verification of inbound communications.
Launch the Akash Console application to complete the sections that follow.
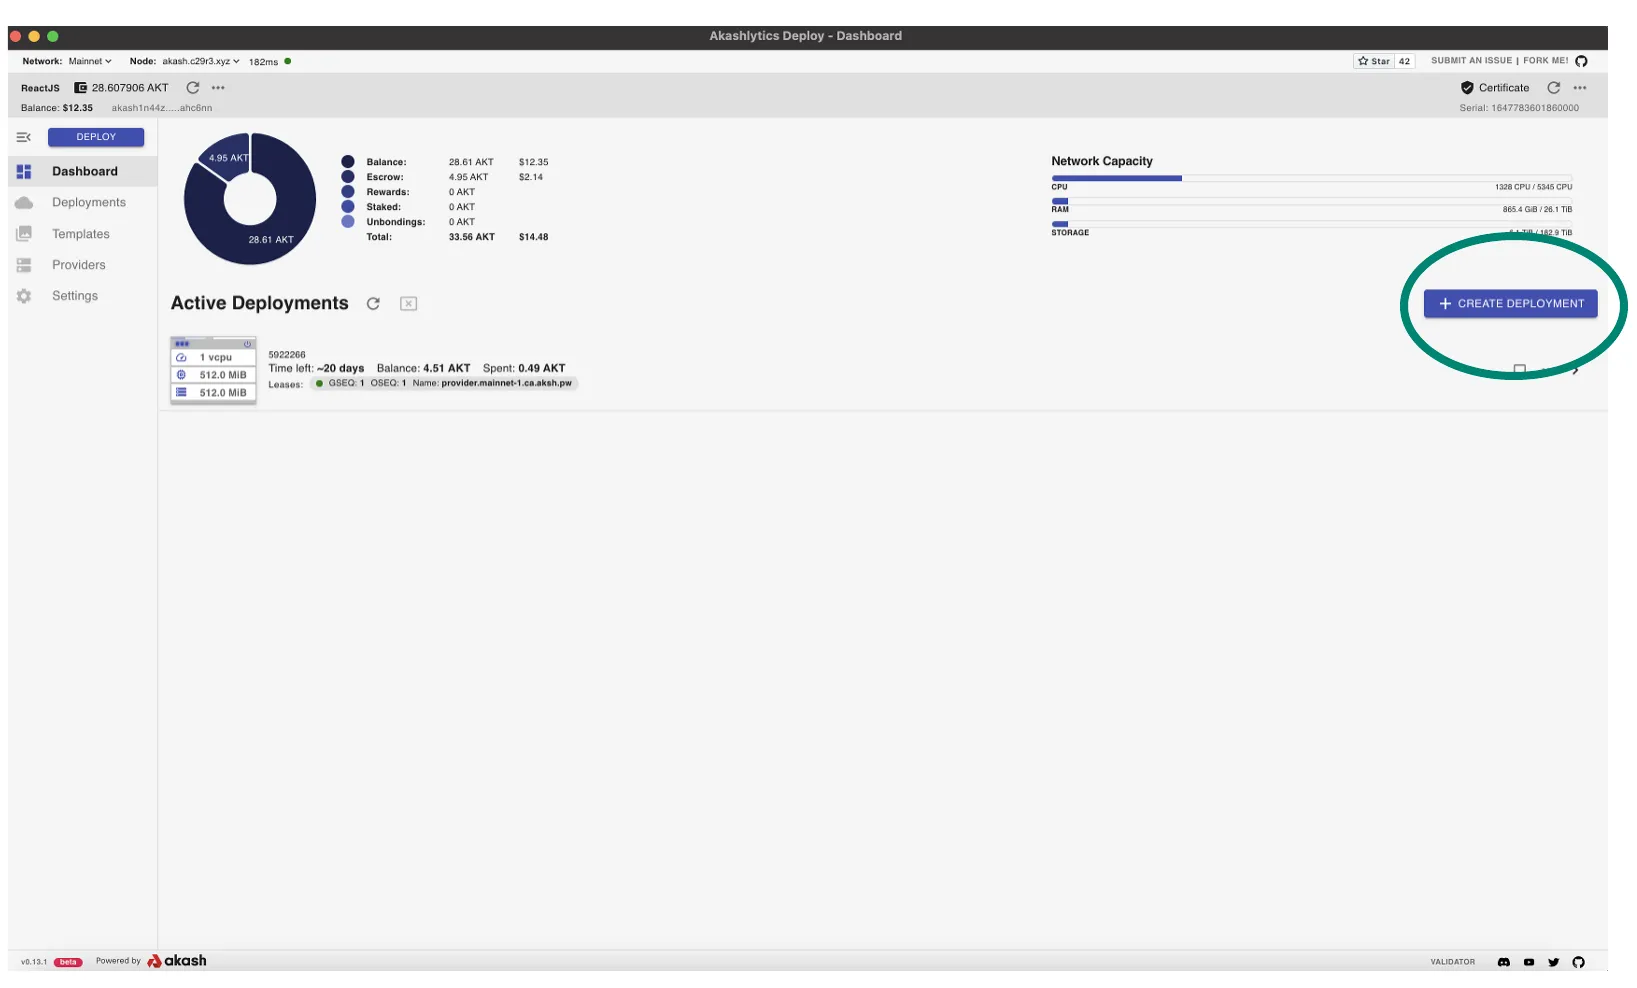
Create Deployment
- Select the CREATE DEPLOYMENT option from the Dashboard page
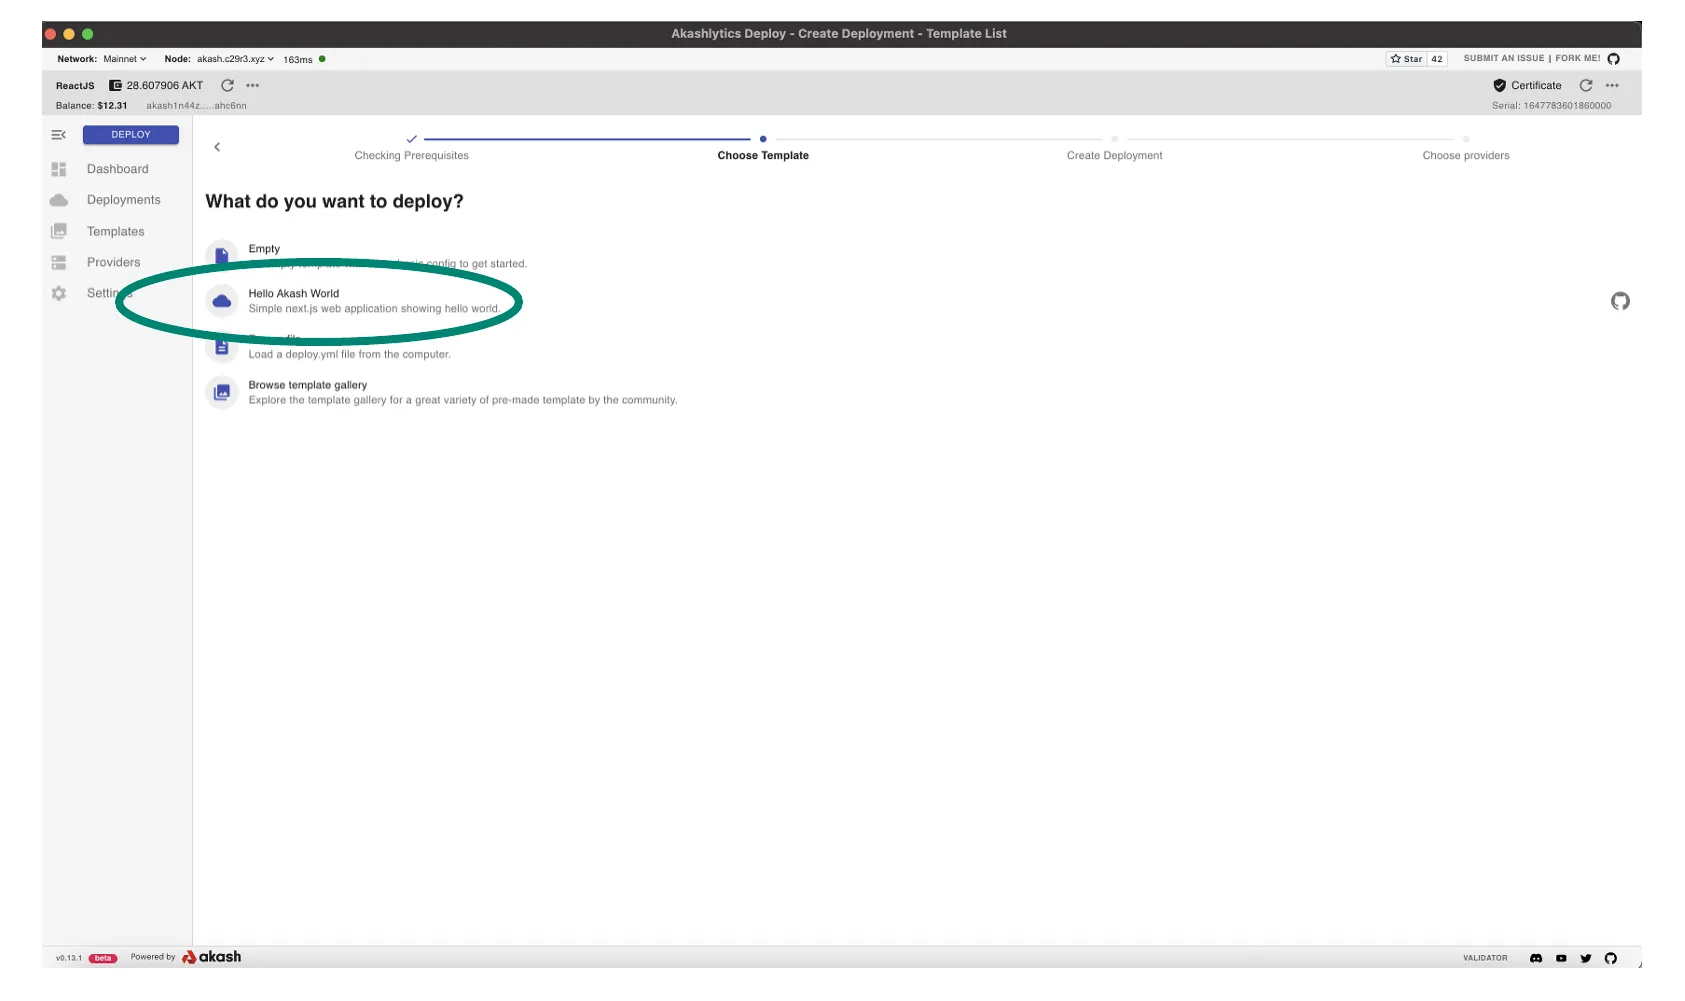
- In our testing we will use the Hello Akash World simple SDL
- Note - this SDL does not specify any attributes. If the list of bids received from the deployment is large and you would like to reduce the list to isolate a bid from your provider a bit easier, consider attribute use as detailed in this SDL reference.
- Otherwise process with the deployment with no need for change to the Hello Akash World SDL and pause when you reach reach the Create Lease phase of the deployment
Create Lease
- Within the Create Lease screen we encounter one of the primary objectives of our test deployment
- Isolate and ensure that your provider has responded to the deployment order with a bid as demonstrated in this example
- If a bid from your provider was received, select that bid and proceed with ACCEPT BID which will complete our first test deployment on our provider and we can proceed to next verification steps. Leave the test deployment open for next steps.
- If a bid from your provider was not received, review the Provider Logs section of this guide in which we will verify that the deployment order reached the provider and was processed successfully.

STEP 2 - Inbound Communication Verifications
- In this step we will verify functionality of inbound communication for active deployments on our provider
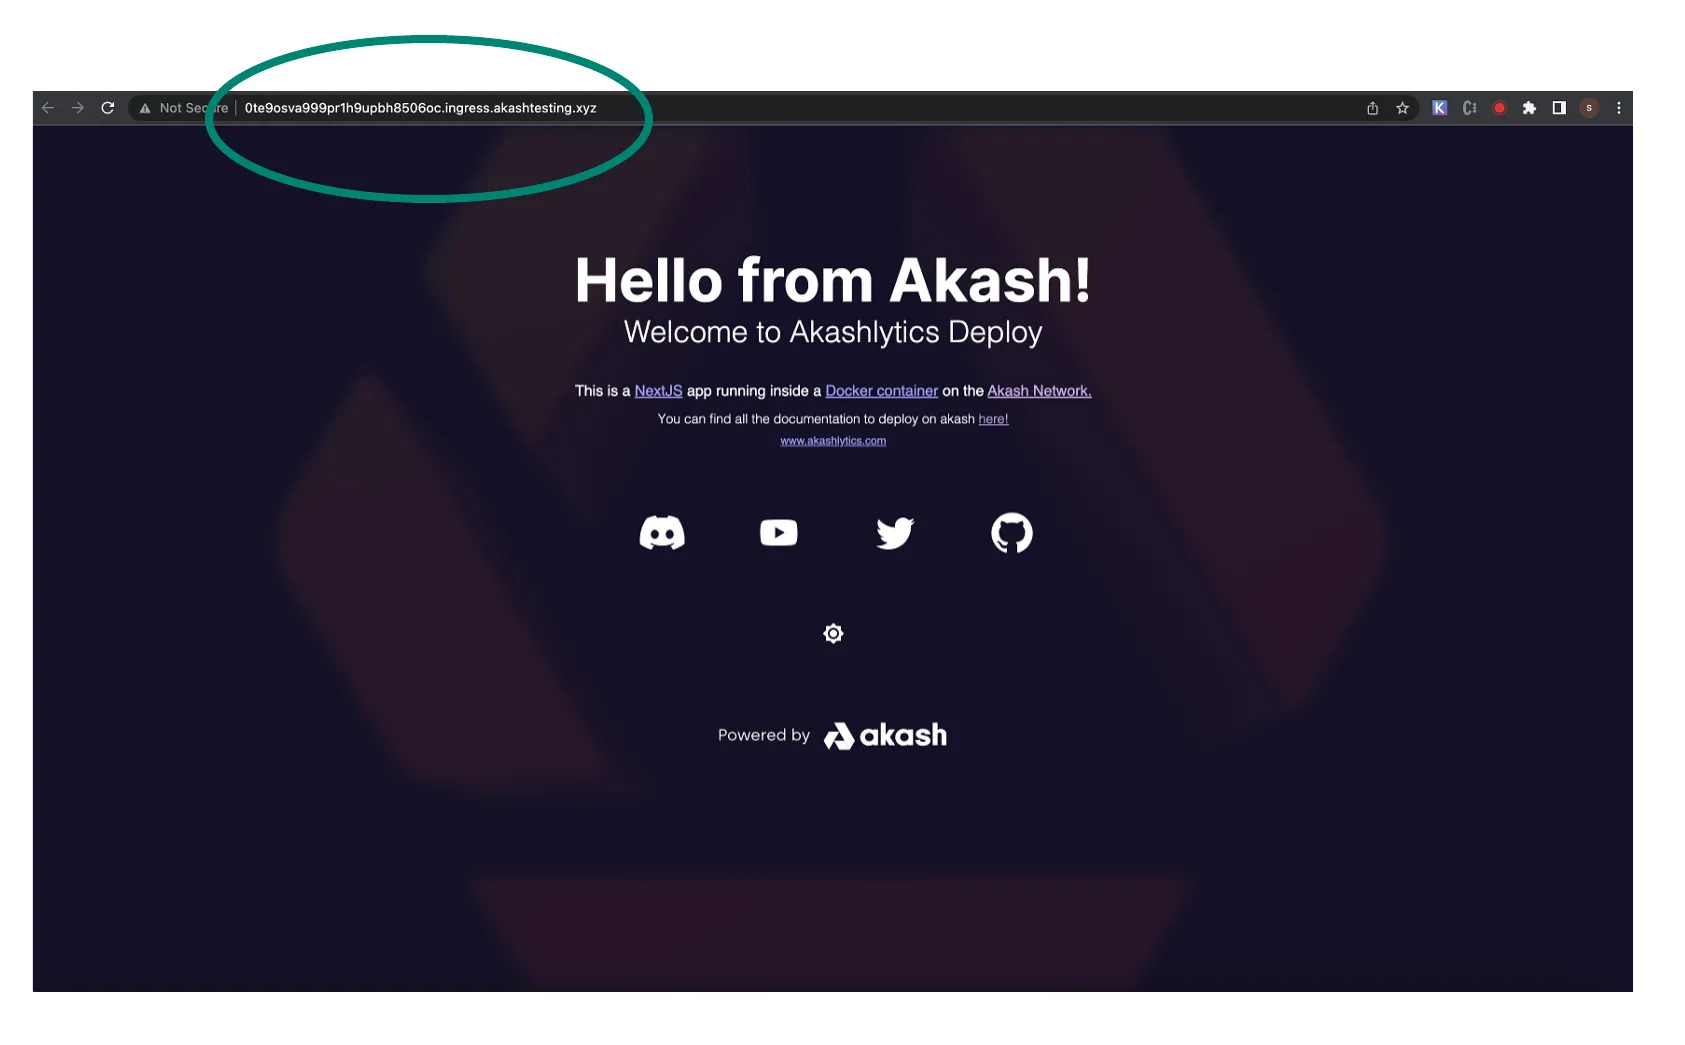
- Within the Akash Console Deployment detail pane > navigate to the LEASES tab > and click the URL of the test deployment
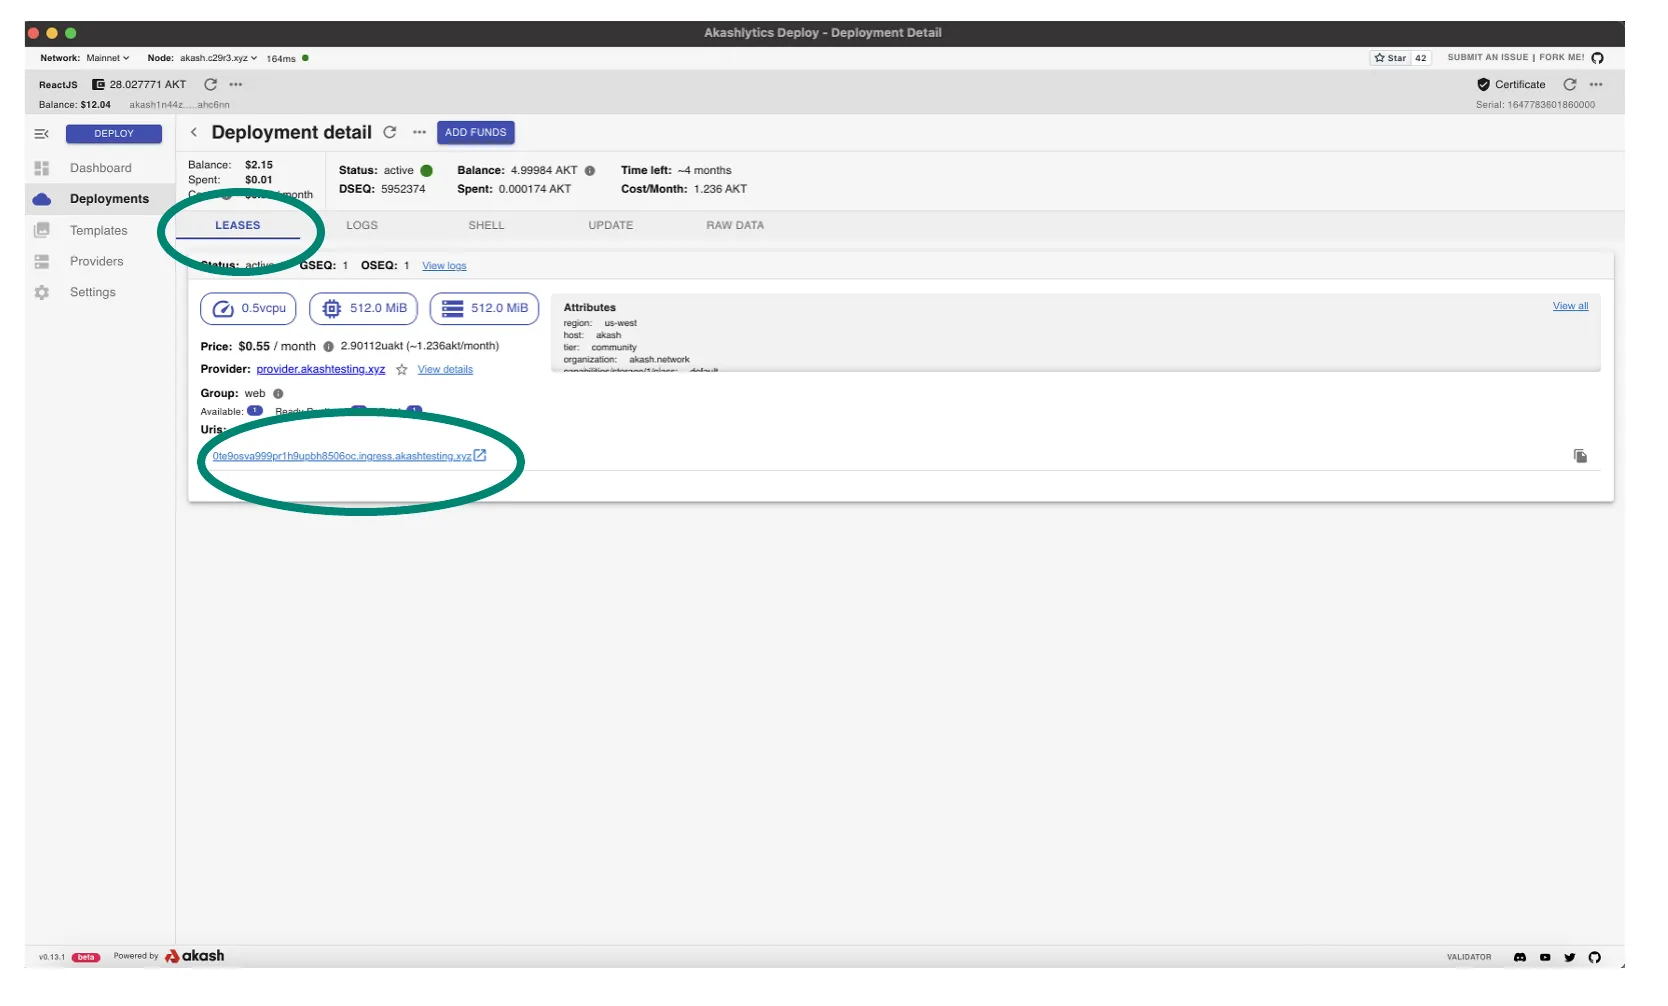
- A new tab within your browser should launch and Hello Akash World home page should display as demonstrated below
- Note - the URL will be directed to the Ingress Controller of your provider Kubernetes cluster
- If this page does not display properly it would indicate an issue with the provider’s Ingress Controller and we should investigate via the Provider Troubleshooting guide
STEP 3 - Shell Access Verification
- Tenants should have access to their deployment’s Linux shell which can be used for basic troubleshooting and administration.
- Within this step we will ensure that there are no issues with shell access into a deployment running on your provider.
- Open the shell for the Hello Akash World test deployment and within Akash Console via the deployment’s SHELL tab as demonstrated
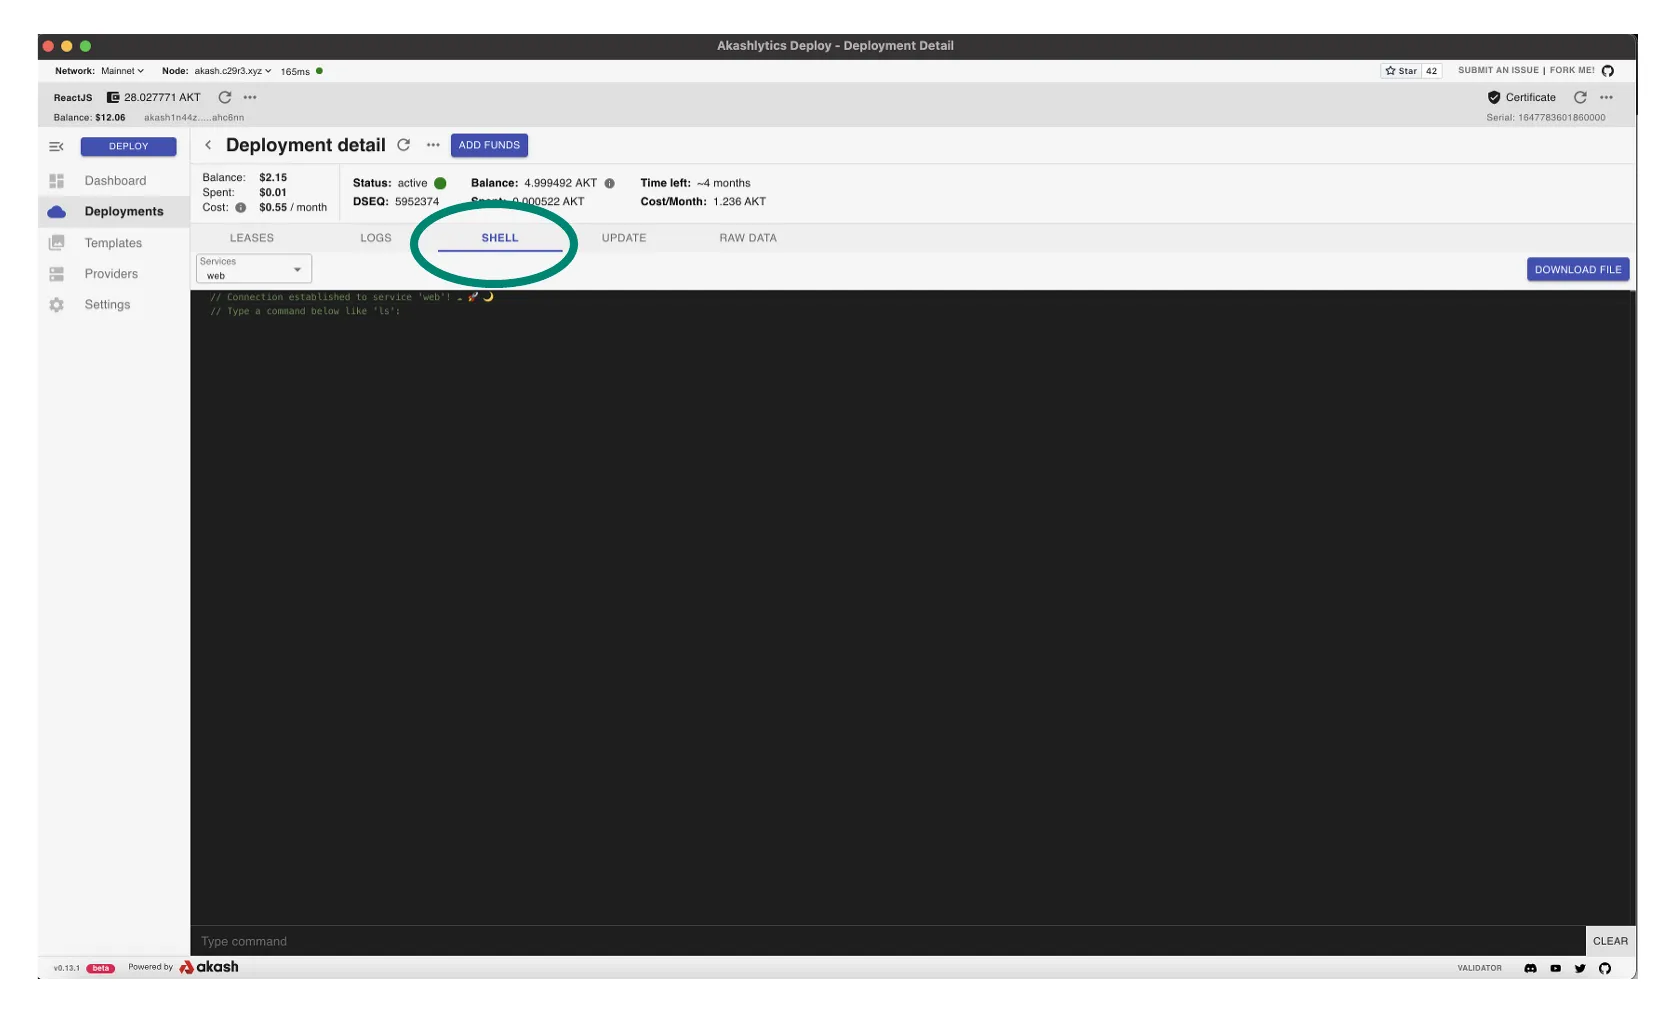
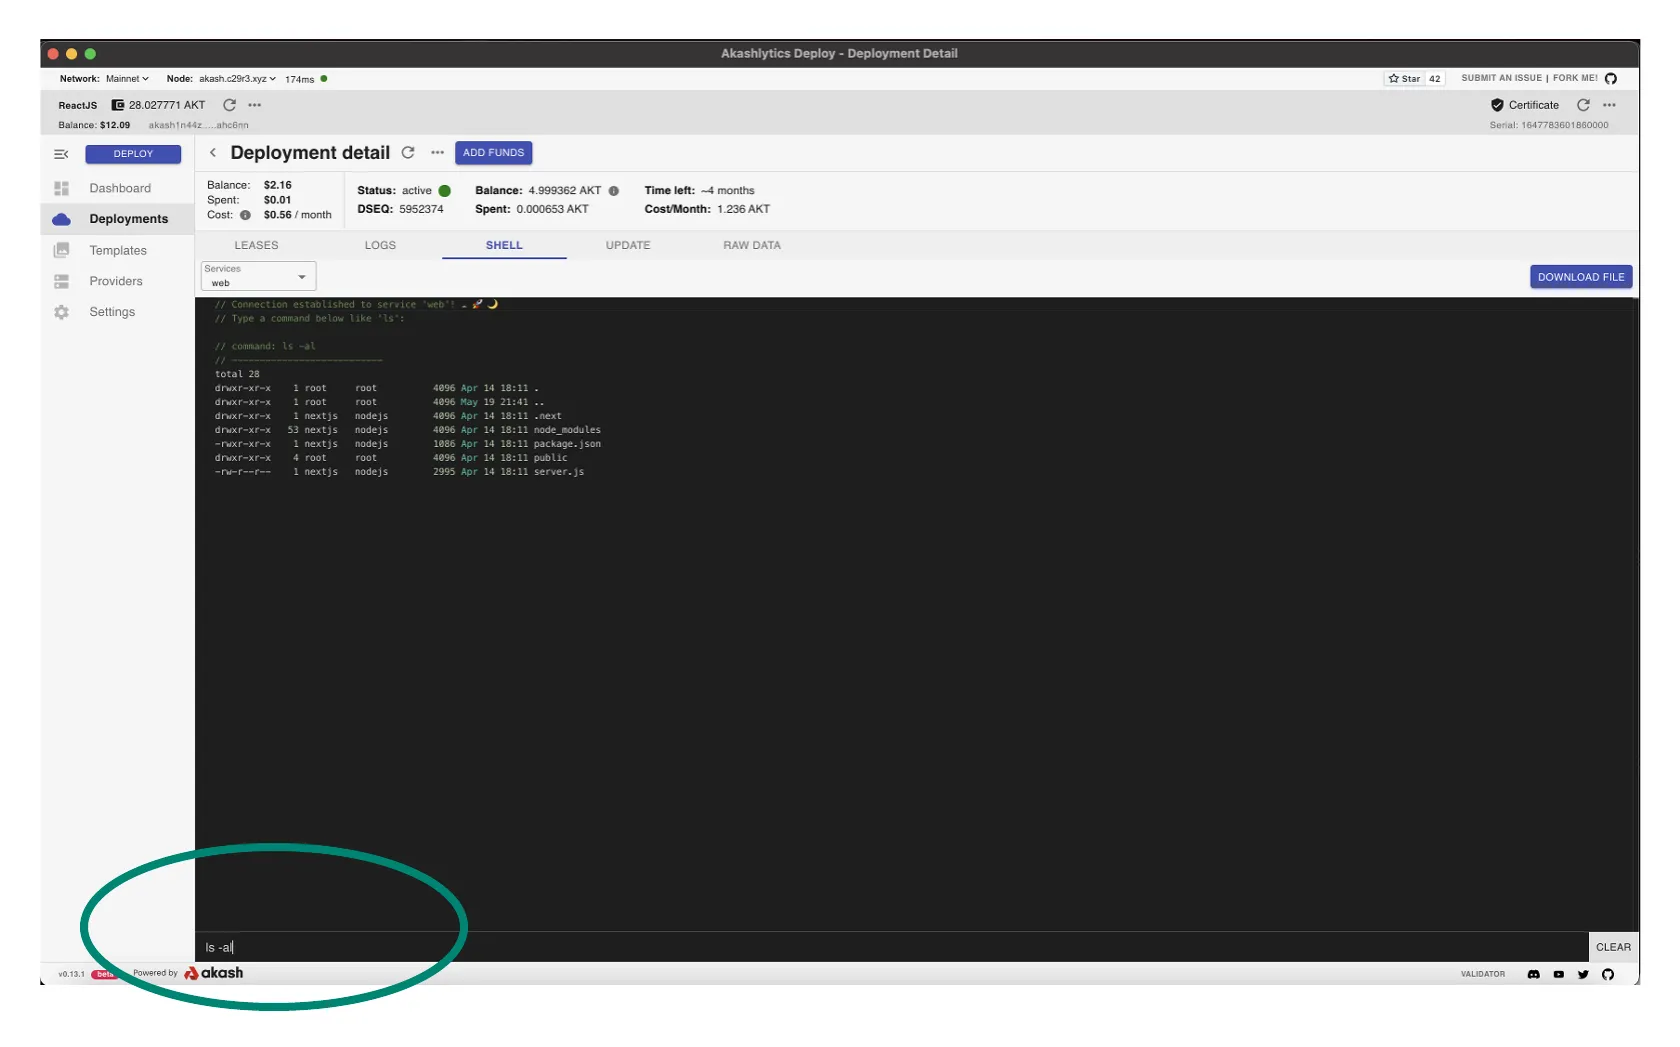
- Ensure that not only can we get into a deployment’s shell but we can issue commands in operating system
- Issue a simple
ls -aland list the file details in the current directory as a simple shell command execution test
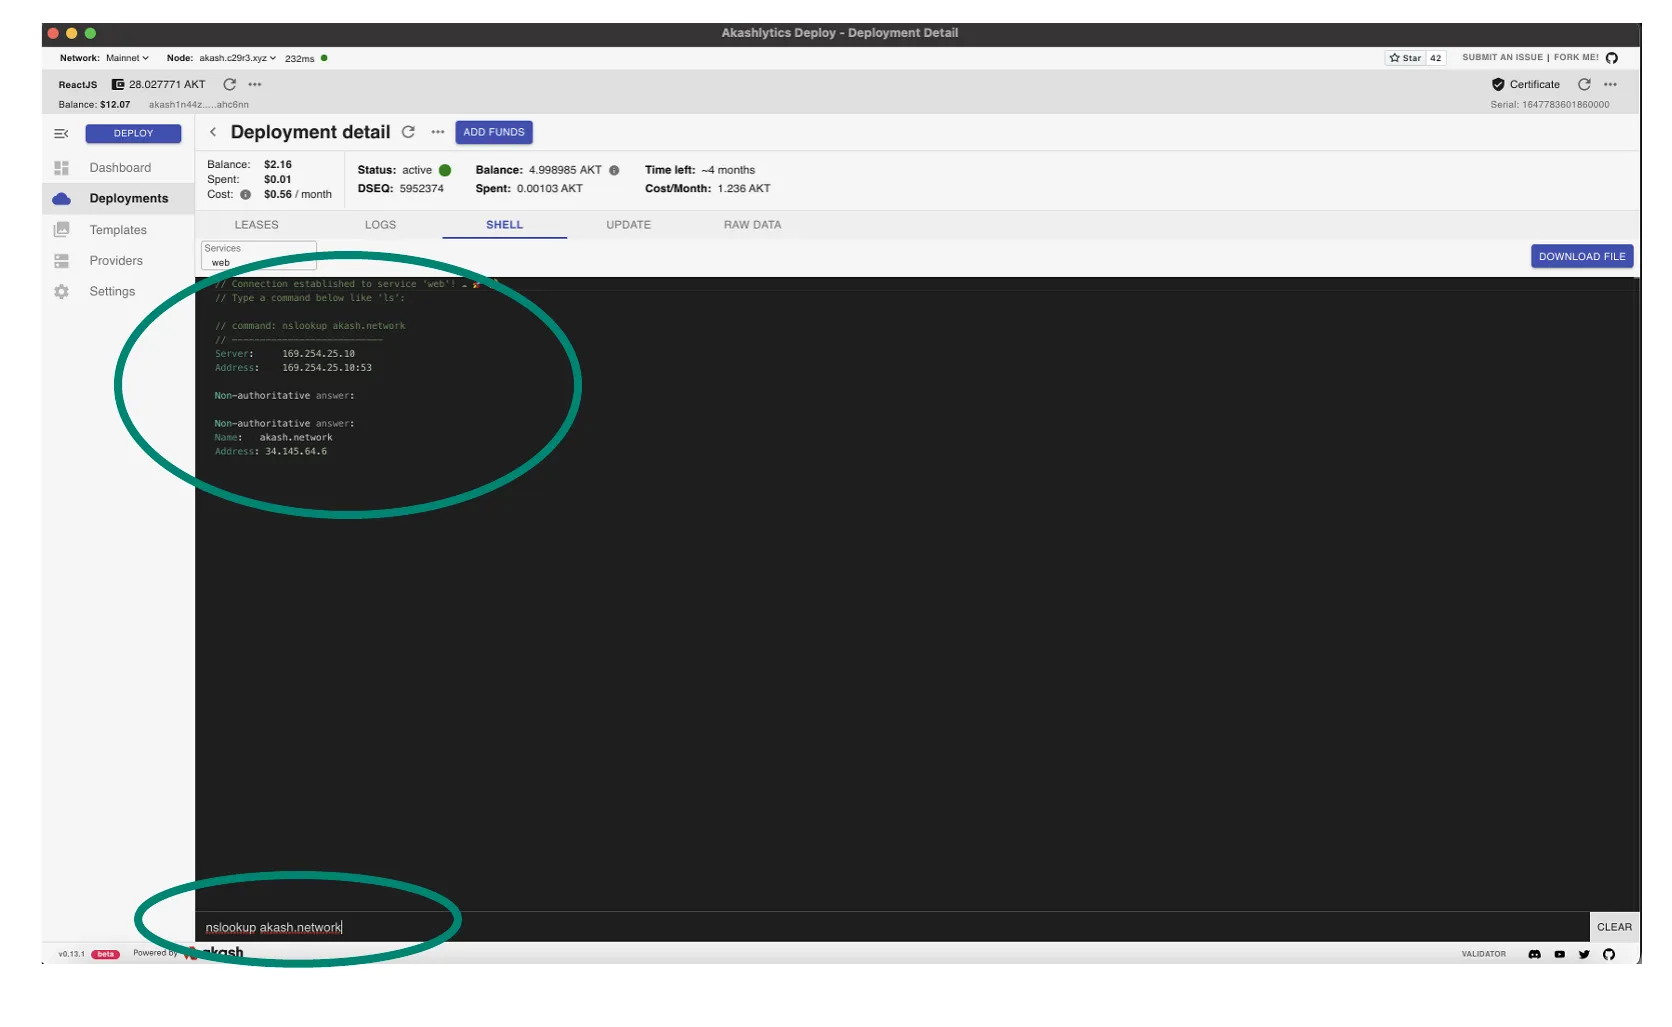
STEP 4 - Provider DNS Verification
- DNS issues within deployments launched a provider are a somewhat frequent issue and should be verified immediately following provider creation.
- Often DNS issues can be unrecognized for some time so this verification ensures we will not have such issues in the future.
- Issue a
nslookup akash.networkfrom the deployment’s shell as shown in the demonstration. The example also displays the successful response of the domain name to IP address lookup we would expect and verifies that no DNS issues exist within deployments on our provider.
STEP 5 - Provider Logs
- In this step we will verify that deployment orders are reaching our provider successfully
- Within the provider logs we will further ensure that the provider bids on the order as expected
- We would recommend that a new deployment is launched for this review to ensure the log entries are available and easy to isolate. Revisit STEP 1 of this guide if you need a refresher on launching a deployment that we would expect to find on our provider.
- Create a new test deployment and proceed thru the steps of accepting the bid from our own provider prior to the verification steps performed below
Verify Provider Order Received and Bid Submitted
- Initially we will verify that the test deployment launched is received by the provider and that in response the provider submits a bid to the tenant
Command Template
Issue the commands in this section from a control plane node within the Kubernetes cluster or a machine that has kubectl communication with the cluster.
kubectl logs <pod-name> -n akash-services | grep <DEPLOYMENT-DSEQ>Example Command Use
- Using the example command syntax our provider pod will be automatically populated
- Replace the <DEPLOYMENT-DSEQ> variable with your deployment ID
kubectl -n akash-services logs $(kubectl -n akash-services get pods -l app=akash-provider --output jsonpath='{.items[-1].metadata.name}') | grep 5964735Example/Expected Output
- Note within the example the receipt of a deployment order with a DSEQ of 5964735
- The sequence shown from
order-detectedthru reservations thrubid-completeprovides an example of what we would expect to see when an order is received by the provider
I[2022-05-20|18:36:57.089] order detected module=bidengine-service order=order/akash1ggk74pf9avxh3llu30yfhmr345h2yrpf7c2cdu/5964735/1/1I[2022-05-20|18:36:57.193] group fetched module=bidengine-order order=akash1ggk74pf9avxh3llu30yfhmr345h2yrpf7c2cdu/5964735/1/1I[2022-05-20|18:36:57.193] requesting reservation module=bidengine-order order=akash1ggk74pf9avxh3llu30yfhmr345h2yrpf7c2cdu/5964735/1/1D[2022-05-20|18:36:57.193] reservation requested module=provider-cluster cmp=service cmp=inventory-service order=akash1ggk74pf9avxh3llu30yfhmr345h2yrpf7c2cdu/5964735/1/1 resources="group_id:<owner:\"akash1ggk74pf9avxh3llu30yfhmr345h2yrpf7c2cdu\" dseq:5964735 gseq:1 > state:open group_spec:<name:\"akash\" requirements:<signed_by:<> attributes:<key:\"host\" value:\"akash\" > > resources:<resources:<cpu:<units:<val:\"100\" > > memory:<quantity:<val:\"268435456\" > > storage:<name:\"default\" quantity:<val:\"268435456\" > > endpoints:<> > count:1 price:<denom:\"uakt\" amount:\"10000000000000000000000\" > > > created_at:5964737 "D[2022-05-20|18:36:57.193] reservation count module=provider-cluster cmp=service cmp=inventory-service cnt=-1I[2022-05-20|18:36:57.193] Reservation fulfilled module=bidengine-order order=akash1ggk74pf9avxh3llu30yfhmr345h2yrpf7c2cdu/5964735/1/1D[2022-05-20|18:36:57.193] submitting fulfillment module=bidengine-order order=akash1ggk74pf9avxh3llu30yfhmr345h2yrpf7c2cdu/5964735/1/1 price=0.850560000000000000uaktI[2022-05-20|18:36:57.432] broadcast response cmp=client/broadcaster response="code: 0\ncodespace: \"\"\ndata: \"\"\nevents: []\ngas_used: \"0\"\ngas_wanted: \"0\"\nheight: \"0\"\ninfo: \"\"\nlogs: []\nraw_log: '[]'\ntimestamp: \"\"\ntx: null\ntxhash: BDBE9B03F7FDB936D175152AB79ACF7A49CDF75DF9B3EBB264F3E6315C48F821\n" err=nullI[2022-05-20|18:36:57.433] bid complete module=bidengine-order order=akash1ggk74pf9avxh3llu30yfhmr345h2yrpf7c2cdu/5964735/1/1Verify Provider Processes Accepted Bid
- In this section we verify that the provider received and process the bid accepted by the tenant
Command Template
Issue the commands in this section from a control plane node within the Kubernetes cluster or a machine that has kubectl communication with the cluster.
kubectl logs <pod-name> -n akash-services | grep 5964735Example Command Use
- Using the example command syntax our provider pod will be automatically populated
kubectl -n akash-services logs $(kubectl -n akash-services get pods -l app=akash-provider --output jsonpath='{.items[-1].metadata.name}') | grep 5964735Example/Expected Output
- Provider log events when tenant accepts our bid
- Note the progression thru the
bid completetolease-wonevents
I[2022-05-20|18:36:57.433] bid complete module=bidengine-order order=akash1ggk74pf9avxh3llu30yfhmr345h2yrpf7c2cdu/5964735/1/1I[2022-05-20|18:38:10.199] lease won module=provider-manifest lease=akash1ggk74pf9avxh3llu30yfhmr345h2yrpf7c2cdu/5964735/1/1/akash1xmz9es9ay9ln9x2m3q8dlu0alxf0ltce7ykjfxI[2022-05-20|18:38:10.200] new lease module=manifest-manager deployment=akash1ggk74pf9avxh3llu30yfhmr345h2yrpf7c2cdu/- Subsequent event when tenant sends deployment manifest to provider
- Note the progression thru the
manifest receivedtodeploy completeevents
I[2022-05-20|18:38:28.620] manifest received module=manifest-manager deployment=akash1ggk74pf9avxh3llu30yfhmr345h2yrpf7c2cdu/5964735I[2022-05-20|18:38:28.620] watchdog done module=provider-manifest lease=akash1ggk74pf9avxh3llu30yfhmr345h2yrpf7c2cdu/5964735D[2022-05-20|18:38:28.620] requests valid module=manifest-manager deployment=akash1ggk74pf9avxh3llu30yfhmr345h2yrpf7c2cdu/5964735 num-requests=1D[2022-05-20|18:38:28.620] publishing manifest received module=manifest-manager deployment=akash1ggk74pf9avxh3llu30yfhmr345h2yrpf7c2cdu/5964735 num-leases=1D[2022-05-20|18:38:28.620] publishing manifest received for lease module=manifest-manager deployment=akash1ggk74pf9avxh3llu30yfhmr345h2yrpf7c2cdu/5964735 lease_id=akash1ggk74pf9avxh3llu30yfhmr345h2yrpf7c2cdu/5964735/1/1/akash1xmz9es9ay9ln9x2m3q8dlu0alxf0ltce7ykjfxI[2022-05-20|18:38:28.829] hostnames withheld module=provider-cluster cmp=service cmp=deployment-manager lease=akash1ggk74pf9avxh3llu30yfhmr345h2yrpf7c2cdu/5964735/1/1/akash1xmz9es9ay9ln9x2m3q8dlu0alxf0ltce7ykjfx manifest-group=akash cnt=0I[2022-05-20|18:38:28.907] declaring hostname module=provider-cluster-kube lease=akash1ggk74pf9avxh3llu30yfhmr345h2yrpf7c2cdu/5964735/1/1/akash1xmz9es9ay9ln9x2m3q8dlu0alxf0ltce7ykjfx service-name=supermario external-port=80D[2022-05-20|18:38:28.924] deploy complete module=provider-cluster cmp=service cmp=deployment-manager lease=akash1ggk74pf9avxh3llu30yfhmr345h2yrpf7c2cdu/5964735/1/1/akash1xmz9es9ay9ln9x2m3q8dlu0alxf0ltce7ykjfx manifest-group=akashSTEP 6 - Verify Current Provider Settings
Overview
Use the steps covered in this section to verify the current settings of your running provider.
Steps in this section assume the provider was installed via Akash Provider Helm Charts.
Conduct the steps from a Kubernetes control plane node with
kubectlaccess to the cluster.
View Provider Current Settings
Access Provider Pod
- Verification of current settings will be conducted from within the Provider pod’s shell
- Use the following command to gain access to the Provider’s shell
kubectl -n akash-services exec -ti $(kubectl -n akash-services get pods -l app=akash-provider --output jsonpath='{.items[0].metadata.name}') -- bashList All Provider Settings
- Current Provider settings are obtained from the process/PID
cat /proc/$(pidof akash)/environ | xargs -0 -n1Example/Sample Output
- Only head of example output shown
cat /proc/$(pidof akash)/environ | xargs -0 -n1
AKASH_PROVIDER_PORT_8443_TCP_PROTO=tcpAKASH_DEPLOYMENT_BLOCKED_HOSTNAMES=KUBERNETES_SERVICE_PORT_HTTPS=443AKASH_BID_PRICE_MEMORY_SCALE=0.0016KUBERNETES_SERVICE_PORT=443AKASH_GAS=autoAKASH_PROVIDER_SERVICE_PORT_API=8443AKASH_BOOT_KEYS=/boot-keysAKASH_VERSION=0.1.0HOSTNAME=akash-provider-77bddc8c4c-qkwtzAKASH_PROVIDER_PORT_8443_TCP_ADDR=10.233.24.154AKASH_GAS_PRICES=0.025uakt
List Specific Provider Setting
- Example command to list only the Withdraw Period from the Provider’s current settings
cat /proc/$(pidof akash)/environ | xargs -0 -n1 | grep -i withdrawExample/Expected Output
cat /proc/$(pidof akash)/environ | xargs -0 -n1 | grep -i withdraw
AKASH_WITHDRAWAL_PERIOD=1h
STEP 7 - Additional Verifications
As desired consider additional verifications covered in the Akash Provider Troubleshooting documentation.
Among the topics covered in the troubleshooting guide that should be considered for your new provider verifications:
- Provider Lease Verifications and Management
- Provider Manifest Verifications and Management
- Provider Earnings Review
Contact Technical Support
Please contact Akash technical support for any Provider issues not resolved following the review of our Provider Checkup and Provider Troubleshooting guide.
- Akash Discord Server - post questions in the dedicated provider channel where our internal and community experts are ready to assist
- Akash Community Discussions - post questions in the
🙏Q&Acategory for Provider support